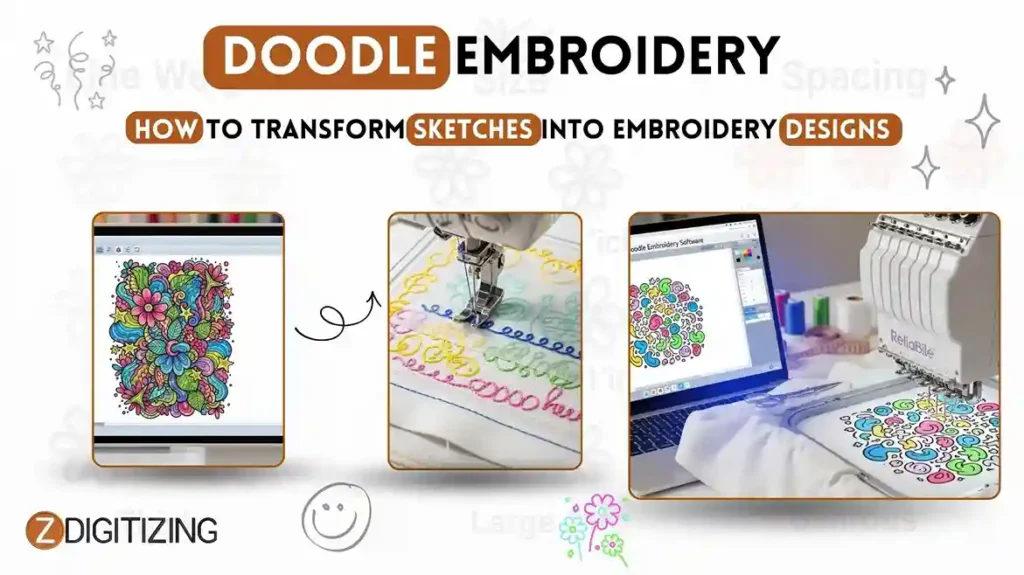
Doodle Embroidery: How to Transform Sketches into Embroidery Designs
In today’s creative embroidery space, doodle embroidery stands out for its natural, hand-drawn appearance stitched with precision. Instead of stiff or overly perfect patterns, this style highlights the flow, movement, and personality of original sketches. It captures meaningful moments, such as quick drawings, simple florals, or spontaneous ideas, and preserves them in thread.
By understanding this technique, you can turn simple sketches into fast-stitching designs that stand out in today’s market.
Doodle Embroidery: How to Transform Sketches into Embroidery Designs
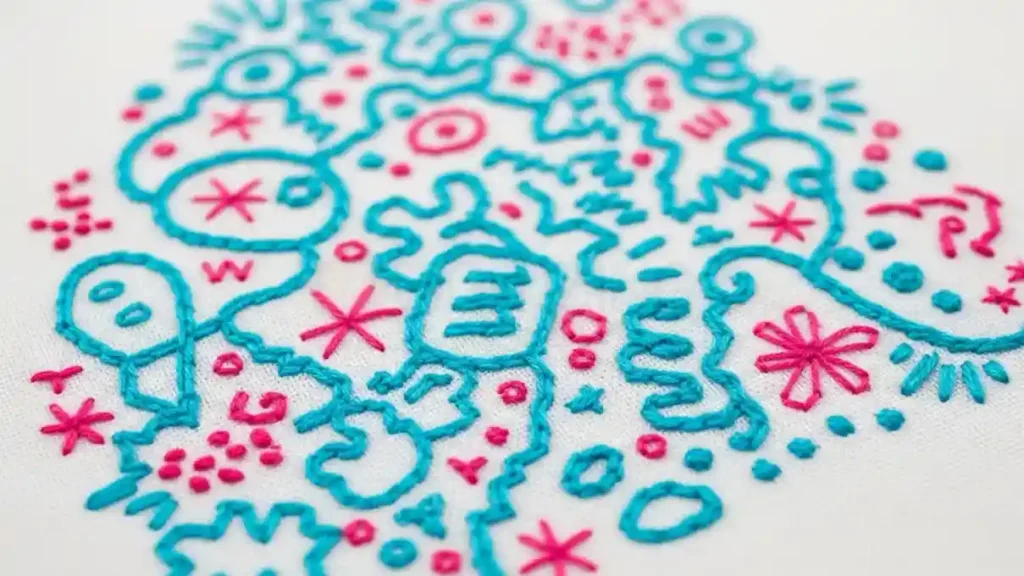
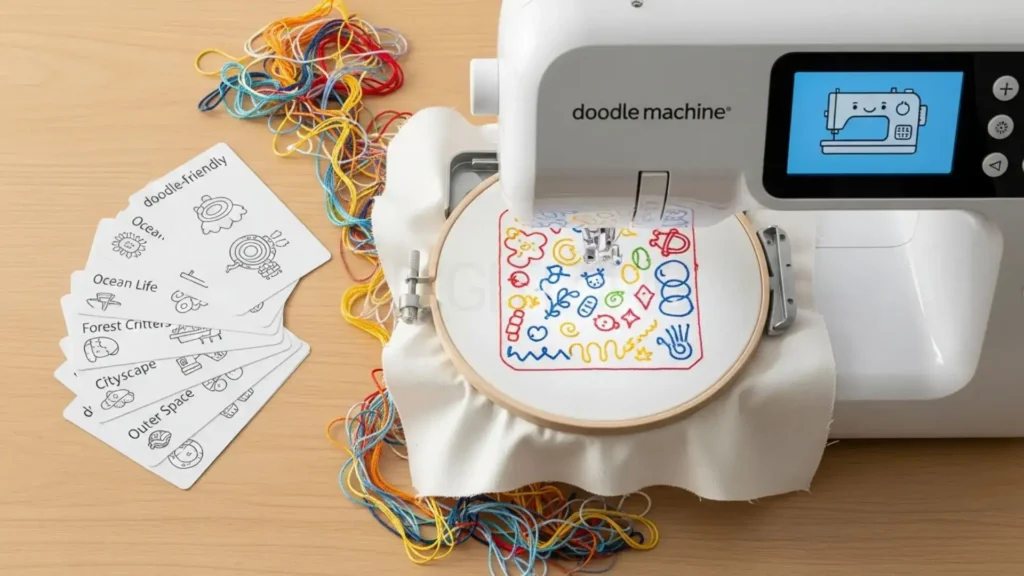
What is Doodle Embroidery?
It is a fun, creative way to turn your simple hand-drawn sketches or scribbles into beautiful stitched designs on fabric. Instead of using strict patterns, you start with loose, playful doodles, like flowers, swirls, or abstract shapes, and bring them to life with embroidery stitches.
It’s perfect for beginners because it doesn’t need perfect drawing skills; even messy notebook sketches work when simplified. You can do it by hand with a needle and thread, or digitize the doodles for machine embroidery to make patches, t-shirts, or bags quickly.
What is Doodle Embroidery
The charm comes from its free-spirited style, mixing doodler embroidery techniques with personal touches to create unique embroidery doodles that feel one-of-a-kind.
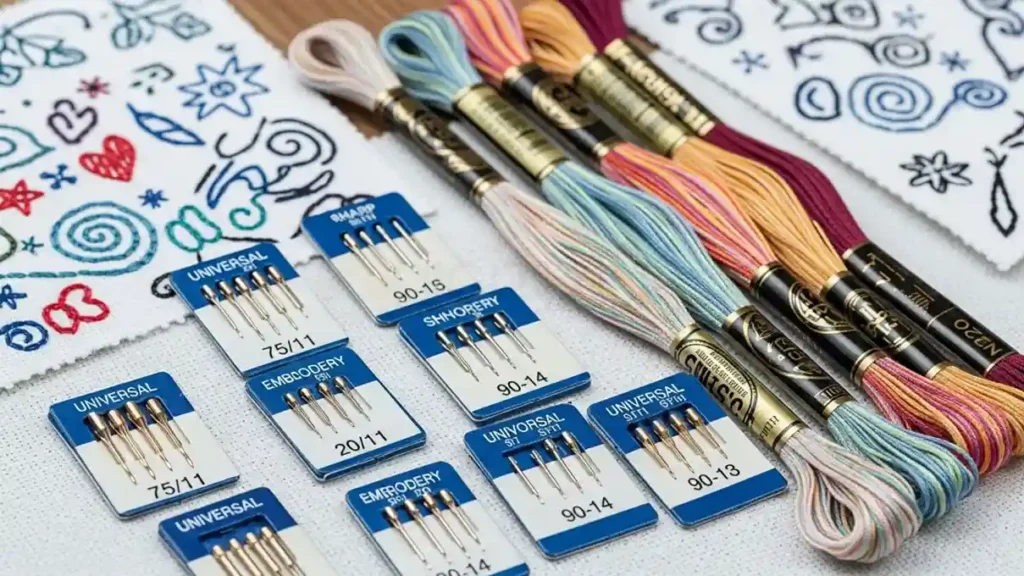
Essential Tools for Design Doodle Embroidery Projects
Before moving into sketching or stitching, the first step is making sure your setup is ready. For embroidery doodle stitching, preparation matters more than people realize because this style is light, clean, and very detailed.
Since there are no heavy fill stitches to hide mistakes, every stitch must land perfectly. That’s why the right tools are essential, especially when working on fine-line doodle embroidery designs.
1. Choosing the Right Needle and Thread
Choosing the Right Needle and Thread
Fine-line embroidery needs lighter supplies than standard designs. A sharp needle in size 65/9 or 70/10 works best because it makes smaller holes in the fabric and keeps lines neat. Thinner thread, such as 60-weight, is also a smart choice.
Using this combination helps stitches stay smooth and controlled, which is especially important when working on doodle embroidery that relies on clean, pen-like lines instead of thick fills.
2. Proper Stabilization for Clean Line Work
Proper Stabilization for Clean Line Work
Stabilization plays a huge role in line-based embroidery. Long, thin stitch paths can easily cause fabric shifting or puckering if the backing is weak. A firm cut-away stabilizer is usually the safest option for machine work.
Because these designs have low stitch density, the fabric may pull inward. Using temporary adhesive spray or a hoop-and-stick method helps keep everything stable and evenly tensioned during stitching.
3. Using Reliable Doodle Embroidery Software
Using Reliable Doodle Embroidery Software
One of the most important tools is the doodle stitching embroidery art software. This is where your sketch becomes a stitch path that the machine can understand. Good software lets you control stitch direction, entry and exit points, and trim behavior.
When stitch paths are planned properly in software, the machine runs more smoothly, and the final design looks cleaner instead of broken or jumpy.
4. Hooping for Accuracy and Control
Hooping for Accuracy and Control
Hooping must be done with extra care. Even slight movement can ruin alignment in delicate designs. Magnetic hoops or high-tension hoops are ideal because they hold fabric evenly without distortion.
For the best embroidery results, always make sure the fabric is drum-tight before starting the machine. This ensures the stitched lines land exactly where the design intends.
Planning Your Doodle Embroidery Designs for Machine Stitching
Now that your tools are ready, it’s time to move to the first real production step, planning your design specifically for an embroidery machine. This stage is critical because machines do not “interpret” sketches the way humans do. Proper planning ensures your doodle embroidery stitches cleanly, runs smoothly, and avoids thread breaks or distortions.
Think of this step as preparing instructions for the machine. The clearer the design logic, the better the final stitch-out will be.
Machine-Friendly Prompts for Doodle Embroidery Patterns
Machine-Friendly Prompts for Doodle Embroidery Patterns
When designing for machines, simplicity always wins. Start with prompts that create continuous, flowing lines rather than complex details:
Single-line florals or vines
Minimal faces with open spacing
Abstract curves, waves, or loops
Limit your sketch to one main concept. Machine embroidery performs best when designs have three to five elements with clear separation. These simple prompts produce reliable doodle embroidery results and reduce unnecessary trims and jumps.
Converting Everyday Objects into Embroidery Doodle Motifs
Everyday objects are excellent references, but they must be adapted for machine stitching. Look for shapes that naturally form smooth paths:
Rounded handles or cords
Leaves with gentle curves
Simple outlines of household items
Exaggerate curves and remove sharp angles so the machine needle can move smoothly. Redraw the same object two or three times, focusing on cleaner stitch paths. This method helps create embroidery doodle motifs that machines can stitch without hesitation or overlap issues.
Machine Design Rules: Line Weight, Size, and Spacing
Machine Design Rules Line Weight, Size, and Spacing
Machines require clear stitch instructions, not artistic guesswork. Before convert image to embroidery pattern, apply these checks:
Line thickness should support running or bean stitches
Avoid ultra-thin lines that disappear after stitching
Test design size at hoop scale (4×4 inches is standard)
Maintain consistent spacing between elements
Leave enough open space so stitches don’t push fabric or cause puckering. Balanced designs always stitch better than crowded ones.
Preparing Sketches for Digitizing Software
Once the sketch is machine-ready, scan or photograph it at high resolution. Clean the lines digitally before importing into doodle embroidery software. This step ensures smoother stitch paths and reduces manual corrections during digitizing.
A well-prepared sketch leads to faster digitizing, fewer edits, and more consistent stitch-outs.
From Paper to Screen: Digitizing Your Doodle for Machine Embroidery
Once your sketch is on paper, the next move is bringing it onto the screen so your machine can stitch it accurately. This step unlocks speed, consistency, and easy repeats.
For simple designs, the full process usually takes 30–60 minutesusing free or budget-friendly tools. When done correctly, this workflow helps your sketch turn into clean, production-ready doodle embroidery without stress.
Step 1: Scan or Photograph Your Sketch Clearly
Start by capturing a clean image of your doodle. If you’re using a scanner, place the paper flat and scan at 600 DPI. Save the file as PNG to keep lines sharp and clear.
If you’re using a phone, take the photo in natural light with no shadows. Shoot straight from above, then crop tightly so only the drawing remains. Increase contrast so lines appear dark against a white background, this avoids blurry imports later.
Step 2: Clean Up the Image in Free Graphics Software
Clean Up the Image in Free Graphics Software
Open your image in a free program like Inkscape or GIMP. At this stage, your goal is cleanup, not digitizing yet.
Remove smudges, extra marks, and backgrounds using basic tools. Convert outlines into smooth paths and keep line thickness around 1/8 inch so stitches don’t disappear. Separate elements into layers if needed, starting with outlines first.
Step 3: Import into Embroidery Software and Auto-Trace
Import into Embroidery Software and Auto-Trace
Now bring the cleaned image into the designdoodle embroidery software that supports auto-tracing. Run auto-digitize on the outlines so the software converts them into running stitches.
Zoom in closely and review the stitch paths. Remove tiny nodes under 1/16 inch, as these often cause thread breaks. Clean paths here save you problems later on the machine.
Step 4: Manually Refine Stitches and Add Details
Auto-tracing gives you a base, but manual adjustment is where quality improves. Smooth curves, fix sharp points, and close open paths.
Use satin stitches only for narrow areas under 1/2 inch wide. For larger areas, keep fills light and set stitch density around 0.4 mm to avoid puckering. Add zigzag underlay where needed, especially on stretchy fabrics. Sequence colors logically to reduce jumps and trims.
Step 5: Optimize for Your Machine and Test Simulate
Optimize for Your Machine and Test Simulate
Before exporting your doodle embroidery, fine-tune machine settings. Use 1–2% pull compensation to counter fabric pull, activate auto-trim between color changes, and reduce jump stitches to less than 1/4 inch.
Run the stitch simulator and watch a virtual sew-out. Look for bunching, misalignment, or weak areas. Resize carefully if needed; smaller designs often require tighter control.
Step 6: Export, Transfer, and Test Stitch on Scrap
Save the file in your machine’s format, such as PES for Brother or DST for multi-brand machines. Transfer it via USB or Wi-Fi.
Hoop scrap fabric that matches your final project, add stabilizer, and stitch at 600–800 SPM. Watch for gaps or tension issues, make adjustments, and re-export if necessary. This final test is what turns a good file into reliable embroidery.
Common Mistakes in Doodle Embroidery (and How to Fix Them)
These are some of the most common issues people face when working with sketch-style embroidery. Fixing them early saves time, thread, and rework, and helps your designs stitch clean and smoothly.
Simplify overly detailed doodles by removing tiny internal elements. Embroidery machines struggle with micro-details under 1/8 inch, which often leads to thread breaks and messy stitching.
Redraw designs to fix wobbly lines, uneven spacing, or off-center placement. Using software grids or alignment guides helps keep stitch paths smooth and balanced.
Always match the stabilizer to the fabric’s weight and stretch. Testing thread tension before full stitching prevents sinking lines and uneven results.
Keep jump stitches under 1/4 inch and secure them properly to avoid loose threads. Reduce heavy fills to about 6–8 threads per inch so the design stays light and flexible.
Avoiding these mistakes makes sketch-style embroidery faster to run and far more professional in the final stitch-out.
Conclusion: Bringing Your Sketches to Life
From the first sketch to the final stitch, doodle embroidery is a creative way to turn simple ideas into beautiful stitched designs. It allows you to combine hand-drawn creativity with modern embroidery tools and enjoy seeing your artwork come to life in thread.
While learning and experimenting are important, achieving clean and production-ready results often depends on expert digitizing. Quality digitizing helps embroidery machines run smoothly and ensures every design stitches accurately.
At ZDigitizing, we provide professional embroidery digitizing services UK and worldwide, backed by over 10+ years of experience. Our expert digitizing team works 24/7, with full customer support available around the clock. We guarantee quality, share previews before payment, offer free minor edits, and keep our prices lower than the market. Plus, new customers get 50% OFF on their first order.
Visit ZDigitizing today and let us turn your sketches into flawless, production-ready embroidery designs.
Are you looking for embroidery digitizing and vector art services at low cost with superfast turnaround, guarranted quality and preview before pay? So, you are at right place. We can digitize and vectorize any type of artwork in your required file format.