You may already have a company logo and want to put it on shirts, caps, or other products, but to make that possible, how to digitize a logo for embroidery is something you must understand first. Embroidery helps your brand stand out, builds trust, and turns simple apparel into powerful marketing tools. However, embroidery machines cannot read images directly, which means your logo must be converted into stitch instructions before production.
That’s why learning this process is essential if you want clean, professional embroidery results that truly represent your brand.
How to Digitize a Logo for Embroidery in 2026?
What Does It Mean to Digitize Logo for Embroidery?
Logo digitizing for embroidery means turning a normal logo image into stitch instructions that an embroidery machine can follow. If you want to understand how to digitize a logo for embroidery, you need to know that machines cannot read PNG, JPG, or SVG files like screens do. They only read stitch data.
What Does It Mean to Digitize Logo for Embroidery
In digitized embroidery logo, the logo is rebuilt using different stitch types instead of pixels. Text, shapes, and details are planned carefully by setting stitch direction, density, and color changes, while also handling fabric stretch and thread tension. When this process is done right, the logo stitches cleanly, looks professional, and stays durable even after repeated washing.
Top 5 Softwares for How to Digitize a Logo for Embroidery in 2026
Choosing the right software is one of the most important steps when you want clean and professional embroidery results. Every tool works differently, and each one supports the embroidery digitizing process in its own way. Below are the most commonly used software options in 2026, explained simply so you can decide what fits your needs and budget.
Wilcom is considered the top-level software used by professional embroidery businesses worldwide. It gives full control over stitch direction, density, underlay, and sequencing, which is critical for high-end embroidery logo digitization.
Pricing: $1,500 to $4,500 (one-time license, depends on version)
What you get: Advanced manual stitch control, strong lettering and vector tools, and excellent results for commercial embroidery.
What you don’t get: High price and a steep learning curve.
Best for: Large embroidery shops and experienced digitizers.
2. Brother PE-Design 11 (Best for Brother Machine Users)
Brother PE-Design 11 (Best for Brother Machine Users)
Brother PE-Design 11 is made specifically for Brother embroidery machines, which makes the workflow smooth and beginner-friendly. Many users choose it when learning how to digitize logo for embroidery online free because it connects directly with the machine and reduces technical steps.
Pricing: $1,500–$1,900 (often available near $1,000 on sale)
What you get: Wireless file transfer to Brother machines, built-in designs and fonts, and fabric-based automatic settings.
What you don’t get: Limited advanced editing options and best use only with Brother machines.
Best for: Home users and small businesses using Brother machines.
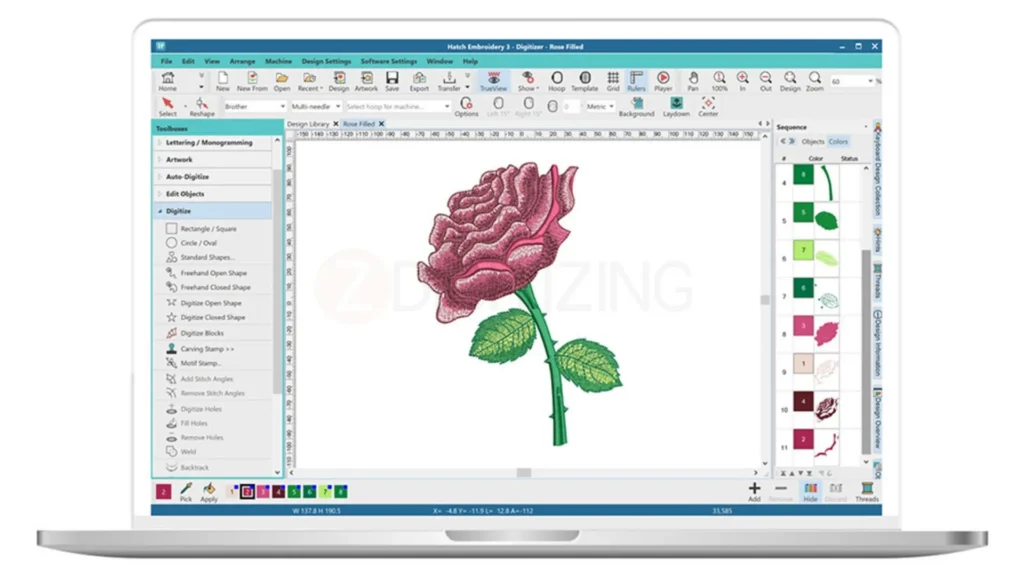
3. Hatch Embroidery 3 (Easy and Balanced Choice)
Hatch Embroidery 3 (Easy and Balanced Choice)
Hatch is designed for users who want professional results without complex controls. It simplifies the digitizing workflow while still delivering clean and reliable output.
Pricing: Around $1,000 (monthly plans available)
What you get: Easy auto-digitizing for simple logos, step-by-step digitizing tools, and a modern interface.
What you don’t get: Not ideal for very complex or heavy production work.
Best for: Small embroidery businesses and serious beginners.
Embrilliance StitchArtist is popular because you can grow step by step. You don’t need to buy everything at once, which makes it a good option if you are slowly learning how to digitize logo for embroidery and improving your skills over time.
Pricing:
Level 1: $169
Level 2: $369
Level 3: $649
What you get: Works on both Mac and Windows, easy resizing with stitch recalculation, and good control for basic logo digitizing.
What you don’t get: Advanced features are only available in higher levels.
Best for: Hobby users and beginners planning long-term learning.
5. Ink/Stitch (Free & Open-Source Software)
InkStitch (Free & Open-Source Software)
Ink/Stitch is a free plugin that works with Inkscape. It is a powerful option for users who are technical and want to practice without spending money.
Pricing: Free
What you get: Full manual control over stitches, no embroidery digitizing software cost, and community-based improvements.
What you don’t get: Very difficult learning curve and no official customer support.
Best for: Tech-savvy users and learners on a zero budget.
Before You Start: Preparing Your Logo Artwork for Custom Logo Embroidery
Before jumping into digitizing, proper artwork preparation saves time and prevents most embroidery problems. If you really want clean results from how to digitize a logo for embroidery, these small prep steps make a big difference.
Here’s how you should prepare your logo before starting the digitizing work:
Always use the best-quality file available (SVG, AI, or EPS is best)
Avoid low-resolution JPG or blurry images whenever possible
Open the logo in Illustrator or Inkscape and clean overlapping shapes
Reduce gradients into solid colors (4–6 colors work best)
Remove tiny details smaller than 1/16 inch because they won’t stitch clearly
Scale the logo to its final size early (large logos don’t always work small)
Test the logo in black and white first to check readability
Decide placement in advance (left chest, cap front, sleeve, etc.) Note down final size, fabric type, and thread colors (Pantone if possible)
Prepare a simplified version of the logo if it’s meant for custom logo embroidery
Following these steps makes the actual digitizing smoother and helps you get better results when applying how to digitize a logo for embroidery in real embroidery projects.
How to Digitize a Logo for Embroidery Manually | Step-by-Step
Manual digitizing means you control every stitch yourself instead of depending on auto tools. This method takes more time, but it gives cleaner and more professional results.
Most people use tools like Embrilliance StitchArtist, Wilcom Hatch, or Ink/Stitch, and a simple 4-inch logo usually takes 20–60 minutes. Work slowly, use preview or simulation at each stage, and practice first on simple black-and-white logos.
When people ask how to digitize a logo for embroidery by hand, the real work starts after preparation. Always zoom in (200–400%) so you can see small details clearly, and save versions of your file after every big change. This habit alone saves hours later.
Step 1 – Import and Size Your Logo Correctly
Open your software and create a new design file using the final embroidery size. For example, use about 3.5 inches for a left-chest logo or around 2.25 inches for caps. Import your cleaned artwork (SVG or EPS is best, PNG/JPG if needed) and center it on the hoop.
Import and Size Your Logo Correctly
Use the ruler tool to double-check size. Lock the aspect ratio so the logo does not stretch. Many mistakes happen here, so take your time. Lower the image opacity to make tracing easier, and add simple guides to keep placement balanced.
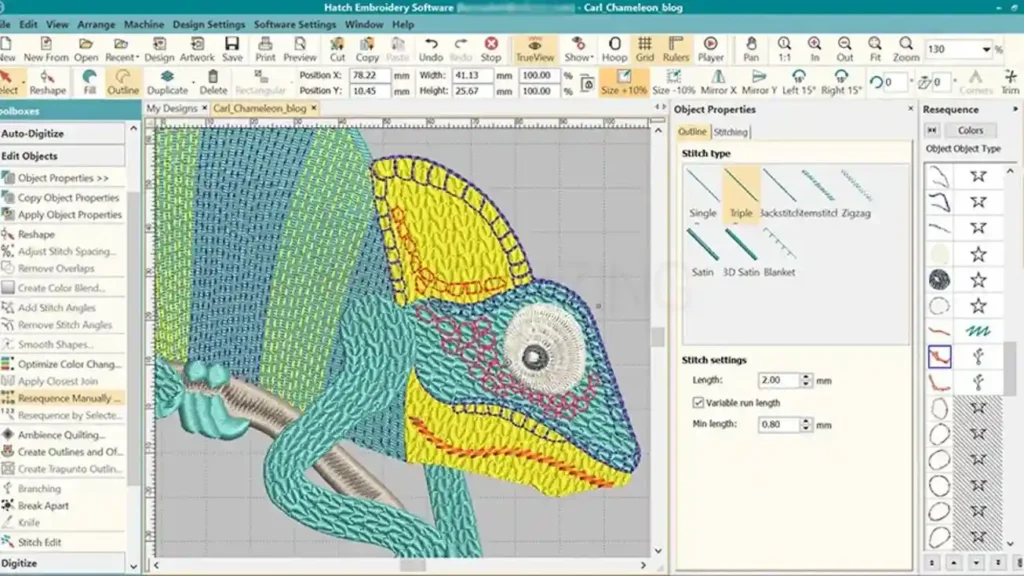
Step 2 – Choose Fabric Profile, Underlay, and Density Settings
This step is very important in how to digitize a logo for embroidery because fabric type directly affects how stitches behave during sewing. Before drawing stitches, set the fabric type in your software. This tells the program how stitches should behave.
Use knit settings for polos
Use stable woven settings for jackets
Use cap or twill settings for hats
Choose Fabric Profile, Underlay, and Density Settings
Turn on underlay stitches to support the design and adjust stitch density based on fabric stretch. These settings are the foundation of the whole embroidery digitizing process, and wrong values can cause puckering or loose stitches.
Step 3 – Choose Stitch Types for Each Part of the Logo
Now break the logo into small parts and assign stitch types carefully.
Running stitch for thin lines and small details
Satin stitch for borders and lettering
Fill stitch for large solid areas
Do not use very wide satin stitches, as they can gap and pull fabric. Preview the design in 3D mode and make sure stitches look smooth and flat. Choosing stitch types correctly makes later steps much easier.
Step 4 – Digitize Shapes and Plan Smart Stitch Paths
Trace shapes using the digitizing tool and think about stitch order. Start from the center or bottom and move outward to keep fabric stable.
Digitize Shapes and Plan Smart Stitch Paths
Group same-color areas together to reduce trims and jumps. Keep jump stitches short and avoid unnecessary stops. Doing this properly is a big part of learning how to digitize a logo for embroidery efficiently and helps reduce production time.
Step 5 – Digitize Text So It Stays Readable
Digitize Text So It Stays Readable
Text needs extra care because it can easily become messy.
Keep text at least 6.5–7mm high for simple fonts
Use satin stitches for letters
Adjust spacing so letters don’t touch or gap
Avoid decorative or very thin fonts. Test by slightly resizing or rotating the text to make sure it stays clear. Clean text is essential for professional results.
Step 6 – Assign Thread Colors and Match Brand Shades
Assign Thread Colors and Match Brand Shades
Open your thread color library and assign colors carefully. Match brand colors as closely as possible and limit the total number of colors to avoid extra machine stops.
Stitch lighter colors first and darker ones later. Good color planning helps when you convert logo to embroidery for repeat jobs and keeps results consistent.
Step 7 – Export the File and Prepare the Hooping
Export the File and Prepare the Hooping
This step completes how do you digitize a logo for embroidery and connects your digital design to real stitching. Before exporting, run a final check to fix short stitches or long jumps. Save the editable file first, then export the correct machine format such as PES, DST, or JEF.
Load the file into your machine, choose threads based on your color chart, and hoop the fabric tightly with the right stabilizer. A clean setup prevents many stitching problems.
Step 8 – Test Sew, Review, and Improve the File
Always run a test stitch on the same fabric you will use for production. Look closely under good light.
Fix gaps by adjusting overlap or underlay
Reduce puckering by lowering density slightly
Solve thread breaks by shortening jumps
Most fixes come from small density or compensation changes. Re-export and test again until the design stitches cleanly. This final loop is where how to digitize a logo for embroidery truly comes together, never skip it.
DIY vs Outsource Digitizing Services: Which Is Right for You?
At this point, you already understand the basics and steps of how to digitize a logo for embroidery. You know what preparation is needed and how manual work looks in real life. Now the real decision starts: should you do everything yourself, or should you outsource the digitizing work?
Let’s explain both options simply, so you can decide what suits you best.
What DIY Embroidery Digitizing Really Involves?
DIY means you handle the complete process on your own. You prepare the artwork, digitize it in software, test stitch it, fix issues, and repeat until the design stitches cleanly. This is the practical side of digitizing a logo for embroidery, not just clicking auto tools.
Time to learn stitches, density, underlay, and pathing
Patience for testing and corrections
Pros
Lower cost per design after learning
Full control over stitch settings and edits
Useful long-term skill if embroidery is core to your work
Cons
Takes time to learn properly
Early results can be inconsistent
Software and learning costs are high at the start
DIY works best if you enjoy technical work and are okay spending time practicing while learning how to digitize a logo for embroidery.
What Do Outsource Embroidery Digitizing Services Mean?
Outsourcing means you send your logo file to a professional online embroidery digitizing services and receive a ready-to-use stitch file. This option is common for businesses that already understand how to digitize a logo for embroidery, but don’t want to spend hours doing it themselves.
Pros
Faster turnaround without a learning curve
More consistent, production-ready results
Saves your time for embroidery or business work
Cons
Cost per design
Less direct control over stitch paths
Depends on service turnaround time
Key Decision Factors (Side-by-Side Comparison)
These factors make it easier to decide how do i digitize a logo for embroidery by comparing time, cost, quality, and control between DIY digitizing and professional services.
Factor
DIY Digitizing
Outsource Digitizing Services
Upfront cost
High (software + learning)
None
Cost per design
Very low after learning
Fixed fee per design
Time required
High, especially at start
Low
Learning curve
Steep
None
Quality (early stage)
Inconsistent
Usually high
Long-term control
Full control
Partial
Best for
Hobbyists, learners, technical users
Busy shops, businesses, deadlines
Why Professional Digitizing Still Wins for Business?
When embroidery becomes part of your business, quality and consistency are no longer optional. You may understand the basics of how to digitize a logo for embroidery, but doing it correctly every single time, across different fabrics, sizes, and machines, is where professional digitizing truly wins. One poorly digitized file can waste garments, thread, and hours of production time, which directly affects your profit and customer trust.
Professional digitizing covers everything we discussed earlier: clean artwork handling, correct stitch types, proper density, smart pathing, accurate color matching, and thorough testing. These details take years of experience to master.
That’s why many businesses choose experts instead of spending time fixing mistakes or redoing designs. When deadlines are tight and orders are large, reliability matters more than experimentation.
At ZDigitizing, we’ve been delivering professional embroidery digitizing for over 10+ years, with 100,000+ designs completed for clients worldwide. Our expert team works 24/7, supported by 24/7 customer support, so your projects never slow down.
We guarantee quality, provide a preview before payment, offer free minor edits, and deliver most orders within 4-12 hours. We also handle complex jobs, including premium quality patch digitizing, with precision and care.
Instead of spending your time figuring out how to digitize a logo for embroidery on your own, you can trust professionals who already know how to deliver clean, production-ready results.
If you want stress-free digitizing and embroidery files that stitch perfectly the first time, visit ZDigitizing today. Place your first order now and get 50% OFF. Let our experts handle the digitizing, so you can focus on growing your business with confidence.
Are you looking for embroidery digitizing and vector art services at low cost with superfast turnaround, guarranted quality and preview before pay? So, you are at right place. We can digitize and vectorize any type of artwork in your required file format.