You have a customer’s logo in a PDF, but your embroidery machine cannot sew a PDF. To convert PDF to DST, you must first prepare the artwork and then digitize it into machine-readable stitch instructions. A PDF may contain editable vector paths, a scanned image, or both. Each requires a different preparation process. Once the design has been digitized, you can export it as a Tajima DST file, inspect the stitch sequence, and test it before production.
Convert PDF to DST Embroidery File: A Complete Digitizing Tutorial
What Does It Mean to Convert PDF to DST?
Converting a PDF to DST means turning visual artwork into embroidery instructions that a compatible machine can read. It is not a simple change of file format, the design must be built with stitches, sewing directions, and machine commands.
PDF Artwork vs. DST Stitch Data
A PDF may contain vector shapes, text, or raster images. A DST file contains the stitch movements and commands an embroidery machine follows.
Feature | PDF artwork | Tajima DST file |
Main purpose | Display and share artwork | Guide an embroidery machine |
Data | Text, images, vector paths, and page elements | Stitch coordinates and machine commands |
Editable content | May retain editable artwork | Does not preserve the original vector objects |
Thread information | May show visual colors | Records color-change stops, not actual thread shades |
Machine use | Not directly usable as a stitch design | Used by compatible embroidery machines |
A digitizer decides how each part of the artwork should be stitched. That is why PDF to embroidery file conversion involves more than preserving the appearance of the original artwork.
Why Renaming a PDF to DST Does Not Work
Can you convert PDF to DST by renaming the file? No. Changing company-logo.pdf to company-logo.dst changes only the filename; it does not create the stitch instructions an embroidery machine needs.
The Four Stages of PDF-to-DST Conversion
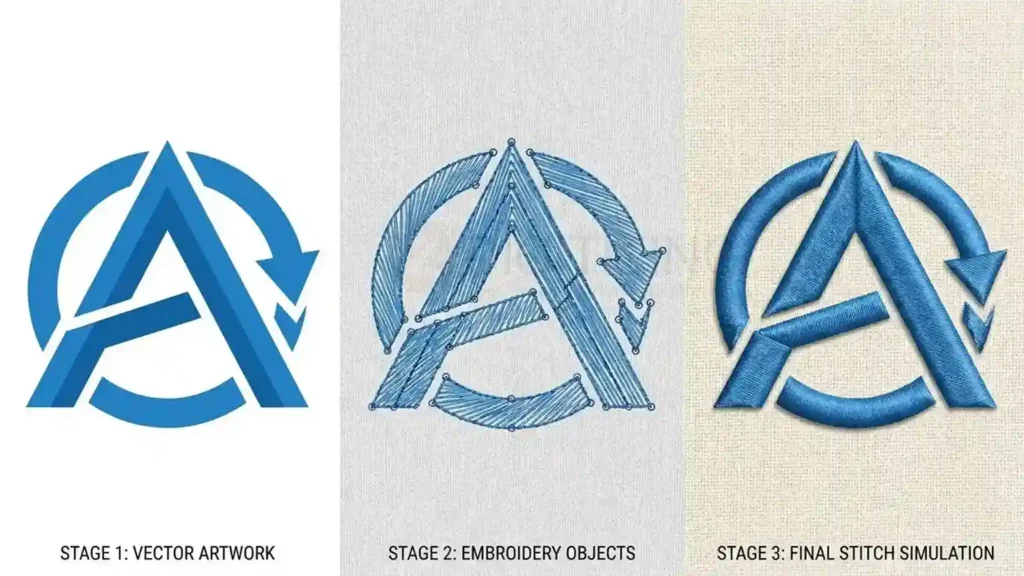
PDF-to-DST stitch file conversion is easier to understand in four stages:
- Artwork extraction: Get the logo or design out of the PDF and into a format suitable for editing.
- Artwork preparation: Clean paths, convert text where necessary, remove unsuitable details, and establish the intended dimensions.
- Embroidery digitizing: Build stitch objects and assign stitch types, directions, density, underlay, and other production settings.
- DST export: Save the completed design when you convert PDF to DST format, then inspect the resulting file.
Each stage has a different purpose. Skipping artwork preparation can create problems during digitizing, while skipping quality checks can allow errors to reach production.
Check Whether Your PDF Artwork Is Ready for Embroidery in the USA
Before opening digitizing software, inspect the PDF. The most important question is whether it contains clean vector artwork, a raster image, or a mixture of both. That determines how much preparation the design needs.
How to Identify Vector Artwork in a PDF
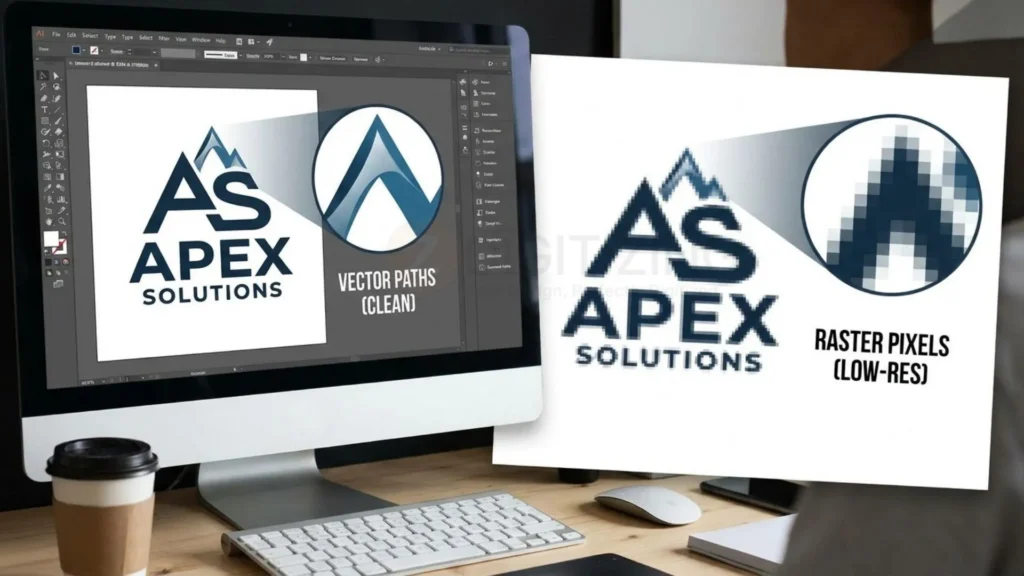
Vector artwork uses editable paths and can usually be enlarged without becoming blurry.
Here are practical ways to check:
- Select individual paths or shapes in Illustrator, CorelDRAW, or Inkscape.
- Zoom in to check whether edges remain smooth.
- Use Outline View in Illustrator to inspect the underlying paths.
- Convert live text to outlines before transferring the artwork if needed.
A PDF can contain both vector and raster elements, so inspect each design element separately.
How to Identify Raster Images and Scanned Artwork
Raster artwork, such as a PNG, JPG, screenshot, or scanned logo, is made of pixels. Enlarging it reveals blurry edges and does not create editable paths.
You likely have raster artwork if the logo cannot be selected as separate shapes, becomes blurry when enlarged, or behaves like one flat image.
A low-resolution image may look acceptable on screen but may not sew cleanly. Thin borders, small lettering, and tight spaces often need rebuilding before digitizing.
When to Trace, Clean Up, or Redraw a Design
Once you know whether the PDF contains vector paths, a raster image, or a scan, choose the preparation method that protects the final stitched result.
PDF artwork condition | Recommended preparation |
Clean vector logo | Extract and inspect the existing paths |
Vector artwork with unnecessary points | Simplify and clean the paths |
Live text with available font | Convert text to outlines before transferring it |
High-resolution raster logo | Trace or manually rebuild suitable shapes |
Blurry scanned logo | Redraw important elements where necessary |
Photograph or highly detailed graphic | Simplify the design before digitizing |
Auto-digitizing software can create uneven curves and fragmented shapes. Clean the result before digitizing; automatic tools prepare artwork but do not replace stitch decisions.
Simplify details that thread cannot reproduce clearly at the intended size, such as tiny lettering, thin outlines, gradients, photographic textures, and narrow gaps.
For USA apparel decorators working with customer logos, it is worth confirming the intended garment and finished size before simplifying the artwork. A logo intended for a jacket back may retain details that would become unreadable on a small left-chest placement.
How to Convert a Vector PDF Artwork to DST
A clean vector PDF is a strong starting point for vector to DST conversion because its paths can often be extracted without rebuilding the entire design. However, the artwork still needs to be prepared and digitized before it becomes a machine-ready DST file.
Step 1: Extract and Prepare the Vector Artwork
Open the PDF in a compatible vector editor, such as Adobe Illustrator, CorelDRAW, or Inkscape.
Check whether the artwork can be selected as individual objects. If it can, remove unnecessary page elements and isolate the logo or design you want to embroider.
Before importing it into digitizing software:
- Remove unrelated text, page borders, and background elements.
- Separate the logo from other artwork on the page.
- Check that paths are closed where they need to form filled shapes.
- Remove duplicate or overlapping objects.
- Simplify unnecessarily complicated paths.
- Confirm that the artwork has the correct proportions.
If the PDF contains live text, consider converting it to outlines. This helps preserve the letter shapes when transferring the artwork to another program, particularly if the original font is unavailable on the receiving computer.
Save a clean working copy as an SVG or EPS where supported. This creates a practical SVG to DST workflow for vector artwork.
Keep the original PDF, too. It serves as the reference if you need to compare the prepared artwork with the customer’s approved design.
Step 2: Convert Text to Outlines and Clean Up Paths
Text can create problems when moving artwork between applications. A digitizing computer may not have the same font installed, which can cause lettering to change or display incorrectly.
Converting text to outlines turns each letter into a vector shape. This prevents font-substitution problems when you move the artwork into digitizing software.
However, outlined text still needs inspection.
Look closely at:
- Letter spacing and alignment.
- Small counters inside letters such as A, B, and O.
- Narrow strokes and sharp corners.
- Overlapping letter shapes.
- Unnecessary anchor points.
- Uneven curves or broken outlines.
For example, a thin serif font may look elegant in a printed PDF but become difficult to reproduce at a small embroidered size. You may need to simplify the lettering or discuss an alternative with the customer before digitizing.
Do not automatically remove every small detail. First check the intended embroidery size and whether the detail can be reproduced reliably.
Step 3: Set the Final Embroidery Size and Hoop
Decide how large the design needs to be before creating the stitch objects.
A logo intended for a left-chest position will require a different level of detail from the same logo used across a jacket back. The smaller version may need simplified lettering, adjusted spacing, or different stitch construction.
Confirm these details:
- Finished design width and height.
- Intended garment and placement.
- Available hoop area.
- Fabric type and thickness.
- Whether the design will be sewn on a flat surface, cap, jacket, or another item.
For USA apparel orders, a customer may provide one logo but request it for several placements. Do not assume that one digitized file can simply be scaled to every size. Changing dimensions can affect stitch density, coverage, underlay, and small details.
If multiple sizes are required, assess whether each needs its own digitized version.
Step 4: Create Stitch Objects and Choose Suitable Stitch Types
Now the prepared artwork needs to become embroidery objects.
This is where manual embroidery digitizing begins. The digitizer assigns an appropriate stitch structure to each part of the design rather than filling every shape with the same stitch.
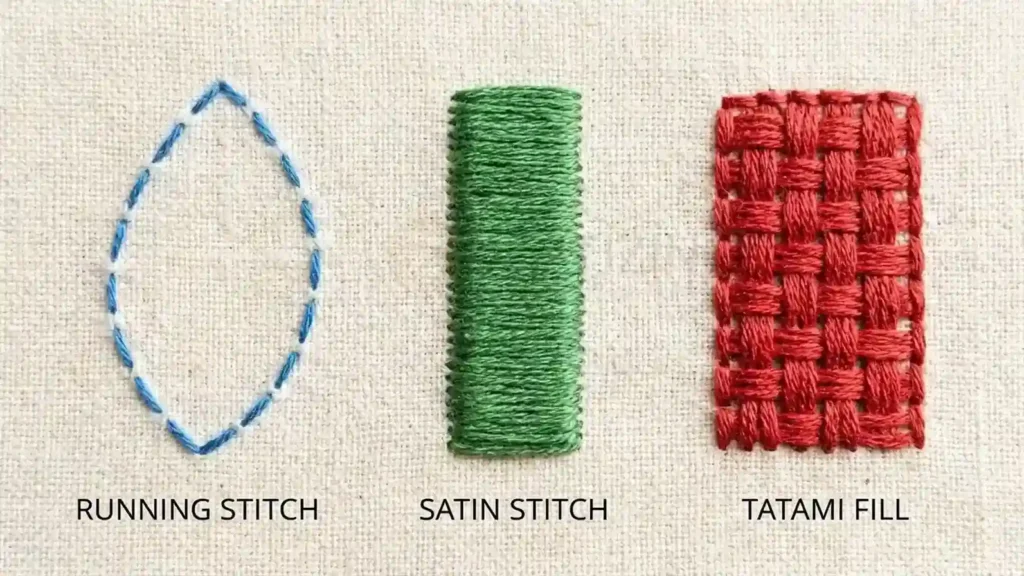
Three commonly used stitch types are running stitch, satin stitch, and tatami fill stitch:
Running stitch: A line of individual stitches used for fine outlines, details, and narrow paths. It can also be used for underlay or other supporting structures.
Satin stitch: A series of stitches that span across a narrow shape or column. It is commonly used for lettering, borders, and suitable narrow areas where a smooth, raised appearance is needed.
Tatami fill stitch: A fill pattern made from rows of stitches. It is often used to cover larger shapes and broader areas of a design.
The correct choice depends on the object’s width, shape, intended appearance, and fabric.
For instance, a narrow logo outline may work well as a running stitch, while a wider letter stroke may suit satin stitching. A large solid logo section may need a tatami fill.
Avoid assigning stitch types based only on the colors or boundaries visible in the PDF. Two shapes that look similar on screen may need different stitch structures to sew cleanly.
Step 5: Adjust Density, Underlay, and Pull Compensation
A design can look correct in the digitizing software and still sew poorly if its stitch settings are unsuitable.
Three important parameters influence how the finished embroidery behaves:
Stitch density controls how closely stitches are placed. Too much density can make an area stiff, increase thread buildup, or contribute to puckering and thread breaks. Too little can leave fabric showing through.
Underlay stitches form a supporting foundation beneath the visible stitches. Depending on the design, underlay can help stabilize fabric, support top stitching, and improve coverage.
Common approaches include edge-run, zigzag, and tatami underlay. The appropriate method depends on the object, stitch type, fabric, and desired finish.
Pull compensation adjusts the design to account for fabric and thread movement during stitching. Fabric can pull inward or shift as stitches are formed, potentially leaving gaps or changing the intended shape.
These settings should not be copied blindly from another design. A logo sewn on a stable woven jacket fabric may behave differently from the same design on a stretchy knit polo or textured fleece.
For USA commercial embroidery shops, confirm the intended garment, stabilizer, and commercial embroidery machine requirements before exporting the file.
Step 6: Plan Stitch Order, Jumps, Trims, and Color Changes
The digitizer must decide the order in which the design will be sewn.
A sensible sequence helps maintain registration, reduce unnecessary machine movement, and create a cleaner result.
Consider the following:
- Stitch sequence: Arrange objects in a logical order to avoid unnecessary movement between distant areas.
- Entry and exit points: Choose suitable points where the machine begins and finishes each object.
- Jump stitches: Review movements between objects and reduce unnecessary jumps where possible.
- Thread Trims: Plan thread cuts according to the digitizing software and target machine’s behavior.
- Color changes: Organize the design so the operator can follow the intended thread sequence.
DST records color-change stops, but it does not identify the actual thread brand or shade. Prepare a separate thread chart or color sequence sheet so the operator knows which thread to use at each stop.
Also, trim handling can vary between software and machines. Do not assume that every DST workflow represents or executes trims identically. Check the exported design and the target machine’s requirements.
Step 7: Export and Inspect the DST File
Once the stitch objects and settings are complete, export the design using the embroidery software’s machine-format export function.
Select Tajima DST as the output format, confirm the design dimensions, and verify that your machine supports the required machine embroidery formats before saving.
Keep the editable native project file as well. For example, Wilcom users may retain the EMB project, while Ink/Stitch users should preserve the SVG source. The native file allows future edits that a DST export cannot provide in the same way.
After export, open the DST in a compatible embroidery viewer or digitizing program.
Check:
- Finished width and height.
- Stitch count and overall design size.
- Color-change stops and sewing sequence.
- Jump movements and potential trim requirements.
- Hoop fit and design orientation.
- Whether any objects appear missing or incorrectly positioned.
A visual preview is useful, but it is not proof that the design will sew correctly. The next step is to simulate the stitch sequence and test the file on representative fabric before releasing it for production.
How to Convert a Raster or Scanned PDF to DST
A raster or scanned PDF can look fine on screen but still be difficult to embroider. Before you can convert PDF to DST, the artwork usually needs tracing, cleanup, or manual rebuilding. Only then can a digitizer create stitch objects and export a usable DST embroidery file.

Why a Scanned PDF Needs More Preparation
A scanned PDF is a raster image, not editable vector paths. Blurry edges, shadows, and low resolution can make tracing unreliable. Enlarging the image will not recover missing detail.
For customer-supplied artwork in USA embroidery shops, it is often worth requesting the original vector logo or a higher-resolution file before spending time rebuilding a poor scan.
Tracing vs. Manually Redrawing the Design
Use automatic tracing for clean, high-contrast artwork. Use manual redrawing for blurry lettering, distorted curves, or complex overlapping shapes.
Situation | Better starting approach | Why |
Simple black-and-white logo | Automatic tracing | Clear boundaries can be detected more easily |
Logo with smooth, distinct shapes | Trace, then clean up | Preserves the basic structure while allowing correction |
Blurry scanned lettering | Manual redrawing | Original letter shapes may not trace accurately |
Complex overlapping artwork | Manual cleanup or rebuilding | Automatic tracing can create too many fragmented paths |
Photograph or detailed illustration | Simplification and selective rebuilding | Not every visible detail is suitable for embroidery |
Neither method creates a DST file by itself. Both prepare the artwork for the digitizing stage.
Clean Up Traced Artwork Before Digitizing

Remove stray and duplicate shapes, smooth uneven curves, close broken outlines, and check letter spacing. Simplify details that will not reproduce at the intended embroidery size.
When Simplifying or Rebuilding a Logo Is Necessary
Rebuild the artwork when tracing cannot produce clean lettering, curves, or separable shapes. Get customer approval before changing recognizable brand details.
Once the artwork is clean, follow the same digitizing process used for vector artwork: set the finished dimensions, create stitch objects, choose suitable stitch types, configure the embroidery parameters, and export the DST file.
Best Software for Converting PDF Artwork to DST
Choose software based on whether it can prepare artwork, digitize stitches, and export DST.

Inkscape and Ink/Stitch: A Free Digitizing Workflow
Inkscape is a free vector graphics editor, while Ink/Stitch is an embroidery extension that adds stitch-design functionality.
Together, they offer a practical option for users who want to learn digitizing without buying a commercial software package.
A typical workflow is:
- Open or import the PDF artwork into Inkscape.
- Inspect the design and separate the elements you need.
- Convert text to paths where necessary.
- Clean up the artwork and save it as an SVG.
- Use Ink/Stitch to create embroidery objects.
- Assign stitch types and adjust their parameters.
- Preview the stitch sequence using its simulation tools.
- Export the completed design in DST format.
Inkscape prepares the artwork; Ink/Stitch turns that prepared artwork into embroidery objects. The PDF import step is only the beginning of the workflow.
Ink/Stitch supports DST export, but users still need to understand object properties, stitch settings, and production requirements. Its simulation can help identify design issues, but a real test sew-out remains important.
Best suited to: Beginners, hobbyists, and budget-conscious users who are willing to learn manual digitizing.
Hatch Embroidery: Preparing Artwork in Supported Formats
Hatch Embroidery is commercial embroidery software with tools for lettering, digitizing, editing, and machine-file export.
It can be useful for users who want a more guided embroidery workflow without relying entirely on a free extension.
One important limitation: do not assume that Hatch directly imports PDF files. Its artwork workflow uses supported image and vector formats. Extract the artwork from the PDF first and save it in a compatible format, such as EPS or a supported raster format, depending on the installed version and edition.
A practical workflow is:
- Extract the logo from the PDF using a suitable graphics program.
- Save the artwork in a format supported by your Hatch edition.
- Import the prepared artwork into Hatch.
- Use its digitizing tools to create embroidery objects.
- Adjust stitch types and settings.
- Review the design and export it in DST format.
Hatch can speed up parts of the workflow, but the digitizer still needs to review object construction, sizing, and fabric suitability before exporting the file.
Best suited to: Beginners and small embroidery businesses looking for an integrated commercial digitizing environment.
Wilcom EmbroideryStudio: Professional Digitizing and Export
Wilcom EmbroideryStudio is a professional embroidery design and digitizing platform used for detailed control over stitch construction and production preparation.
It provides tools for creating and editing embroidery objects, adjusting stitch parameters, organizing the sewing sequence, and exporting machine formats such as DST.
For PDF artwork, use an appropriate intermediate file if the installed version does not support the source directly. A common approach is to prepare the artwork in a vector editor and transfer it in a supported vector or bitmap format.
A typical workflow looks like this:
- Prepare the PDF artwork in a graphics editor.
- Export the design in a format supported by the installed Wilcom version.
- Import the artwork into EmbroideryStudio.
- Set the design dimensions and intended hoop.
- Create embroidery objects and assign stitch types.
- Adjust underlay, density, compensation, and object sequence.
- Inspect the design using the available preview and editing tools.
- Save the editable EMB project and export a separate DST file.
Wilcom gives experienced digitizers more control over complex construction, but it does not replace good digitizing judgment or a test sew-out.
Best suited to: Experienced digitizers, embroidery production teams, and commercial shops handling varied or complex work.
Other Useful Tools for Artwork Preparation and Digitizing
A few additional programs may fit into a PDF-to-DST workflow, depending on the user’s requirements.
Embird offers embroidery editing and digitizing capabilities through its available modules. Check which modules and formats are supported by the version you plan to use before choosing it for a particular PDF workflow.
Adobe Illustrator and CorelDRAW are useful for preparing vector artwork, cleaning paths, converting text to outlines, and exporting suitable intermediate files. They are not replacements for embroidery digitizing software because they do not create the stitch instructions required by an embroidery machine.
A DST file viewer or stitch simulator can help inspect an exported file, but a viewer does not necessarily provide the tools needed to correct its underlying stitch construction.
Software Comparison: PDF Support, Digitizing, and DST Export
Here is how the main options fit into the workflow:
Software | PDF artwork workflow | Digitizing capability | DST export | Best use |
Inkscape + Ink/Stitch | Import PDF into Inkscape, then prepare SVG artwork | Manual digitizing and stitch-parameter control | Yes | Free learning and simple designs |
Hatch Embroidery | Prepare PDF artwork in a supported format first | Automated and manual digitizing tools | Yes | Guided commercial digitizing |
Wilcom EmbroideryStudio | Use a supported intermediate artwork format where required | Advanced professional digitizing | Yes | Detailed production work |
Embird | Use supported artwork formats and relevant modules | Editing and digitizing features depend on modules | Yes | Users needing embroidery editing and conversion |
Adobe Illustrator | Opens and prepares PDF artwork | No embroidery stitch digitizing | No | Vector artwork cleanup |
CorelDRAW | Opens and prepares supported PDF artwork | No embroidery stitch digitizing | No | Vector cleanup and artwork preparation |
Before purchasing software, confirm its current import and export formats, edition restrictions, and available modules. Capabilities can differ between versions.
Remember: vector graphics vs. raster images describes the artwork, while digitizing software determines how that artwork becomes stitches. A program that opens a PDF is not necessarily capable of producing a usable DST file.
How to Check a DST File After You Convert PDF to DST
A DST file should be checked before it reaches the embroidery machine. A file that opens successfully may still contain poor stitch sequencing, unsuitable density, or details that will not reproduce cleanly on fabric.
Use a DST file viewer or embroidery software to inspect the design before production. Then, whenever possible, confirm the results with a physical sew-out.

1. Confirm the Design Dimensions and Hoop Fit
Start by checking the finished design dimensions. They should match the size requested by the customer, not simply the dimensions of the original PDF artwork.
Also confirm that the design fits the intended hoop. A design that exceeds the available sewing area may require repositioning, splitting, or resizing.
Before exporting or sending the file, check:
- Finished width and height.
- Hoop compatibility.
- Design orientation and placement.
- Whether the proportions match the approved artwork.
- Whether small elements remain readable at the final size.
Do not assume that a PDF’s page dimensions represent the intended embroidery size. A logo placed on an entire PDF page may be intended to stitch only a few inches wide.
2. Review Stitch Sequence and Color Stops
The stitch sequence determines how the machine builds the design. Poor sequencing can create unnecessary jumps, repeated travel, excessive trims, and an inefficient production run.
Check whether the objects stitch in a sensible order. For example, background elements generally need to be considered before foreground details so that later stitching does not cover important parts of the design.
Also review the color-change stops. Remember, DST records stop instructions, but it does not identify the exact thread brand or shade. Keep a separate thread chart with the production file.
3. Use Embroidery Simulation Before Production
Embroidery software can simulate how a design will stitch. This makes it easier to identify visible problems before loading the file onto a machine.
Look for:
- Unexpected gaps between objects.
- Excessive jumps or unnecessary travel.
- Poor stitch direction.
- Overlapping areas that may create unnecessary bulk.
- Missing details or incomplete coverage.
- Incorrect color-change order.
A simulation is useful, but it cannot fully predict how fabric will behave under the needle. It does not replace a physical test sew-out.
4. Test the Design on the Intended Fabric
A test sew-out is especially important for commercial orders, small lettering, detailed logos, and designs with multiple stitch types.
Use the same or a representative garment, stabilizer, thread, and machine setup planned for production. Then inspect the result for:
- Puckering: The fabric gathers around the design.
- Registration problems: Elements do not align as intended.
- Gaps: Fabric shows through where coverage should be complete.
- Distortion: Letters, circles, or other shapes lose their intended appearance.
- Thread breaks: Frequent breaks may indicate design, thread, needle, or machine-related issues.
- Poor readability: Small lettering or fine details become difficult to recognize.
If the result is poor, identify the cause before changing the digitized file. Not every stitching problem comes from digitizing. Fabric choice, stabilizer, needle, thread tension, hooping, and machine condition can also affect the result.
Quality Control for USA Embroidery Production
For US embroidery businesses, quality control should happen before a customer order enters full production. This is particularly important when the same logo will appear on multiple garments, different fabric types, or several product placements.
A reliable commercial embroidery machine workflow should include these checks:
Production check | What to confirm |
Artwork approval | The customer has approved the correct logo and version |
Finished dimensions | Width and height match the requested placement |
Garment compatibility | The digitizing approach suits the fabric and garment |
Thread selection | Colors match the agreed thread chart |
Machine compatibility | The DST file opens and is suitable for the intended machine |
Test sew-out | The stitched sample meets the required appearance |
File control | The approved DST and editable source are stored together |
One detail that is easy to overlook: keep the approved artwork, thread chart, and final DST file linked to the same order or job number. This reduces confusion when a customer requests a repeat order months later.
For shops handling multiple customer logos, consistent file naming also helps. Include the customer or job reference, design name, size, and revision number where practical.
Common PDF-to-DST Digitizing Mistakes to Avoid
Problem | Checks to make |
Small lettering is unreadable | Finished size, artwork detail, and lettering construction |
Fabric puckers | Density, underlay, stabilizer, hooping, and tension |
Outlines do not align | Sequencing, compensation, fabric movement, and hooping |
Thread breaks repeatedly | Dense overlaps, short stitches, needle, thread, and machine setup |
Thread colors look wrong in the preview | Compare the file with the approved thread chart |
Free vs. Professional PDF-to-DST Conversion: Which Should You Choose?
The right option depends on the design’s complexity, your experience, and whether the file is for experimentation or commercial production.
Option | Best suited for | Main limitation |
Free artwork software | Opening, inspecting, and cleaning PDF artwork | Does not automatically create production-ready stitches |
Ink/Stitch | Learning and digitizing relatively simple designs | Requires manual knowledge and careful testing |
Paid embroidery software | Regular digitizing work and more advanced editing | Requires software investment and operator experience |
Professional digitizing service | Customer logos, detailed designs, and commercial production | Requires a clear brief and review of the supplied proof |
When a Free Embroidery Digitizer Makes Sense
A free embroidery digitizer can be useful when you are learning, experimenting with simple artwork, or preparing a straightforward design.
For example, Ink/Stitch can provide a practical starting point for users who want to work with vector artwork and create embroidery files without purchasing a full commercial software package.
However, free software does not remove the need for digitizing knowledge. You still need to understand stitch types, underlay, density, sequencing, and fabric behavior.
When Professional Digitizing Is the Better Option
Professional digitizing is worth considering when the design includes:
- Small lettering that must remain readable.
- Detailed company logos or complex artwork.
- Multiple sizes or garment placements.
- Fine outlines, overlapping objects, or intricate shapes.
- Commercial orders where a poor sew-out could waste customer garments.
The important distinction is that professional digitizing is not simply file conversion. It involves making decisions about how the artwork should be constructed in stitches.
When USA Embroidery Shops Should Outsource PDF-to-DST Digitizing
Outsourcing can make sense when an embroidery shop receives artwork that needs more technical work than its in-house team can handle efficiently.
For example, a USA promotional-products business may receive a customer logo as a scanned PDF. The shop needs a clean DST file for a cap order, but the artwork contains small text and several overlapping elements.
Rather than relying on an automatic conversion, the shop can provide the artwork and production requirements to an experienced digitizer.
Before sending the job, clarify:
- The final design dimensions.
- Garment type and fabric.
- Intended placement.
- Required machine format.
- Thread colors or preferred thread chart.
- Any details that must remain unchanged.
- Whether a proof or revision is required before production.
Outsourcing does not remove the need for production checks. The embroidery shop should still review the supplied file and test it on the intended material.
For businesses handling frequent orders, a consistent digitizing partner can also help standardize file preparation and reduce repeated corrections.
What to Send a Digitizer to Convert PDF to DST
A digitizer needs more than the PDF file to make suitable production decisions. A clear brief helps prevent unnecessary revisions and misunderstandings.
Use this checklist before submitting your artwork:
- Original PDF: Send the highest-quality version available.
- Vector source: Include the original AI, EPS, SVG, or other vector file if available.
- Finished size: Specify the required width and height.
- Placement: Explain where the design will be embroidered, such as the left chest, cap front, or jacket back.
- Fabric or garment: Identify the material and garment type.
- Thread colors: Provide brand and color references if they are specified by the customer.
- Machine format: Confirm that DST is the required output.
- Quantity and use: Explain whether the design is for a single sample or a commercial production run.
- Reference image: Include an approved visual showing the intended appearance.
- Special instructions: Mention small text, fine details, required outlines, or elements that must not change.
If you do not know the exact stitch settings, do not guess. Share the garment and production details so the digitizer can assess the design appropriately.
A Practical PDF-to-DST Workflow for US Embroidery Businesses
For a shop handling regular customer orders, a repeatable workflow is more reliable than treating every PDF as a simple file conversion.
A practical process looks like this:
- Receive the artwork: Collect the PDF and any available original vector files.
- Confirm the requirements: Record the finished size, placement, garment, thread colors, and machine format.
- Inspect the artwork: Identify whether it contains vector paths, raster images, or a combination of both.
- Prepare the design: Clean up, trace, or redraw artwork where necessary.
- Digitize the artwork: Assign stitch types, directions, density, underlay, sequencing, and other relevant settings.
- Export the DST: Save the machine file and retain the editable project.
- Review the output: Check dimensions, stitch sequence, color stops, and design coverage.
- Run a test sew-out: Use the intended or representative production materials.
- Approve and archive: Store the approved DST, source artwork, and thread chart together.
This workflow gives the production team a clear record of what was approved and which file should be used for repeat orders.
Need a Production-Ready DST File?
To convert PDF to DST, prepare the artwork, digitize it into suitable stitch instructions, and check the result for the intended fabric and embroidery application.
If you are preparing a company logo, detailed design, or customer artwork for production, professional embroidery digitizing service support can help turn the artwork into a machine-readable file.
ZDigitizing offers embroidery digitizing services for customers who need artwork prepared for machine embroidery. You can submit your design and production requirements for review before moving ahead with the embroidery work. And as a new customer, you will also receive 30% off your first order.
The better the artwork and production brief, the easier it is to make informed digitizing decisions, and the more confidently you can move from a PDF design to an embroidery-ready DST file.