Digitizing Pictures for Embroidery: Why Most Images Fail (And How to Fix Them)
You may have tried digitizing pictures for embroidery and ended up with a messy, distorted design that looked nothing like your original photo. This is one of the most common frustrations both beginners and professionals face. The truth is, most pictures fail during embroidery digitizing because they are not prepared the right way, lack contrast, or use the wrong stitch settings.
In this detailed guide, you’ll learn exactly why this happens, how to fix it, and how to turn any photo into a flawless embroidery design that stitches beautifully every time.
Digitizing Pictures for Embroidery: Why Most Images Fail (And How to Fix Them)
What Digitizing Pictures for Embroidery Really Means?
When we talk about digitizing images for embroidery, we mean converting a digital image (like a JPG or PNG) into an embroidery file format that tells your machine how to stitch. The process translates each color, line, and texture into stitch types and paths.
Think of it like turning pixels into threads; instead of colors of light, you’re working with tiny stitches that need direction, spacing, and density.
What Digitizing Pictures for Embroidery Really Means
During this conversion, the software generates a stitch map, which includes:
Stitch types (satin, fill, or run)
Directions and angles
Color changes
Density and underlay settings
A good digitized design ensures the machine stitches smoothly without puckering or pulling the fabric. The final embroidery should look crisp, just like the photo, but achieving this quality takes planning.
Many people believe digitizing pictures for embroidery is as simple as clicking one button in software, but the art lies in interpreting the image manually.
Automatic tools can struggle with gradients, shadows, and complex color regions. Understanding how stitches behave is what separates amateurs from professional results.
Why Most Pictures Fail When Digitized?
Many images fail because embroidery and photography are two very different art forms. Cameras capture millions of color dots.
Embroidery paints with threads, limited colors, fixed stitch lengths, and physical tension on fabric. Knowing where things go wrong helps you avoid errors.
Poor Image Resolution or Too Many Colors
Poor Image Resolution or Too Many Colors
If a photo is blurry or low in resolution, the digitizing program cannot detect sharp edges. As a result, digitizing pictures for embroidery becomes difficult, and stitches may end up scattered instead of following clean outlines.
Similarly, an image with too many shades, like a full-resolution portrait, can overwhelm the software. Many beginners think you can easily digitize picture for embroidery without adjustments, but complex colors often lead to messy results.
Simplify the image first by increasing contrast and reducing unnecessary color tones to achieve cleaner and more professional stitching.
Complex Shadows or Gradients
Complex Shadows or Gradients
Real photos contain smooth transitions in brightness, but embroidery threads cannot reproduce soft gradients perfectly. Those smooth parts appear blocky when stitched. Instead, you need to convert gradients into lighter stitch fills or tone transitions by hand.
No Contrast Between Background and Subject
No Contrast Between Background and Subject
Without contrast, outlines vanish into the fabric. Always separate your subject for example, make a light shirt photo stand out by using a darker background fabric, or vice versa.
Wrong Stitch Density or Fill Types Causing Puckering
Using the wrong density can crush the fabric and distort the design’s proportions. In digitizing pictures for embroidery, too few stitches make the design weak and uneven, while too many stitches make it stiff, bulky, and prone to puckering.
Balance is key; always test density settings based on thread weight and fabric type, especially if the material has stretch.
Quick Comparison Table: Why Images Fail and How to Fix Them?
Issue
Cause
Fix
Blurry output
Low-resolution photo
Use 300 dpi or higher image
Patchy stitches
Too many colors
Reduce palette to 4-6
Uneven design
Wrong density
Use standard 0.40-0.45 mm
Fuzzy edges
No contrast
Increase brightness and sharpness
How to Choose the Right Image Before Digitizing?
Half the work of digitizing happens before you even open your software. In digitizing pictures for embroidery, choosing the right image makes everything downstream smoother and more accurate.
Best Image Types for Embroidery Digitizing
Select a picture with clear outlines, simple shapes, and visible contrast. Logos, icons, and portraits with sharp lighting work well. Avoid motion-blurred photos or soft, pastel gradients.
Common Photo Aspects to Avoid
Common Photo Aspects to Avoid
In digitizing pictures for embroidery, images with complex backgrounds, tiny faces, or very fine details like hair tend to fail. The software often interprets these elements as random noise, which results in messy and unclear stitches.
Simplify your image by removing unnecessary background elements or cropping closely around the main subject to achieve cleaner and more accurate embroidery results.
Checklist Before You Start
Edges are visible and sharp
Subject stands apart from background
Image resolution is high (at least 1000px width)
Limited color variations (under ten tones)
A quick visual test: if the black-and-white version of your image looks flat or confusing, it won’t digitize a picture for embroiderywell. Adjust brightness and contrast until shapes pop distinctly.
How to Digitize a Picture for Embroidery?
Turning your favorite photo into a professional‑looking design takes more than just pressing an “auto” button. The process of digitizing pictures for embroidery combines judgment, software skill, and testing. Follow these practical steps to make sure your design runs smoothly every time.
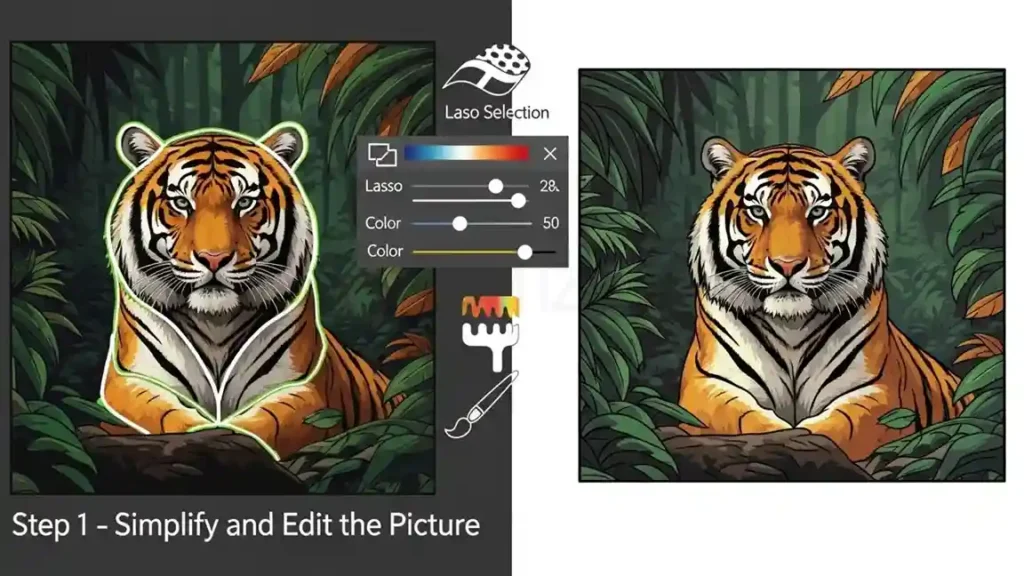
Step 1 – Simplify and Edit the Picture
Simplify and Edit the Picture
Even the best photos need cleanup before they’re ready. You should:
Crop out busy backgrounds.
Boost brightness and contrast for visibility.
Reduce total colors through posterization or vector tracing tools.
Resize the image to your embroidery hoop dimensions.
This edit helps the digitizing engine convert areas more accurately into thread sections, making finished stitches cleaner and more balanced.
Step 2 – Import into Embroidery Digitizing Software
Import into Embroidery Digitizing Software
Now open your photo in the embroidery software of your choice. In digitizing pictures for embroidery, tools like Hatch or Wilcom allow both manual and auto conversion.
If you use the auto‑digitize feature, review the generated stitch areas immediately. The software guesses, but doesn’t always get shading right.
For manual digitizing, use vector tools to draw stitch regions, assign fill types (satin, tatami, etc.), and set correct color order.
Always save your project frequently in its native format before exporting to machine code.
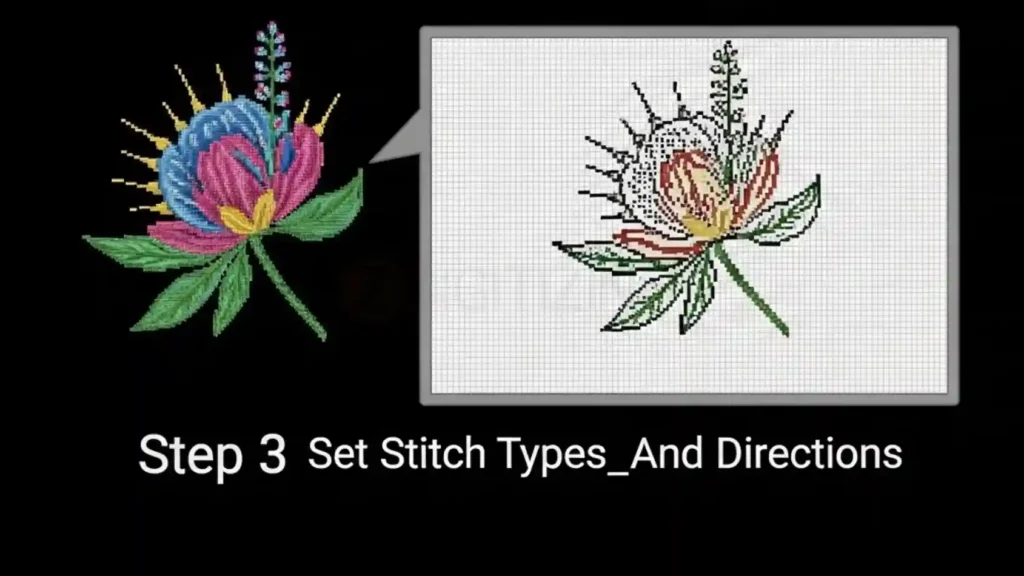
Step 3 – Set Stitch Types and Directions
Set Stitch Types and Directions
In digitizing pictures for embroidery, stitch direction defines how light reflects off threads and directly affects the final texture of the design. For example:
Satin stitches work best for letters or borders.
Fill (tatami) stitches cover large areas evenly.
Running stitches outline shapes or add thin lines.
Vary stitch angles slightly across areas to prevent puckering on one grain. Your embroidery digitizing software usually displays stitch paths visually so you can spot dense overlaps.
Step 4 – Test the Design on Sample Fabric
Test the Design on Sample Fabric
Export your digitized file into your machine’s format (DST, PES, EXP, etc.) and test it on a fabric similar to your final product. Small problems, such as thread breaks, jumps, or uneven fills, show up during testing. Adjust density, underlay, and pull‑compensation before final stitching.
This extra test run ensures your digitized pictures for embroidery come out clean, professional, and color‑accurate.
Quick Embroidery‑Ready Checklist
Before final stitch-out, in digitizing pictures for embroidery, confirm that you have:
Simplified, high‑contrast image
Correct fabric type selected
Proper thread colors matched
Stitch density balanced
File exported in correct machine format
When all boxes are checked, you’re ready to press start with confidence.
Choosing the Best Software to Digitize Pictures for Embroidery
In digitizing pictures for embroidery, the quality of your results depends heavily on the software you use. While even budget tools can create decent outcomes, higher-end programs offer smarter auto-digitizing features, better stitch control, and cleaner file exports.
What to Look for in Embroidery Digitizing Software?
What to Look for in Embroidery Digitizing Software
When comparing options, focus on these factors:
Ease of use: Is the interface simple enough for you to learn?
Auto‑digitizing quality: How well does it recognize shapes and shading?
Manual editing tools: Can you adjust stitch angles, densities, and underlay?
File compatibility: Does it export DST, EXP, JEF, and PES formats reliably?
Support and updates: Regular patches and tutorials keep your skills growing.
Photo embroidery features: Particularly useful if you work with portraits or logos.
Top Embroidery Digitizing Software Options
In digitizing pictures for embroidery, choosing the right tool matters. Below is a concise comparison of industry-leading programs that convert images into embroidery stitch data.
Software
Best For
Skill Level
Auto‑Digitizing Quality
Key Advantage
Wilcom Embroidery Studio
Professional shops
Advanced
Excellent
Deep manual control and 3D preview
Hatch Embroidery
Home users / small businesses
Intermediate
Very good
Friendly interface, great training resources
Brother PE‑Design
Brother machine owners
Beginner–Intermediate
Good
Direct hardware integration
Embird
Budget‑minded hobbyists
Intermediate
Fair
Affordable with powerful plug‑ins
Each program handles file interpretation differently, but all are capable of converting pictures into embroidery designs when used correctly.
Best Free or Low‑Cost Tools for Beginners
If you’re just starting out, in digitizing pictures for embroidery, free and trial versions can help you practice without a heavy investment:
Ink/Stitch: An open‑source add‑on for Inkscape, great for simple logos or text designs.
SophieSew: Lightweight, allows basic digitizing and stitch simulation.
My Editor (by Wings): Free viewer + minor editing tool for testing files.
These tools let you explore stitch properties and editing before upgrading to professional software like Hatch or Wilcom. Once you master basic editing, you’ll better understand how digitizing a picture for embroidery truly works at a technical level.
Fixing Common Digitizing Mistakes (With Real Solutions)
Even experienced users make errors in digitizing pictures for embroidery when converting photos. Here’s how to recognize problems and fix them fast.
Distorted Photo Look → Adjust Stitch Direction
Distorted Photo Look → Adjust Stitch Direction
If a circular logo looks squashed when embroidered, rotate stitch angles so threads flow with the design rather than against it.
Thread Breaks → Tweak Density or Underlay
Broken threads usually mean the stitch density is too tight. Reduce by 10–15%, and always ensure proper underlay — it acts like scaffolding for your top stitches.
Washed-Out Colors → Balance Thread Palette
Washed-Out Colors → Balance Thread Palette
In digitizing pictures for embroidery, choose thread shades that maintain natural contrast. Soft skin tones often need slightly darker threads to appear realistic once stitched under lighting.
Edges Not Clean → Use Manual Outlines or Push-Pull Compensation
Push-pull distortion happens when stitches stretch fabric outward. Manually outline borders using satin edges and apply small compensation (0.05–0.1 mm shrink) where necessary.
When to Use Photo Embroidery Software (And When Not To)
An image digitizer for embroiderysoftware promises quick conversions. While handy, it’s not always accurate for detailed pictures.
Use photo embroidery tools when:
Your image has smooth tones and large subjects.
You want a quick, stylized “photo stitch” effect.
The embroidery size is large (so details don’t blend).
Avoid them when:
The image contains small faces or intricate text.
You need a sharp, professional-level look.
You’re digitizing for commercial logos or branding.
Photo embroidery software works best as a creative shortcut, not a full replacement for manual design. Combine it with your editing tools for fine control.
Turning Digitized Pictures into Professional Embroidery Designs
In digitizing pictures for embroidery, once your photo is digitized and tested, you’re ready to make it production-ready. A professional finish depends on careful preview checks and attention to small details.
Key steps:
Stitch test samples: Always verify on the same fabric you plan to use.
Review color balance: Replace shiny threads with matte ones if light reflections distort realism.
Finalize file format: Save in formats like DST, PES, or JEF to match your embroidery machine.
A properly completed project ensures the digitizing pictures for embroidery reflect both quality and craftsmanship. Professionals often keep a “process log”, noting image type, fabric type, needle size, and results for next time. This practice builds expertise and consistency.
Final Checklist Before You Start Digitizing Your Picture
Use this quick pre-flight checklist to avoid 90% of common mistakes.
Choose a high-quality, high-contrast image.
Simplify colors to fewer than ten shades.
Clean background before importing.
Pick the right software and stitch types.
Preview and test before final output.
Keep density between 0.40 mm – 0.45 mm.
Always test on a similar fabric.
Having this list by your workstation ensures consistency and saves time in revisions.
When to Hire a Professional Digitizer (and How to Choose One)?
If a photograph is very complex, such as a detailed portrait or a tiny logo, it needs a level of manual skill that basic software simply cannot reach.
While practicing on your own is a great way to learn, digitizing pictures for embroidery at a professional level requires years of experience to understand how different fabrics move under a needle.
If you want a result that looks perfect and professional, you can hire the expert team at ZDigitizing to handle the technical work for you.
Our company has over ten years of experience, and we specialize in turning difficult images into flawless stitch files without using messy automated filters.
Our senior artists manually create every stitch path to ensure your machine runs smoothly without thread breaks. We are proud to provide premium embroidery digitizing services in Germany, USA, Uk and all over the world with constant support to help your projects succeed.
What makes ZDigitizing truly unique is our commitment to quality and speed. We offer a lightning-fast 4 to 12-hour turnaround time so your production never has to wait.
We also provide a free backup service, meaning if you ever lose your files, we will have them saved for you forever. Unlike other services, we offer a 100% money-back guarantee because we are confident that our rapid digitizing will work perfectly on your specific machine.
Hiring a professional at ZDigitizing gives you a cleaner result and shows you how digitizing pictures for embroidery should actually be done. This is the best path for professional branding or special gifts that need to look realistic.
To make it easy for you to try our quality, we are currently offering a 50% discount on your very first order.
Click the link to claim your 50% discount at ZDigitizing.
Are you looking for embroidery digitizing and vector art services at low cost with superfast turnaround, guarranted quality and preview before pay? So, you are at right place. We can digitize and vectorize any type of artwork in your required file format.