In most cases, how to remove embroidery from a hat safely starts by cutting the stitching from the back with a sharp seam ripper or stitch eraser, then gently removing the loose top threads from the front. Work slowly and avoid cutting the hat fabric, because dense stitching can leave needle holes, puckering, ghosting, or other permanent marks. The right method depends on the hat’s fabric, structure, embroidery density, and backing.
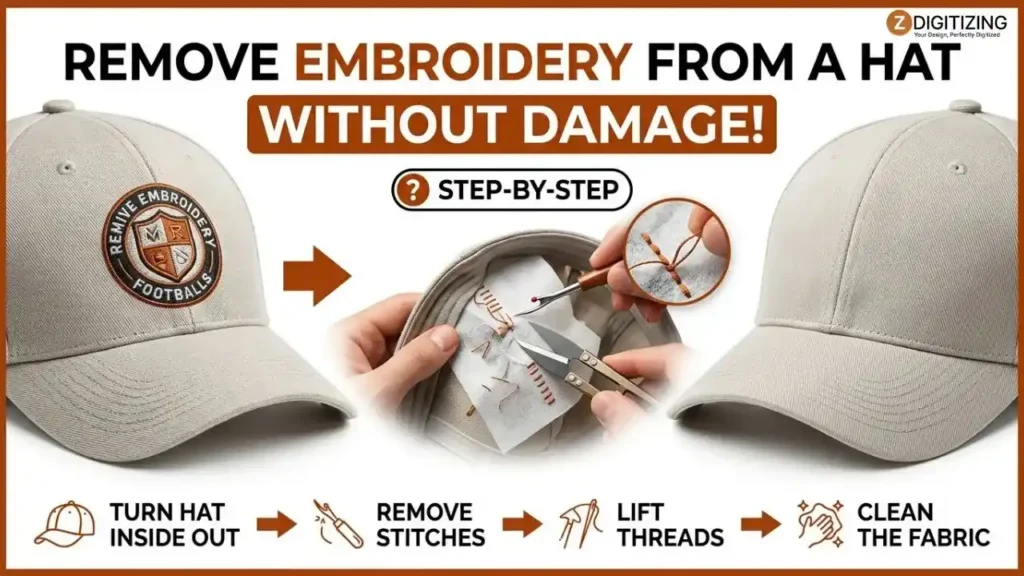
A structured cap requires more support and control than a soft hat, and some embroidery cannot be removed completely without leaving visible traces.
How to Remove Embroidery from a Hat: Step-by-Step Methods Without Damage
Before You Start: Check the Hat and Embroidery
Before beginning hat embroidery removal, inspect both the embroidery and the hat itself. The goal is not simply to cut every visible thread; it is to remove the design while preserving the fabric, backing, and shape of the hat. Knowing how to remove embroidery from a hat safely starts with understanding the hat’s structure and the way the design was stitched.

Identify the Hat Structure
Check whether the hat is:
- Structured with buckram or stiff interfacing
- Unstructured and flexible
- Made from cotton, polyester, wool, denim, leather, vinyl, or another material
- Designed with multiple panels or seams close to the embroidery
- Fitted with a stiff brim or curved crown
A structured crown needs particular care because cutting or pulling the backing can weaken its shape. Because embroidery on hats is stitched onto a curved and often reinforced surface, removal requires more control than removing embroidery from a flat garment.
Inspect the Embroidery
Look closely at the design and determine how densely it has been stitched. The type of hat embroidery machine used to create the design can also affect how densely the stitches are packed and how many layers need to be removed.
A lightly stitched name or simple logo is usually easier to remove than a dense design with multiple layers of underlay and top stitching.
Also check whether the design includes:
- Standard machine embroidery
- Dense stitching
- Appliqué
- An embroidered patch
- Metallic or specialty thread
- Adhesive-backed material
If you can access the inside of the hat, inspect the bobbin stitches and backing before cutting anything.
Support the Hat Before Removing Stitches
Do not flatten a structured hat aggressively just to reach the embroidery. Instead, place it over a rounded object that supports the crown while still allowing you to access the inside.
This keeps the hat closer to its original shape and gives you better control when performing machine embroidery removal.
If the embroidery is close to a seam, brim, or panel edge, work especially slowly. One misplaced cut can damage the hat rather than just the embroidery.
Tools You Need for Hat Embroidery Removal
Having the right tools makes hat embroidery removal much safer. You do not need a large collection of equipment; the most important thing is having a sharp tool that lets you separate stitches without cutting the fabric underneath.
The safest answer to how to remove embroidery from a hat is usually a sharp seam ripper, fine tweezers, and small embroidery scissors.
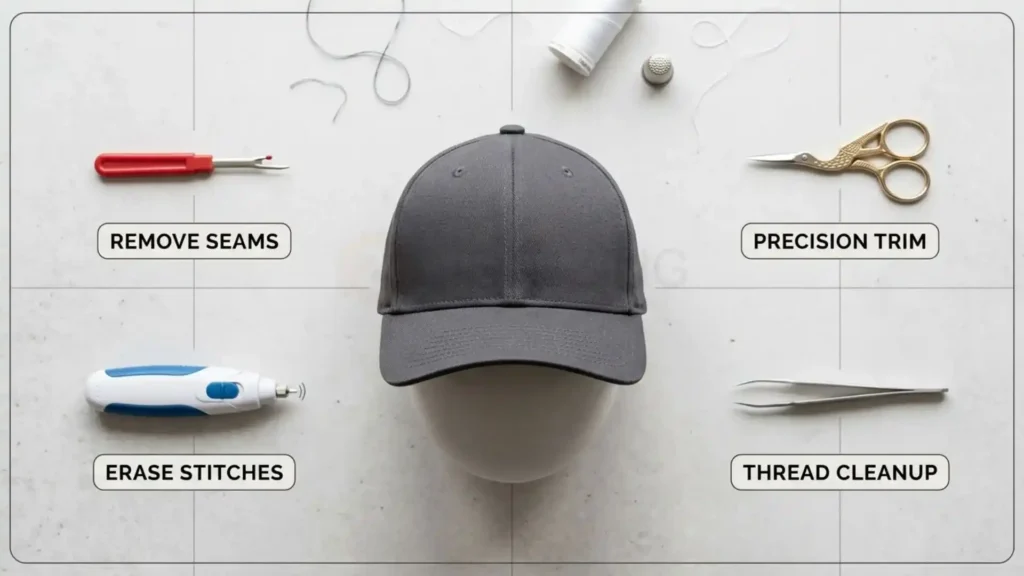
Seam Ripper
A sharp seam ripper is the best starting tool for most hats. Use the pointed end to get underneath individual stitches, then cut small groups of threads rather than trying to remove an entire section at once.
Work from the inside of the hat whenever possible. This gives you better visibility of the bobbin and underlay stitches and reduces the chance of cutting the crown fabric.
Embroidery Scissors
Small, sharp embroidery scissors are useful after the main stitches have been loosened. Use them to trim remaining thread tails or cut a stubborn thread that is already clearly separated from the fabric.
Avoid using them blindly against the hat surface. Their sharp tips can easily puncture the material.
Fine-Tip Tweezers
Tweezers help remove loose top threads from the front of the hat after the connecting stitches have been cut from the back.
Pull gently. If a thread resists, do not force it. Return to the inside and cut the remaining stitch instead.
Electric Stitch Eraser
An electric stitch eraser can speed up removal from large or densely stitched designs, but it requires more control than a seam ripper.
It removes stitches by cutting them mechanically, so using it too deeply or too quickly can also shave through the hat fabric, backing, or buckram. Test it on an inconspicuous area or use it only when you can clearly see the stitches being cut.
Rounded Support
A rounded form, small bowl, hat block, or another suitable support can help maintain the crown’s shape while you work.
The support should be firm enough to prevent the hat from collapsing but should not stretch the fabric.
Quick Tool Comparison
Tool | Best Use | Main Risk |
Seam ripper | Cutting individual stitches | Piercing the fabric |
Embroidery scissors | Trimming loose threads | Cutting the base material |
Tweezers | Removing loosened top threads | Pulling and enlarging existing holes |
Electric stitch eraser | Dense embroidery on sturdy hats | Cutting fabric or backing |
Rounded support | Maintaining hat shape | Stretching fabric if oversized |
For most people, a seam ripper, fine-tip tweezers, and small embroidery scissors provide enough control for careful removal.
Step-by-Step: How to Remove Machine Embroidery from a Hat
The safest approach is to separate the embroidery into its individual stitch layers instead of trying to pull the entire design away at once.
The following process explains how to remove embroidery from a hat while keeping the fabric and structure under control.
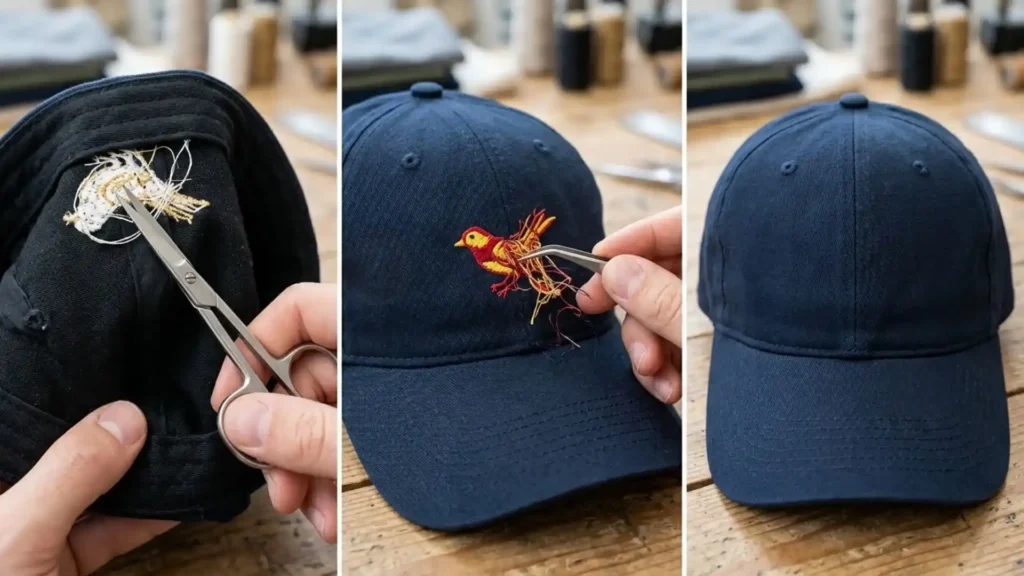
1. Turn the Hat Inside Out
Access the embroidered area from the inside of the hat. If there is a tear-away, cut-away, or other backing, identify how it is attached before removing it.
Do not immediately pull the backing away. Some stabilizers may be held in place by the embroidery itself.
2. Cut the Bobbin Stitches First
Use the seam ripper to cut the bobbin stitches supporting the design.
Work in small sections. Slide the protected part of the seam ripper underneath the stitches and cut them without pressing the blade toward the fabric.
You are trying to weaken the embroidery, not remove every thread in one pass.
3. Carefully Cut the Underlay
Once the main bobbin stitches are separated, look for the underlay beneath the visible embroidery.
Underlay provides stability during embroidery and can form another layer of stitching beneath the top design. Cut it gradually, especially around dense areas.
If you cannot clearly distinguish the thread from the hat material, stop and reposition the hat rather than cutting blindly.
4. Turn the Hat Right Side Out
After enough stitches have been released from the back, turn the hat over and inspect the front.
You should see sections of the embroidered design becoming loose.
Use fine-tip tweezers to lift these threads gently.
5. Remove the Top Threads Slowly
Pull loose threads away from the fabric rather than dragging them across the surface.
To remove embroidered logo from hat jobs, start with the edges of individual letters or design elements and work toward the center.
If a thread does not move easily, do not yank it. Turn the hat inside out again and locate the stitch holding it in place.
6. Cut Stubborn Threads From the Back
Some threads will remain connected even after most of the design has been loosened.
Instead of forcing them from the front, find the connection from the back and cut it with the seam ripper or embroidery scissors.
This is particularly important with dense logos because pulling hard can stretch the fabric or enlarge existing needle holes.
7. Remove Remaining Thread Tails
Once the design is gone, use tweezers to pick up loose fibers and small thread fragments.
Trim thread tails only when you can clearly see that they are separate from the hat fabric.
Do not aggressively scrape or brush the area. Excessive abrasion can create fuzziness or fraying.
8. Remove the Backing Carefully
If the embroidery used a removable stabilizer, separate it according to its type.
Tear-away backing should generally be removed in small pieces rather than pulled forcefully across the stitches. Cut-away backing should not be aggressively ripped from the fabric because doing so can distort the embroidered area.
If adhesive residue remains, do not immediately apply a strong solvent. Test any cleaning product on a hidden area first, particularly on dyed, coated, synthetic, leather, or specialty materials.
9. Inspect the Area Under Good Lighting
After removal, inspect the hat from different angles.
Look for:
- Remaining thread
- Needle holes
- Puckering
- Fraying
- Discoloration
- Adhesive residue
- Backing damage
- A visible outline of the former design
This inspection tells you whether the hat is suitable for reuse or whether the area would be better covered by a new design or patch.
How to Remove Embroidery by Hand
For delicate, expensive, vintage, or unusually shaped hats, remove embroidery by hand rather than immediately reaching for an electric stitch eraser.
Manual removal takes longer, but it gives you more control over how much material you cut.
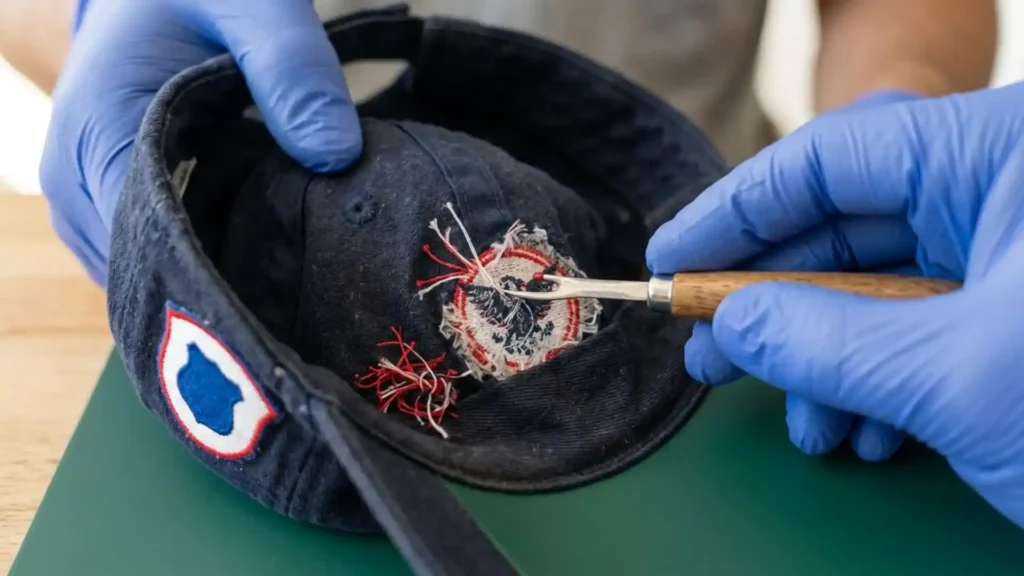
Start from the back, cut a small number of stitches, then check the front. Continue alternating between the two sides so you always know what you are cutting.
This approach is especially useful when the embroidery is close to a seam, brim, thin fabric, or another area where one incorrect cut could permanently damage the hat.
If the embroidery is extremely dense, however, manual removal may become unnecessarily slow. In that situation, an electric stitch eraser can be considered, but only with sufficient visibility and control.
When Should You Stop Removing?
Do not assume that every visible mark needs to be physically removed.
If the remaining mark is a needle track, fabric compression, discoloration, or ghost image rather than thread, continuing to cut will not solve the problem. It may simply create a larger damaged area.
At that point, the better solution may be gentle cleaning, reshaping, repair, or covering the original area with a new design.
When to Use an Electric Stitch Eraser
An electric stitch eraser speeds up machine embroidery removal on large or dense designs, but speed should never compromise the hat fabric.
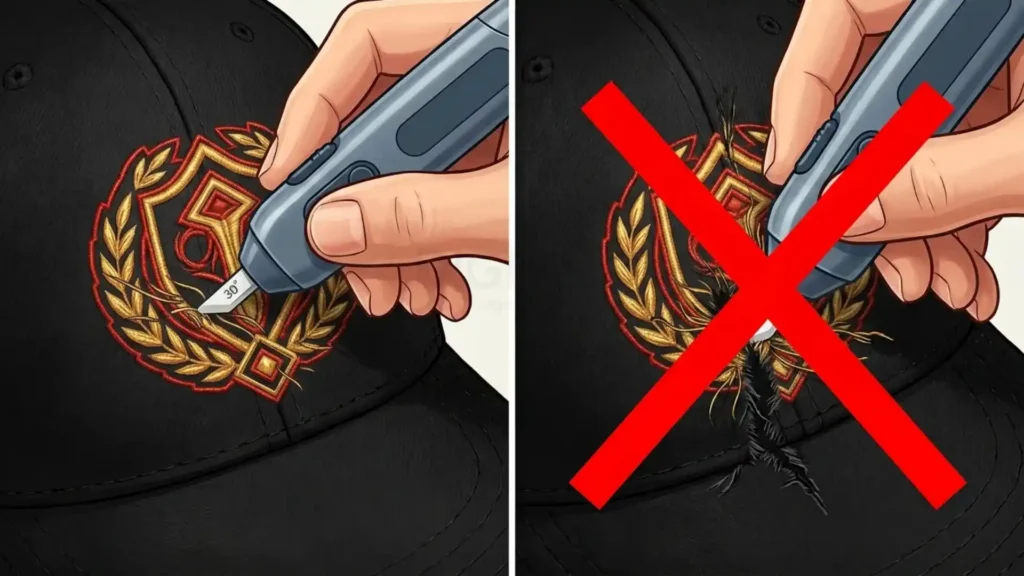
Best Situations for an Electric Stitch Eraser
- Dense machine embroidery on sturdy cotton or polyester hats
- Large logos with closely packed stitches
- Thick embroidery where individual stitches resist seam rippers
When to Avoid It
- Thin, delicate, vintage, or valuable fabrics
- Areas near seams, panel edges, or exposed buckram
- Leather, vinyl, velvet, or specialty materials
Important: An electric stitch eraser cuts stitches; it cannot repair punctured fabric underneath.
How to Remove Different Types of Embroidery from a Hat
Different custom hat embroidery styles require distinct removal techniques.
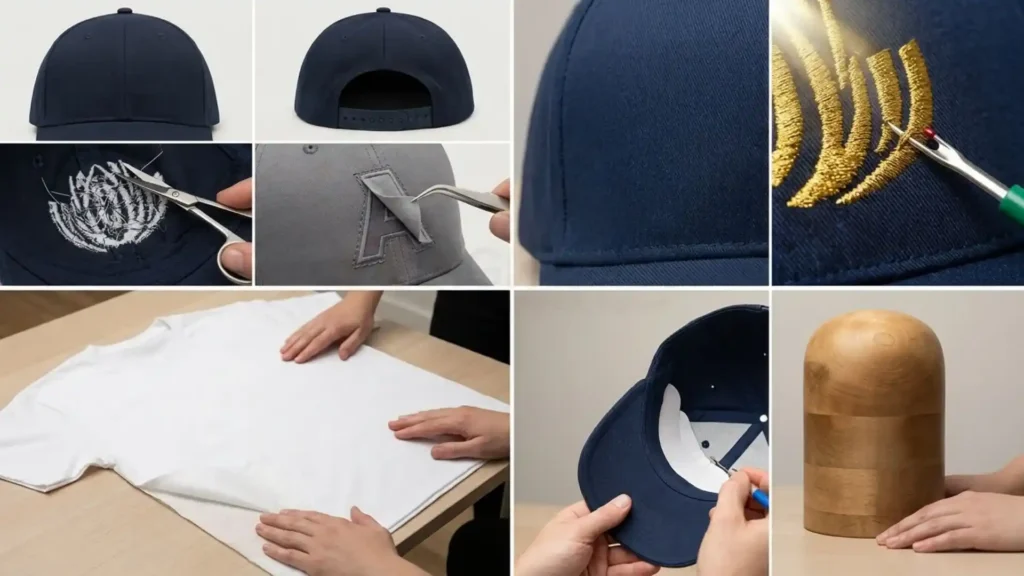
Standard Machine Embroidery
Standard machine embroidery is generally the most straightforward to remove.
Cut the supporting stitches from the back, then loosen and remove the top threads from the front. Work gradually through dense sections rather than pulling large groups of stitches at once.
Dense Embroidery
Dense designs require extra patience because there may be several layers of stitches packed into a small area.
Remove the bobbin stitches and underlay first, then work through the top stitching in sections. Avoid excessive pulling because dense embroidery can leave more noticeable needle tracks or puckering after removal.
Embroidered Patches
A sewn patch is removed differently from embroidery stitched directly into the hat.
Turn the hat inside out and locate the stitches securing the patch. Cut those perimeter stitches carefully, then lift the patch from the front.
If adhesive is also present underneath, remove the remaining adhesive only after testing a suitable cleaner on an inconspicuous area.
Appliqué
Appliqué contains an additional piece of material attached to the hat with embroidery.
Start by cutting the stitches securing the appliqué rather than immediately cutting the fabric layer itself. Once the border stitching has been released, carefully separate the appliqué from the hat.
Do not cut through the hat simply because the appliqué edge is difficult to separate.
Metallic and Specialty Threads
Metallic and other specialty threads can behave differently from ordinary polyester embroidery thread.
Manual removal is generally preferable because you can control each cut and avoid unnecessary abrasion. If the thread is difficult to distinguish from the fabric, work under bright lighting and use tweezers only after the stitches have been released.
Structured Hats
Structured caps need particular attention because they may contain buckram or other stiff materials that help maintain the crown’s shape.
Do not cut deeply into the backing simply to reach a hidden stitch. Support the crown and expose only the section you are working on.
Damaging the buckram can leave the cap permanently distorted even if the embroidery itself is successfully removed.
Unstructured Hats
Keep flexible fabric supported on a rounded form so the crown does not stretch or distort during stitch removal.
Soft, unstructured hats are easier to access but can stretch more easily while you work.
Keep the fabric supported rather than pulling the crown tight. If the material starts to distort around the design, stop and reposition the hat.
Cap Embroidery vs. Shirt Embroidery: Why Removal Is Different
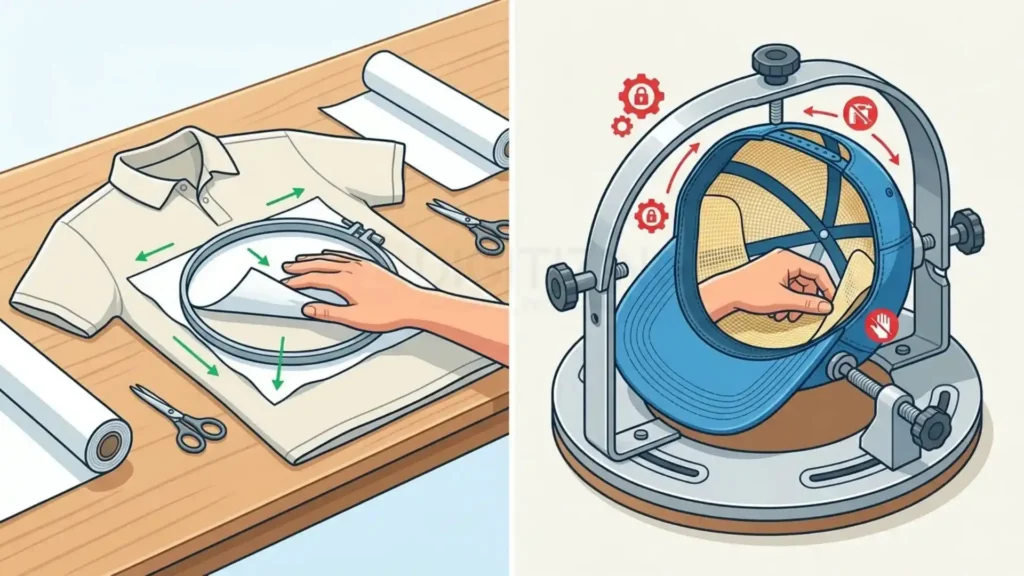
Comparing cap embroidery vs. shirt embroidery comes down to structure, access, and material behavior:
- Flat vs. Curved Working Surface: A shirt lay completely flat for easy access, whereas a cap features a rigid curved crown, heavy panel seams, and tight interior clearance.
- Internal Backing & Buckram: Shirts use soft stabilizer backing, while structured caps feature stiff buckram fused into the front panels that can break or warp if cut too deeply.
- Tension Control: Pulling forcefully on a shirt temporarily stretches the knit or weave, but excessive force on a structured cap permanently distorts the crown’s shape.
To safely remove embroidery from a cap, you must maintain the crown’s shape while working inside a confined space. Always cut the bobbin and underlay stitches from the inside first, and only lift loosened top threads from the front once their connections are completely released.
What Problems Can Appear After Removing Embroidery?
Removing the thread does not necessarily restore the hat to its original condition. The embroidery process has already punctured and compressed the fabric, so the finished result depends partly on the original design and the material underneath it.

Problem | Likely Cause | What to Do |
Needle holes | Repeated needle penetration during embroidery | Stop cutting; small marks may remain permanently |
Puckering | Dense stitching, fabric tension, or pulling during removal | Reshape gently and avoid stretching the area |
Ghost logo | Fabric compression, fading, dirt, or uneven wear | Clean and inspect before deciding whether to cover it |
Loose threads | Remaining top or bobbin stitches | Remove with tweezers after confirming they are no longer attached |
Fraying | Aggressive cutting, pulling, or abrasion | Stop trimming and avoid further disturbance |
Adhesive residue | Patch or adhesive-backed material | Test a fabric-compatible cleaner before treatment |
Damaged buckram | Cutting too deeply into the hat’s internal support | Professional repair or a covering design may be necessary |
Discoloration | Sun exposure, laundering, or different wear beneath the former design | Cleaning may help, but discoloration can be permanent |
Don’t Confuse Thread With Fabric Damage
This is one of the most important points during removal.
If you can still see a faint outline after all the threads are gone, do not keep cutting. The remaining mark may be a needle track, compressed fabric, color difference, or permanent wear rather than leftover embroidery.
Continuing to remove stitches cannot fix those problems and may create new holes.
Instead, inspect the area, gently clean it if the material permits, and decide whether the hat can be restored, repaired, or better used with a new design that covers the affected area.
What to Do After Removing Embroidery From a Hat
Once the stitches are completely removed, do not immediately start washing or applying another design. The fabric needs to be inspected first because removing the thread does not automatically reverse the effects of the original needle punctures.

For anyone learning how to remove embroidery from a hat, the post-removal inspection determines whether the hat can be restored, covered, or retired.
Clean the Area Gently
Use tweezers to pick out remaining thread fragments. If loose fibers remain, gently roll a lint roller over the panel rather than scraping the fabric. If patch adhesive is present, test a mild, fabric-safe cleaner on a hidden interior seam first.
Check for Permanent Marks
Inspect the former design area under direct lighting. Small needle tracks often relax over time, but heavy stitch marks, discoloration, buckram damage, or fabric distortion will remain.
Rule of Thumb: Do not keep cutting or scraping simply because you can still see the ghost outline of the old logo. Once the thread is gone, further cutting will only slice the hat fibers and enlarge the holes.
Restore the Hat’s Shape
If the crown becomes flattened during removal, mount the hat over a rounded form (like a tailor’s ham or small bowl) and allow the fabric to settle. Avoid pressing the area with a hot iron, as concentrated heat can scorch backing materials and permanently set fabric creases.
Can You Cover the Area With a New Design?
If removing the original embroidery leaves visible needle holes or a ghost outline, covering the area with a new design is often much smarter than trying to make the fabric look completely blank.
A new custom hat embroidery design or custom patch can easily mask the former stitching, provided the underlying panel and internal buckram remain structurally sound.
If you plan to replace the design, choosing one of the best hats for embroidery can also make future stitching and removal easier, particularly when the fabric and crown structure are suitable for machine embroidery.
Before stitching a new design, verify:
- The fabric hasn’t frayed or developed tears.
- The crown structure is still rigid.
- All loose bobbin threads and backing fragments are cleared out.
- The replacement design is dense or large enough to overlap the previous needle tracks completely.
If the previous embroidery was excessively thick, avoid stitching another ultra-dense design directly over the exact same spot, as this can weaken the fabric matrix and cause severe puckering.
How Proper Digitizing Solves the Underlying Removal Problem
If you had to go through the painful process of machine embroidery removal because the original logo was clumped, distorted, or ruined the cap, the true issue started before the design ever reached the hat embroidery machine.
When a file isn’t digitized specifically for headwear, embroiderers often encounter thread bunching, misaligned layers, and extreme density that damages the cap.
Precision cap embroidery digitizing prevents removal headaches before production begins by controlling:
- Curved Surface Compensation: Adjusting push and pull settings so stitches lay flat on a 6-panel rounded crown.
- Balanced Density: Ensuring adequate stitch coverage without packing thousands of unnecessary stitches into small areas.
- Cap-Specific Underlay: Using light lattice underlay rather than solid thread blocks that trap seam rippers and tear buckram.
High-quality machine embroidery digitizing ensures your design sews out cleanly the first time, saving your hats from permanent fabric damage.
Prevent Future Embroidery Issues with ZDigitizing
Whether you are replacing a botched logo or preparing a brand-new production run, professional artwork preparation is the single best investment to avoid thread removal disasters.
At ZDigitizing, we specialize in expert embroidery digitizing engineered specifically for structured caps, beanies, and complex apparel:
- Cap-Optimized Files: Custom stitch paths tailored to cap frames and curved panel seams.
- Fast Turnaround: Recognized among the top fast embroidery digitizing services in USA, delivering pre-tested, production-ready files in hours.
- Full-Spectrum Services: From small cap lettering to complex jacket back digitizing services, every file is optimized for seamless sewing.
Final Takeaway
The safest approach for how to remove embroidery from a hat is to work slowly from the inside out: cut bobbin and underlay stitches in small groups, then gently extract top threads from the front using fine tweezers. Always use a rounded support to protect the crown’s shape, and stop cutting the moment all thread is cleared.
For businesses that want to avoid similar production issues with future projects, professional digitizing can help match the stitch structure to the hat and design before embroidery begins. New customers can also receive 50% off their first order at ZDigitizing, providing an opportunity to test the service on an upcoming embroidery project.