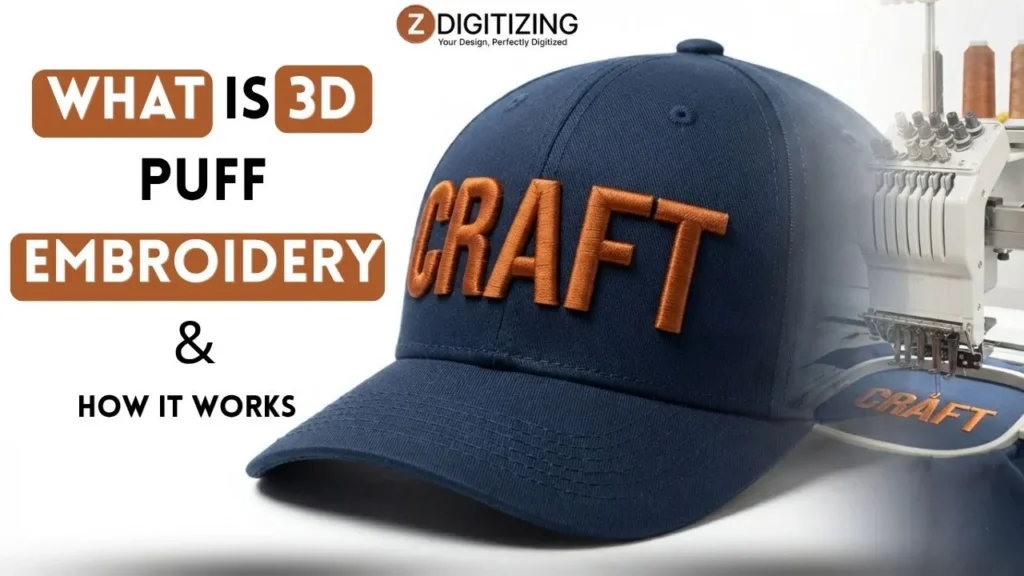
For anyone wondering what is 3d puff embroidery, it is a specialized machine-embroidery technique that creates a raised, dimensional effect by stitching over a layer of foam. The stitches compress and cover the foam, leaving letters, logos, or shapes with visible height and texture. The effect is especially popular on structured caps, where bold designs stand out clearly. Unlike regular embroidery, puff embroidery requires specially planned stitch structures, spacing, sequencing, and foam removal.
What Is 3D Puff Embroidery & How It Works?
How 3D Puff Embroidery Creates a Raised Effect
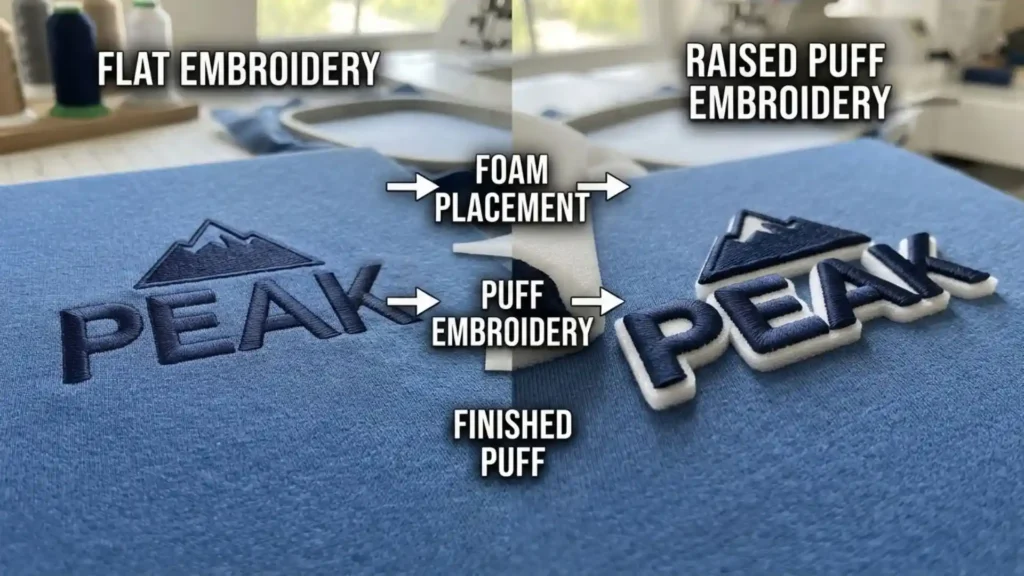
The raised appearance does not come from thicker thread or extra layers of ordinary embroidery. A temporary foam sheet is placed on the surface of the material and stitched over with a specially prepared design.
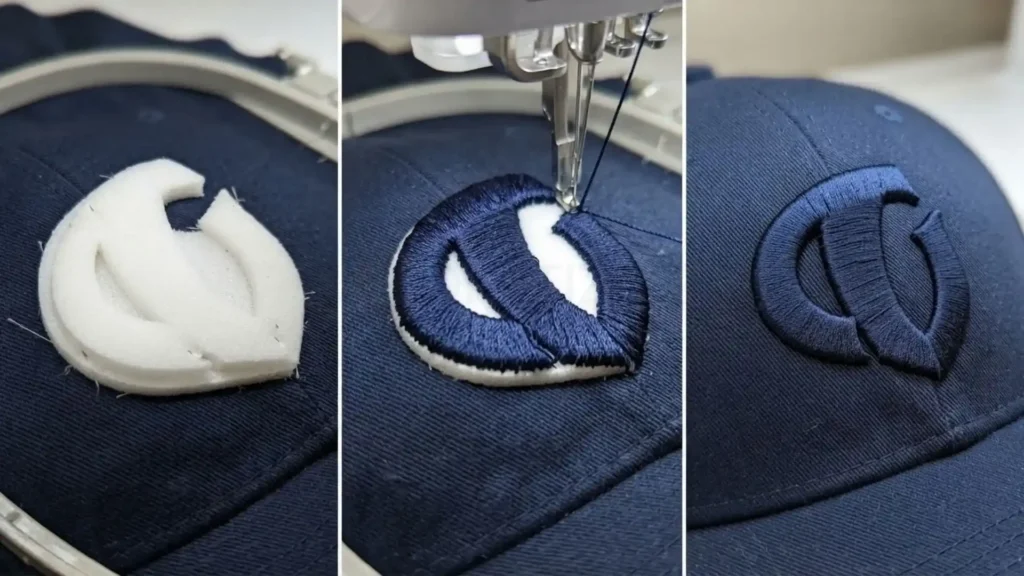
During sewing, the needle penetrates the foam while dense satin stitches cover it. Once stitching is complete, the excess foam around the design is removed. The foam trapped beneath the stitches remains compressed inside the embroidered area, creating the raised surface.
Understanding what is 3d puff embroidery in practical terms requires looking at its six essential production stages:
1. Prepare the artwork
The original logo or lettering is first examined for puff suitability. Bold shapes, short words, initials, numbers, and simple symbols usually translate well.
Very thin lines, tiny details, narrow gaps, and intricate artwork often need to be simplified before digitizing.
2. Create a puff-specific stitch file
The artwork is then converted into machine stitches with the raised effect in mind. Satin columns, stitch direction, density, compensation, borders, and sequencing all need careful control.
This is why understanding how to do puff embroidery starts with the file structure. An ordinary flat embroidery design cannot simply be stitched over foam; the file must be engineered around how foam compresses and expands under high thread tension.
3. Stabilize the material
The cap, garment, bag, or other item is hooped with the appropriate backing or stabilizer. This supports the material and helps control movement during embroidery.
The stabilizer has a different job from the foam. It supports the fabric from behind, while the foam creates the temporary raised structure on the front.
4. Place the embroidery foam
A sheet of 3d puff embroidery foam is positioned over the area that will become raised.
The foam is normally placed on top of the material and held in position while the machine begins stitching. Its color can be selected close to the thread color so that any tiny remaining areas are less noticeable.
5. Stitch over the foam
The machine stitches through the foam and material according to the puff-specific file. Satin stitches compress the foam and form the visible raised columns.
Edge stitching is particularly important because it helps define the shape and makes the foam easier to remove cleanly.
6. Remove the excess foam
After stitching, the foam outside the embroidered boundaries is carefully torn or removed. Small remnants can be cleaned from the design without disturbing the finished stitches.
What remains is a thread-covered raised structure with a distinctly dimensional appearance.
Foam and Stabilizer Do Two Different Jobs
One of the easiest mistakes for beginners is treating embroidery foam and stabilizer as the same material. They are not.
Material | Main purpose | Position during sewing |
Puff foam | Creates the raised height | On top of the material |
Stabilizer/backing | Supports the material and controls distortion | Behind the material |
The foam is part of the physical structure that creates the puff effect. The stabilizer mainly keeps the base material stable while the machine works.
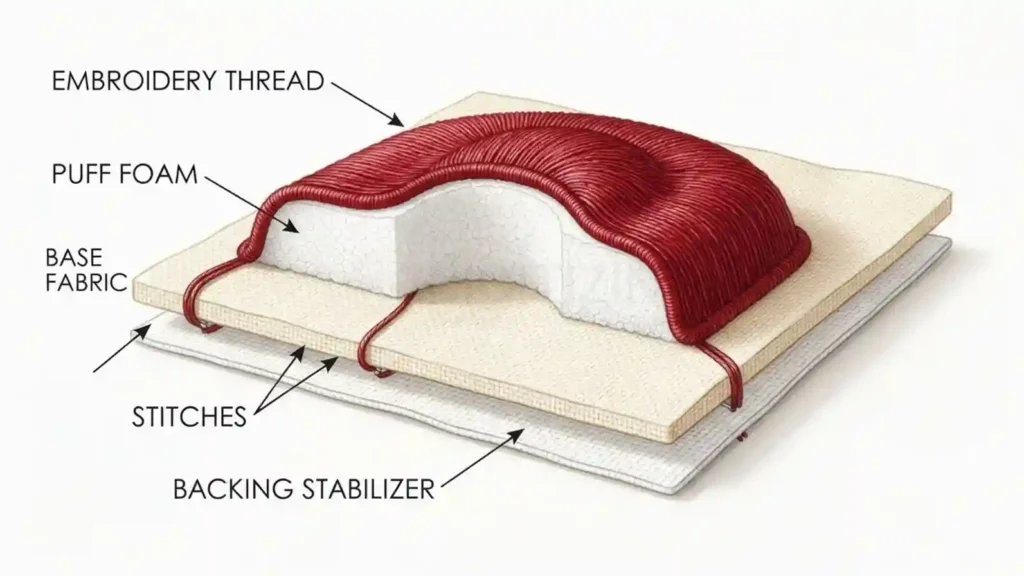
This distinction also explains why simply placing foam beneath a standard embroidery design does not automatically produce clean puff embroidery. The stitch structure has to be capable of compressing and covering the foam properly.
Why Puff Embroidery Needs Different Digitizing
A central concept in what is 3d puff embroidery digitizing is that a design built for flat stitching requires major structural adjustments before it can run over foam.
The main issue is physical space. Raised stitches need enough width to cover the foam, while separate elements need enough clearance to remain visually distinct after the foam is compressed.
A skilled digitizer considers:
- Satin-column width
- Stitch density
- Stitch direction
- Entry and exit points
- Edge coverage
- End caps
- Sequencing
- Push and pull behavior
- Foam removal
- Cap or garment construction
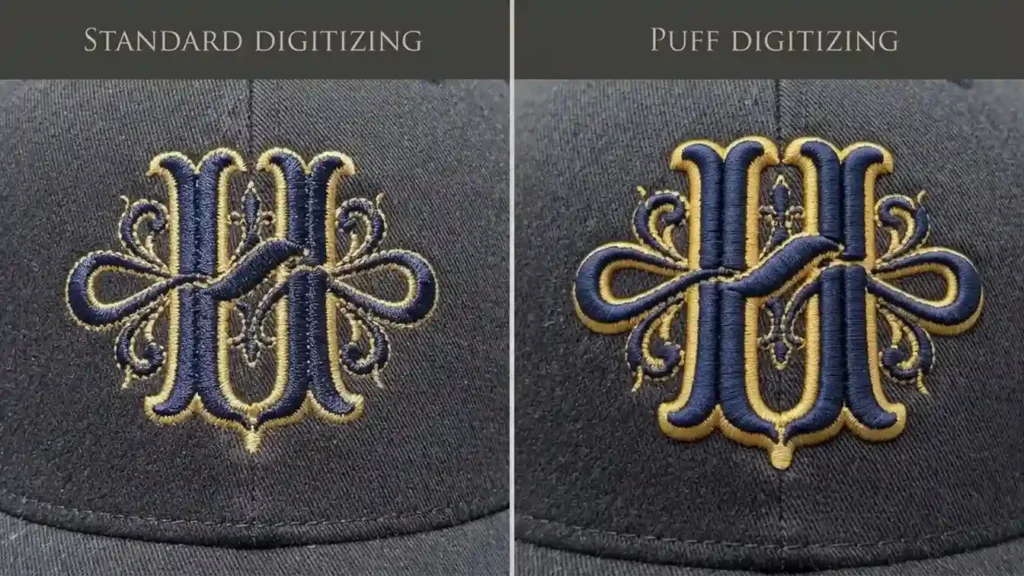
For more complex artwork, Manual digitizing gives the digitizer greater control over these individual elements. Automatic conversion can reproduce the artwork visually, but it cannot reliably make every production decision required for a clean raised result.
This is also where 3d puff embroidery digitizing differs from simply converting an existing embroidery file. The goal is not only to reproduce the artwork. The stitch file must also account for how foam, thread, fabric, and machine movement will behave during production.
Artwork & Logo Characteristics Ideal for 3D Puff Embroidery
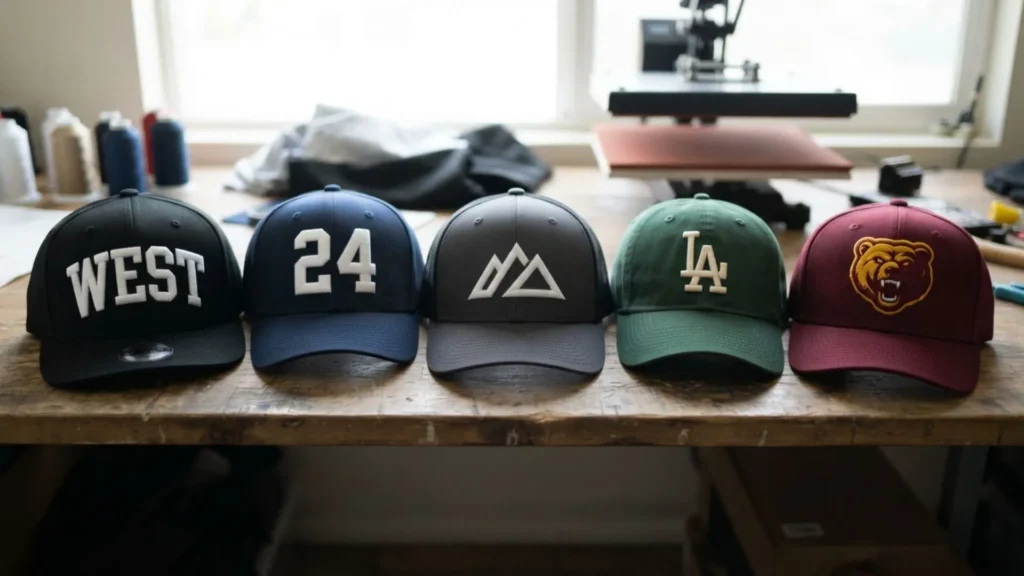
Not every logo is suited to Puff works best when the artwork has enough visual weight for the stitches to cover the foam cleanly.
Strong design choices
Good 3d puff embroidery designs usually include:
- Bold block lettering
- Athletic or collegiate-style numbers
- Short words and initials
- Monograms with open spacing
- Simple geometric symbols
- Thick logo outlines
- Stars, shields, crowns, and similar solid shapes
These designs have enough width for satin stitches to cover the foam without losing their shape.
Designs that need modification
Fine artwork can become difficult when raised. Thin script, tiny lettering, narrow counters, and closely packed details may merge once the stitches compress the foam.
Highly detailed logos may therefore need simplification before production. Removing unnecessary details often produces a cleaner result than trying to reproduce every line at a small size.
The same principle applies to 3d puff embroidery fonts. A font can appear bold on screen but still contain strokes that are too narrow for a clean puff result. The finished stitch geometry matters more than how heavy the letters look in a graphics program.
How to Do Puff Embroidery From Artwork to Finished Stitching
Learning what is 3d puff embroidery workflow in a shop setting involves a six-step process from artwork review to clean foam removal:
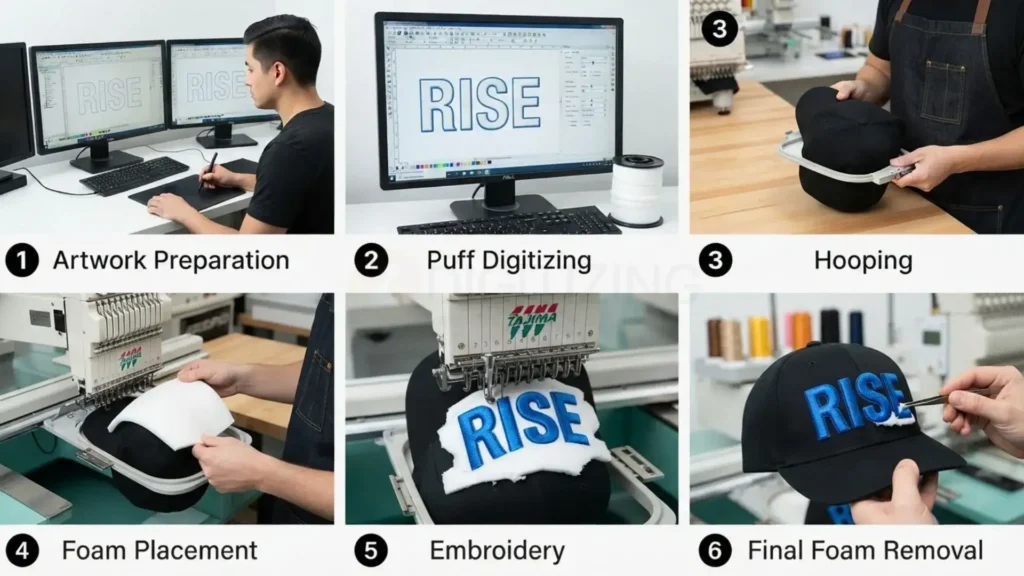
Step 1: Review the artwork
The design is checked for stroke width, spacing, small details, counters, and overall size. Elements that are too fine may be redesigned before digitizing begins.
Step 2: Build the stitch structure
The digitizer converts the artwork into a puff-compatible machine file. Satin columns are planned around the foam, with appropriate stitch direction, density, compensation, and edge coverage.
Step 3: Prepare the product
The item is hooped with suitable backing and positioned correctly. On caps, the curved front panel and nearby seams need particular attention.
Step 4: Position the foam
The embroidery foam is placed over the area that will receive the raised design. The machine then begins the programmed sequence.
Step 5: Stitch the raised elements
The needle penetrates the foam and material while the satin stitches compress and cover the foam. The stitch path also helps define where the excess foam will separate.
Step 6: Remove and clean the foam
After sewing, the exposed foam is torn away around the embroidered shape. Any small remnants are cleaned carefully to reveal the finished raised design.
A test sew-out is valuable when the design, material, foam, or stitch structure is unfamiliar. It can reveal problems before the final production run.
Flat Embroidery vs. 3D Puff: What Changes?
When comparing flat embroidery vs 3d puff, the core distinction lies in structural depth, file programming, and material usage.
Factor | Flat Embroidery | 3D Puff Embroidery |
Surface | Relatively close to the material | Raised above the material |
Main structure | Thread stitched directly into the design | Thread stitched over embroidery foam |
Detail | Better for fine details | Better for bold shapes |
Lettering | Narrower lettering is often possible | Needs wider, well-spaced lettering |
Digitizing | Standard embroidery structure | Puff-specific stitch planning |
Visual effect | Clean and detailed | Raised and tactile |
Common use | Garments, logos, patches, detailed artwork | Caps, bold logos, initials, athletic designs |
Understanding 3d puff embroidery vs regular embroidery goes beyond visual depth, it fundamentally changes digitizing rules:
Width and spacing
Puff elements need wider satin columns so thread can span the foam without pulling too tight. Crowded elements must be spaced farther apart to prevent adjacent columns from overlapping.
Stitch coverage
Density must be increased by 40% to 60% compared to standard flat designs to completely cover the foam underneath and prevent color peek-through.
Sequencing
Stitching order must be strictly planned. Flat elements and background detail are always stitched first before placing the foam to complete the raised foreground layer.
Compensation
Because dense thread compresses foam aggressively, push and pull compensation must be manually adjusted to keep straight lines sharp and circle ends round.
Choosing the Right Product for Puff Embroidery
Structured caps remain one of the most common applications because their front panels provide a stable surface for raised lettering and logos.
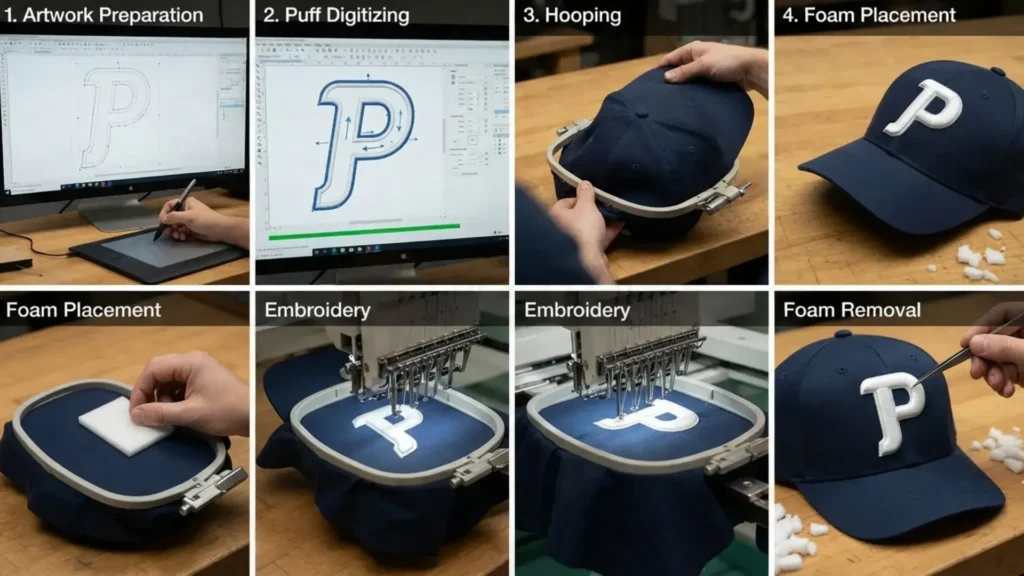
A 3d embroidery cap is particularly well suited to bold logos, team lettering, initials, and short brand names. The raised surface is also easy to notice from a distance.
Puff can also be used on selected garments, bags, patches, and other products. However, the material needs enough stability to support the raised stitches.
Materials that require more caution
Stretchy or lightweight fabrics can allow the design to distort. Soft knits may also make gaps and edges less predictable.
Placement can create another limitation. Seams, pockets, zippers, curved surfaces, and restricted needle access can affect how cleanly the design stitches.
For smaller placements, such as brand logos on polo shirts, space is tightly restricted. Professional left chest embroidery digitizing prioritizes fine detail and clarity, which is why standard flat embroidery is usually preferred over heavy puff foam in small areas.
Puff should therefore be selected based on the design and product together, not simply because a raised effect looks attractive on another item.
Where 3D Puff Embroidery Patches Fit In
3d puff embroidery patches can create a raised version of the same tactile effect without stitching directly onto the final garment.
The patch base still needs enough stability to support the foam and surrounding embroidery. Its border also needs to provide a clean edge around the raised design.
This approach can work well for badges, branding, uniforms, caps, bags, and other products where an attachable patch is more practical than direct embroidery.
The same design limitations still apply. A puff patch does not make thin lettering or highly detailed artwork automatically suitable for raised embroidery.
Does 3D Puff Embroidery Need a Special Machine?
There is no separate machine category that is automatically required for puff embroidery. A compatible computerized embroidery machine can produce puff work when the machine, frame, clearance, file, and production setup are suitable.

Operating a 3d puff embroidery machine requires configuring presser-foot clearance, needle stroke, and thread tension specifically to handle thick EVA foam sheets.
Important considerations include:
- Adequate needle and presser-foot clearance
- Reliable thread tension
- Accurate registration
- A suitable cap frame or hoop
- Programmable stops for foam placement
- Compatible machine-file formats
- Enough working space for the selected design
Industrial embroidery machines from manufacturers such as Tajima, Barudan, and ZSK are commonly used for production embroidery. However, machine capability alone does not determine the result.
The digitized file, material, foam, framing, operator settings, and test sew-out all affect the finished design. When shop deadlines are critical, relying on professional same-day embroidery digitizing services in USA keeps commercial machines running on schedule without sacrificing file precision.
What Makes a Puff Embroidery File Production-Ready?
A core factor in what is 3d puff embroidery digitizing quality is ensuring the file accounts for physical foam compression before it reaches the machine.
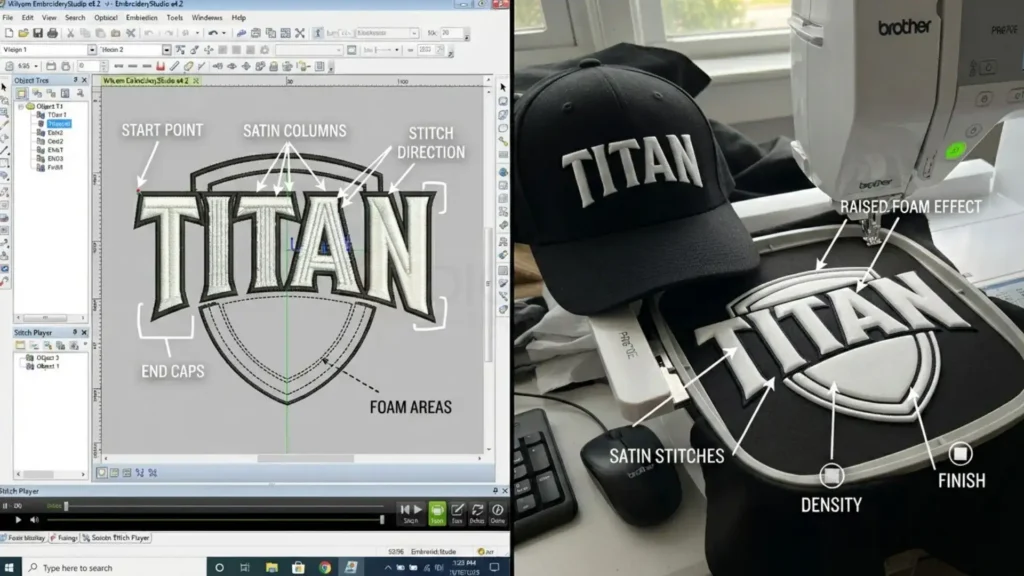
A properly prepared 3d puff digitizing file should consider:
Satin structure
Most raised lettering and outlines rely heavily on satin stitches. The columns need enough width and coverage to compress and conceal the foam.
Spacing
Raised elements need sufficient separation. Tight spacing can cause letters to merge or leave foam trapped between shapes.
Sequencing
The stitch order should allow foam to be placed at the correct stage and removed afterward without trapping unnecessary sections.
Edge control
Borders, edge stitches, bridges, and end caps help define the design and control where the foam breaks away.
Density and stitch length
More stitches do not automatically create better puff. Excessive density can create thread buildup, stiffness, needle stress, or a crushed appearance.
Compensation
The digitizer needs to account for how the material and foam respond to stitching. Settings should be based on the design and production material rather than copied as fixed numbers.
Test sewing
A test sew-out on comparable material can expose gaps, exposed foam, distorted lettering, thread breaks, and registration problems before production.
For custom logos, Custom embroidery digitizing is useful when the artwork needs to be rebuilt specifically for the intended product and puff effect.
Troubleshooting 3D Puff Embroidery: Common Issues & Mistakes
Executing raised designs requires balancing thread tension, foam density, and stitch paths. When a design fails on the machine, it usually stems from identifiable production errors.
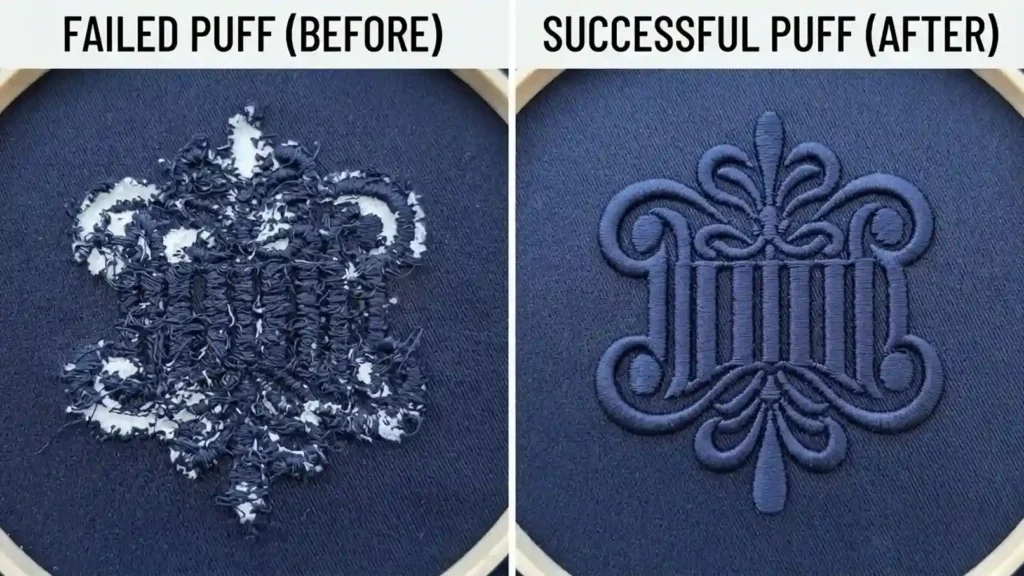
Visible foam and color peek-through
- Cause: Low stitch density, narrow satin columns, or poor edge coverage.
- Fix: Increase density by 40–50% over standard flat settings, widen satin columns, and match foam color to thread color.
Crushed or flattened relief
- Cause: Over-stitching, improper foam density, or using standard flat underlay.
- Fix: Eliminate interior fill underlays, use open border paths, and select 2mm to 3mm high-density EVA foam.
Merged letters and distorted shapes
- Cause: Using un-modified fonts or insufficient spacing between characters.
- Fix: Select specialized 3d puff embroidery fonts designed with wide counters and increased kerning.
Excessive thread breaks
- Cause: Thread tension set too tight, incorrect needle size, or running standard flat embroidery files directly over foam.
- Fix: Use sharp embroidery needles (size 75/11 or 80/12), adjust upper thread tension, and re-digitize the file specifically for puff.
Shifting and registration errors on caps
- Cause: Improper hooping, uncompensated curved surface push/pull, or skipping a test sew-out.
- Fix: Hoop caps tightly on structured cap frames and sequence stitches from the center outward.
How Durable Is Puff Embroidery?
Puff embroidery can hold up well when the design is properly digitized and produced on a suitable material. However, its durability is not automatically higher than flat embroidery.
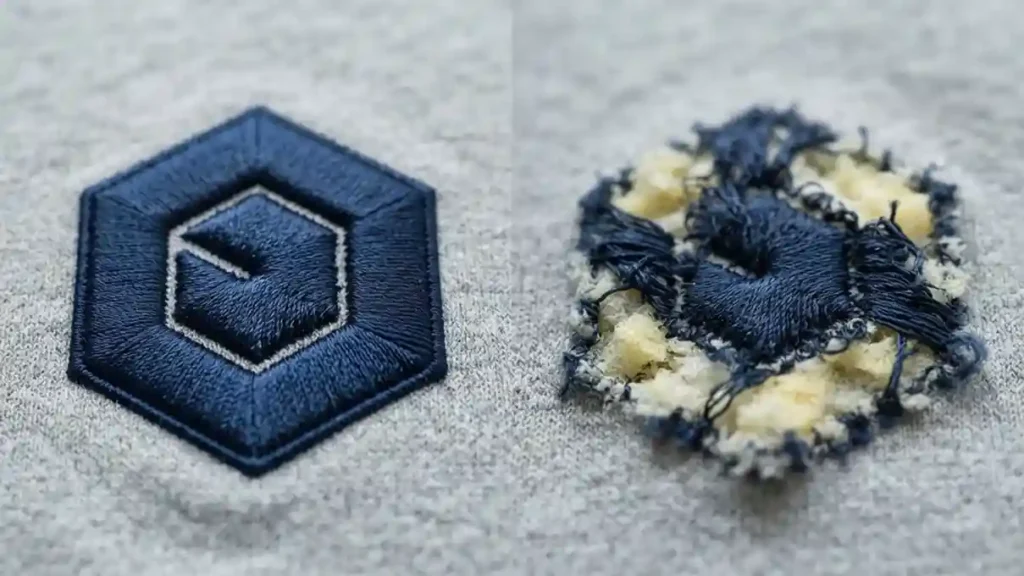
Durability depends on several factors:
- Foam type and quality
- Thread quality
- Stitch coverage
- Base material
- Product construction
- Washing method
- Friction and abrasion
- Placement of the design
- Overall production quality
Raised areas can also experience more contact with the surrounding environment because they sit above the material. Designs used in high-friction areas may therefore need additional consideration.
Care instructions should follow the requirements of the specific garment, thread, foam, and embroidery method rather than relying on one universal washing rule.
Understanding “3D” in Puff Embroidery
The term “3D” can create confusion because not every product described as three-dimensional uses the same technology.
3d puff embroidery creates physical height by stitching thread over embroidery foam.
By contrast, 3d printed hats involve additive manufacturing or printed components made from materials such as polymers. They are not the same as a cap decorated with raised embroidery.
Other terms can also overlap in search results:
- 3d puff embroidery designs: artwork or stitch files intended for raised embroidery.
- 3d puff embroidery fonts: lettering designed with suitable widths and spacing for puff.
- 3d puff embroidery digitizing: the process of creating or modifying a machine file for raised embroidery.
- 3d puff digitizing: a shorter industry term for the same specialized digitizing process.
Understanding these terms makes it easier to evaluate an embroidery service and avoid confusing a visual effect with a specific production method.
What Affects the Cost of Puff Embroidery?
Puff embroidery usually costs more than basic flat embroidery because it adds material, preparation, and production steps.
The final price can depend on:
- Design complexity
- Stitch count
- Number of thread colors
- Product type
- Cap or garment setup
- Foam and backing materials
- Digitizing or file-editing requirements
- Quantity ordered
- Turnaround time
- Whether a test sew-out is needed
A simple bold logo may require less preparation than a detailed design that needs extensive artwork modification.
The important point is that puff pricing should not be judged from foam cost alone. The digitizing, machine setup, product, cleanup, and testing can all affect the total production cost.
When Should You Choose Puff Instead of Flat Embroidery?
The right technique depends on the artwork, product, and visual effect you want.
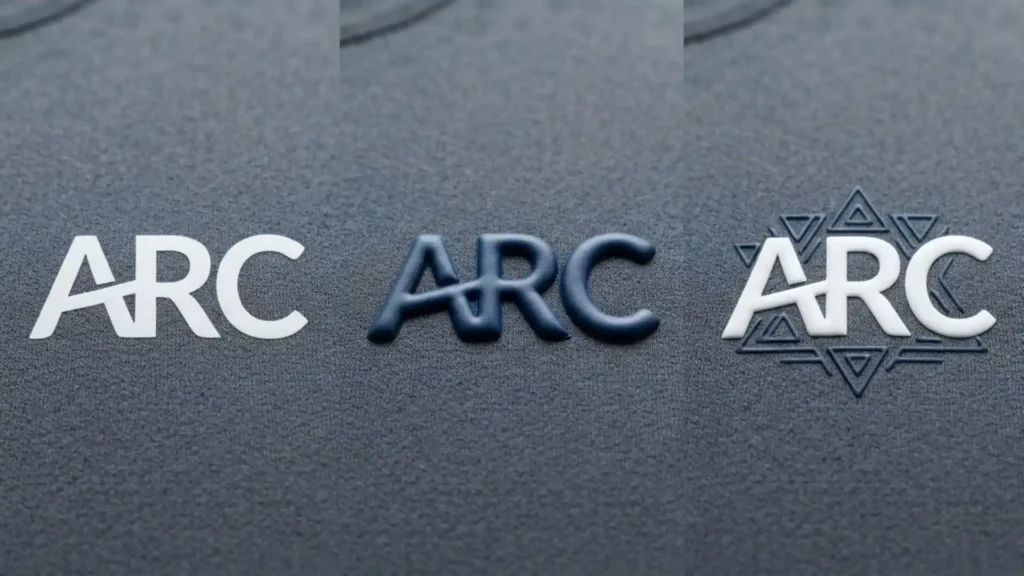
Choose puff when:
- You want a clearly raised, tactile finish.
- The artwork uses bold lettering or simple shapes.
- The design will be viewed from a reasonable distance.
- You are working with a suitable structured product.
- The raised effect is an important part of the visual identity.
Consider flat embroidery when:
- The logo contains fine details.
- Small text must remain highly readable.
- The artwork uses thin lines or intricate shading.
- The product has a soft or highly stretchy surface.
- A lower-profile finish is preferred.
Some designs can also combine flat and raised elements. For example, a bold brand name may use puff while smaller supporting details remain flat.
The decision should start with the artwork and finished product, not with the assumption that one embroidery method is always better.
Why Professional Puff Digitizing Matters
A successful raised design begins before the embroidery machine starts. The digitizer has to translate the artwork into a stitch structure that works with foam, thread, fabric, and the intended product.
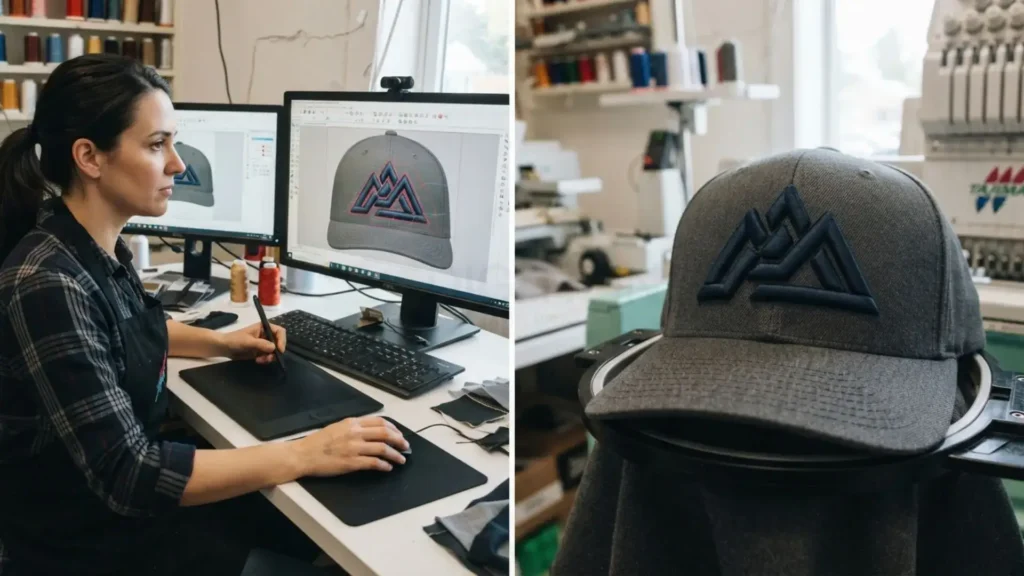
This is where professional 3d puff embroidery digitizing can make a practical difference. The file can be rebuilt around the actual design size, material, stitch structure, and production requirements instead of treating puff as a simple effect.
A quality digitizing process should ultimately produce a file that is ready for testing and production. When tight production deadlines arise, utilizing same-day embroidery digitizing services in USA ensures your stitch files are converted and tested without delaying shop operations.

Engineering Clean 3D Puff Embroidery for Production
Understanding what is 3d puff embroidery comes down to recognizing the physical balance between foam thickness, thread tension, and precise file preparation. While raised embroidery adds tactile depth to caps and heavy garments, its success depends entirely on how satin columns, density increases, and edge caps are programmed before the design reaches the machine.
Skipping proper artwork simplification or running flat files over foam leads to exposed edges, thread breaks, and ruined products. When artwork is carefully simplified and digitized specifically for foam behavior, the resulting embroidery delivers a clean, sharp, dimensional finish that stands out on any product.
New to 3D puff digitizing? Partner with ZDigitizing to get clean, production-ready stitch files engineered for your exact machines, and enjoy 50% off your first order today.