A clean logo can become patchy lettering and crooked outlines when corduroy embroidery meets the fabric’s raised ribs. Add visible hoop rings or repeated thread breaks, and a simple personalized jacket can turn into a frustrating customer order. For embroidery businesses across the USA, these problems can waste both garments and production time. The solution starts with matching the design, backing, topping, and placement method to the fabric.
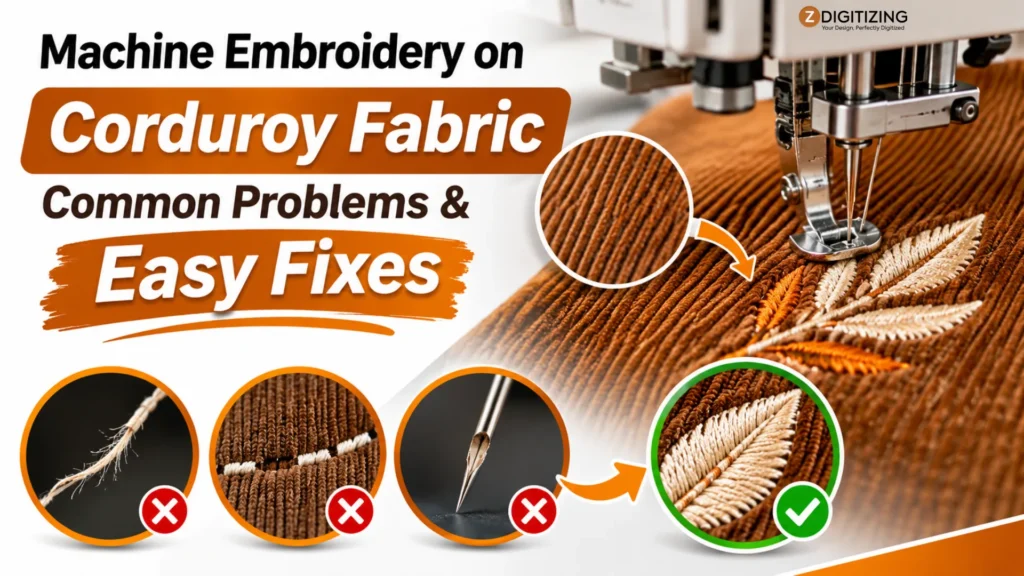
This guide explains the common problems, how to identify their causes, and the practical adjustments to test before stitching your next order.
Machine Embroidery on Corduroy Fabric: Common Problems and Easy Fixes
Why Is Corduroy Difficult to Machine Embroider?
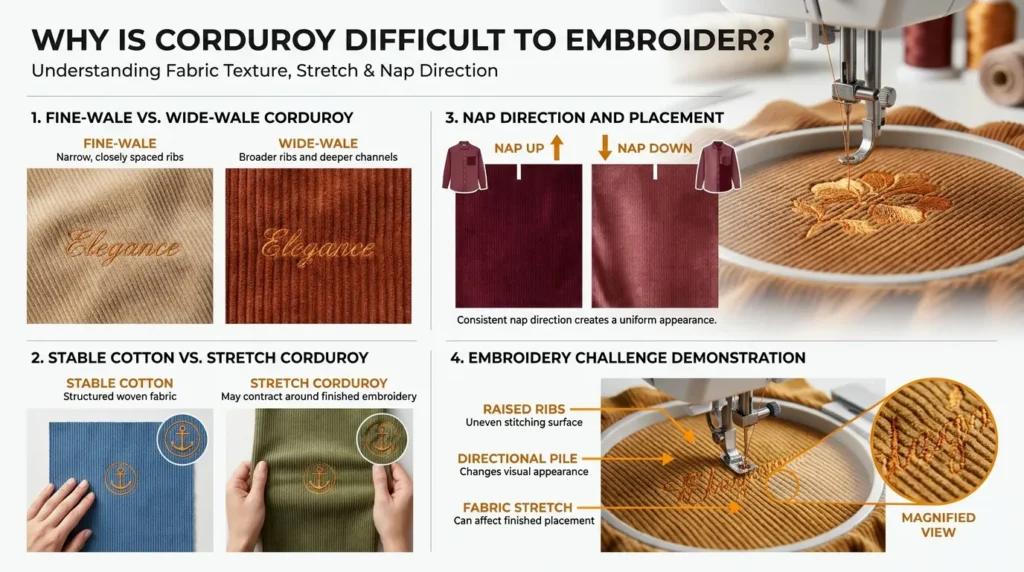
Corduroy has raised ribs called wales, a directional pile, and sometimes stretch fibers. These features create an uneven surface that can hide thin stitches, show pressure marks, or move during embroidery.
Successful corduroy embroidery depends on supporting the fabric underneath and controlling the textured surface above it.
Fine-Wale vs. Wide-Wale Corduroy
Fine-wale fabric has narrower, more closely spaced ribs. Wide-wale fabric has broader ribs and deeper channels that can interrupt delicate lettering and outlines. Fabric thickness matters too: a thick fine-wale garment may still require a different needle and backing combination than a lightweight version.
Stable Cotton vs. Stretch Corduroy
Check the fiber label and gently assess the fabric’s stretch. Stable woven cotton and corduroy containing spandex do not behave identically. Stretch fabric can look smooth while positioned, then contract around the finished design. Avoid choosing backing from the garment’s appearance alone.
Nap Direction and Placement
The pile reflects light differently depending on its direction. Mark the top of each panel and check placement with the garment upright. For USA shops handling matching team or business orders, consistent nap direction helps embroidered pieces look uniform under the same lighting.
What Supplies Do You Need to Embroider Corduroy?
You need backing to support the garment, topping to help control the pile, and a needle and thread combination compatible with your machine. Choose supplies for the actual fabric and design.
A small monogram on stable corduroy needs different support from a large filled logo on a stretch jacket.
Choose the Right Backing
Tear-away can work for stable woven corduroy with suitable designs. Cut-away provides lasting support and is often the better starting point for stretch fabric or demanding designs. Brother’s fabric compatibility chart lists tear-away backing with water-soluble topping for corduroy, so cut-away is not mandatory in every case.
Consider design dimensions, stitch buildup, garment weight, and laundering. For corduroy embroidery, backing should provide adequate support without making the finished area unnecessarily stiff.
Choose a Suitable Topping
Water-soluble topping helps keep stitches above the pile. Sulky Solvy is one example USA readers can consider; Sulky describes its use for preventing stitches from getting lost in napped fabrics.
Check whether the item tolerates water before selecting a removal method. Topping supports the surface temporarily; it does not replace backing underneath.
Match the Needle and Thread
Use the needle system specified by your machine manufacturer. Select the point and size for the fabric, thread, and complete layer combination. SCHMETZ lists Universal or Jeans/Denim 80/12 needles in its corduroy fabric guide, but embroidery machine and thread requirements still apply.
Do not automatically choose a ballpoint simply because the fabric contains stretch. Test a suitable fresh needle first. Madeira Polyneon 40 is a general-purpose polyester embroidery thread option for USA apparel decorators.
Supply | What to Check |
Backing | Fabric stretch, design size, and lasting support |
Topping | Pile height and permitted removal method |
Needle | Machine system, fabric, and thread compatibility |
Thread | Weight, color contrast, and garment use |
Temporary adhesive | Fabric compatibility and product instructions |
Test fabric | Matching weight, texture, stretch, and layers |
How to Prepare Corduroy Before Embroidery?
Check care instructions, finalize the design size, and test placement before starting. Prepare a sample using the same materials as the finished garment.
For corduroy embroidery, a complete test reveals problems that a few trial stitches may miss, including shifting outlines, unreadable lettering, and puckering after the fabric is released.
Check Fabric Care and Shrinkage
Prewash washable fabric when appropriate for the project. For finished customer garments, follow the care label and agreed preparation instructions. Check colorfastness before wetting the visible area. Avoid pressing directly onto the pile, which can flatten the ribs or leave shine.
Choose a Suitable Design
A Corduroy embroidery jacket project usually benefits from clear shapes and lettering with adequate stroke width. Very fine script can disappear into the ribs even when the artwork looks excellent on screen.
Select corduroy embroidery designs around the available space and fabric texture. Bold motifs and suitable appliqué can work well, but large solid fills still need careful planning. Confirm final dimensions before digitizing.
Mark and Secure the Area
Test marking tools on a hidden area. Position the garment without stretching it, and keep thick seams clear where possible. Support a heavy jacket so its weight does not resist hoop movement. Check that the garment’s reverse side cannot accidentally enter the stitching area.
Problem 1: Embroidery Stitches Sink Into Corduroy
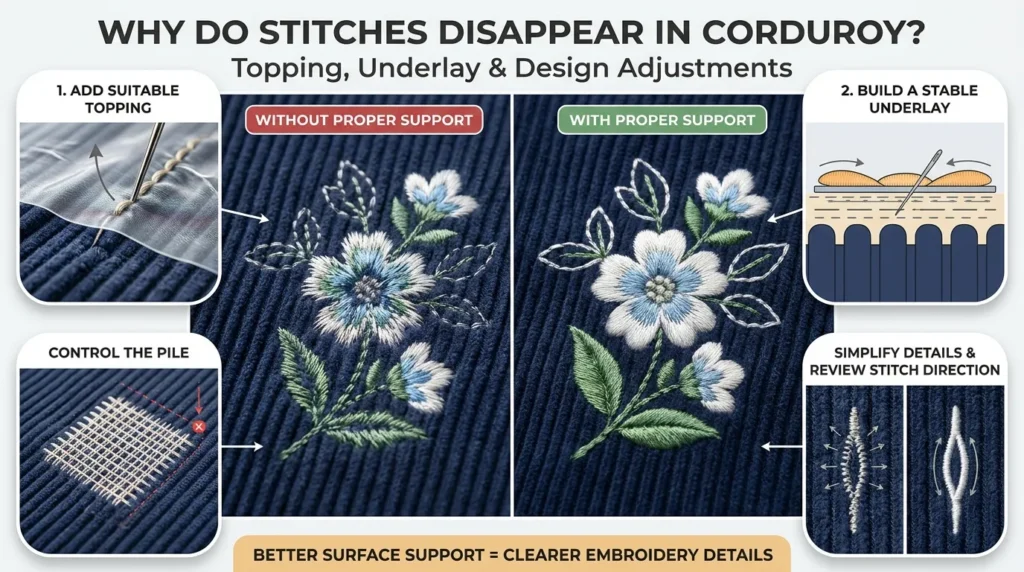
Use suitable topping and review the underlay when stitches disappear between the ribs. A corduroy embroidery design needs enough surface support to remain visible. Increasing density alone can add stiffness and thread stress without fixing narrow details or inadequate support beneath the top stitches.
What the Problem Looks Like
Thin outlines vanish, fabric shows through filled sections, or coverage looks uneven across the ribs. The design may appear acceptable from one angle but patchy from another.
Common Causes
- Missing or unsuitable topping.
- Insufficient underlay.
- Details too narrow for the fabric texture.
- Unsuitable coverage or stitch direction.
Easy Fixes
Add an appropriate topping and test again. Review underlay to establish a stable base beneath satin or fill stitches. A knockdown base can help control pile when appropriate, but keep it within an intentional boundary so it does not show unexpectedly around the artwork.
Simplify details that remain buried. Compare corduroy embroidery patterns at their actual stitched size before committing to a production run.
Problem 2: Small Lettering Looks Blurry or Uneven
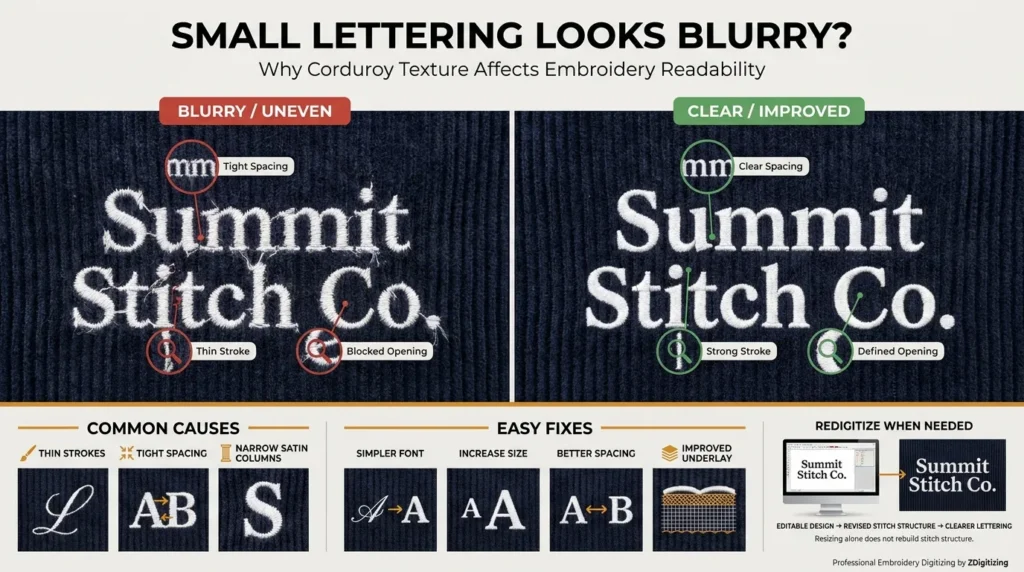
Improve lettering by reviewing its size, stroke width, spacing, and underlay. Small text in corduroy embroidery must bridge the fabric’s texture while keeping letter openings clear. Enlarging the lettering or simplifying the font often helps more than adding stitches to an already crowded design.
Common Causes
Thin scripts, narrow satin columns, and closely spaced characters are difficult on deeply ribbed fabric. Business names and monograms can become unreadable when the pile interrupts their smallest features.
Easy Fixes
Choose a simpler font with stronger strokes. Increase the lettering size if space allows, and preserve enough separation between characters. Test the exact business name rather than a substitute word.
For a corduroy embroidery shirt, confirm that improved readability does not create a logo too large or stiff for the intended placement.
When Redigitizing Helps
Resizing a machine stitch file does not necessarily rebuild lettering correctly. Revise the editable design when stitch structure needs changing. This is where ZDigitizing quality embroidery digitizing can help adapt the lettering, underlay, and sequence to the fabric and finished dimensions.
Problem 3: The Hoop Leaves Rings or Crushed Pile
Prevent hoop marks by testing how the fabric responds to pressure before stitching. Direct clamping can flatten the pile, and some marks may remain. Floating can help protect the surface during corduroy embroidery, provided the garment is securely attached to backing and cannot shift during stitching.

Common Causes
Excessive pressure and prolonged compression can leave a shiny or flattened ring. Even a hoop that works on ordinary woven fabric may mark sensitive corduroy.
Easy Fixes
Hoop suitable backing, then attach the fabric using a compatible method. Follow temporary adhesive instructions and test for staining or residue first. Add a basting stitch where appropriate, considering whether its needle marks will remain visible.
Magnetic hoops also apply pressure, so test them rather than assuming they prevent marks. Release the garment promptly after embroidery.
Can Hoop Marks Be Removed?
Recovery depends on the fabric and severity. If the care label permits, test gentle steaming and light brushing on a hidden area. Avoid direct iron pressure. Do not promise customers that every crushed area can be restored.
Problem 4: Corduroy Puckers Around the Design
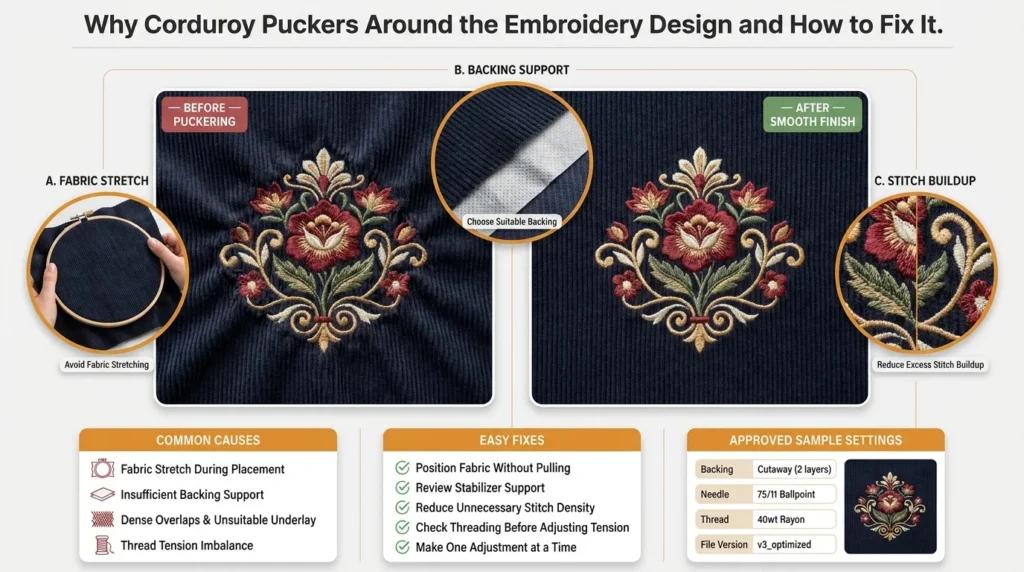
Check fabric stretch, backing support, and stitch buildup before adjusting tension. Puckering in corduroy embroidery can appear after the garment leaves the hoop because stretched fabric relaxes around the stitches.
A successful sample should stay smooth after release, rather than looking flat only while held in place.
Common Causes
- Stretching during placement.
- Backing that cannot support the design.
- Dense overlaps or unsuitable underlay.
- Thread tension imbalance.
Easy Fixes
Reposition the fabric smoothly without pulling it tight. Review backing and reduce unnecessary stitch buildup. Check threading before changing tension, then make one adjustment at a time.
For USA shops preparing repeat orders, label approved samples with the backing, needle, thread, and file version. This makes the successful setup easier to reproduce.
Problem 5: Fabric Shifts and Outlines Do Not Align
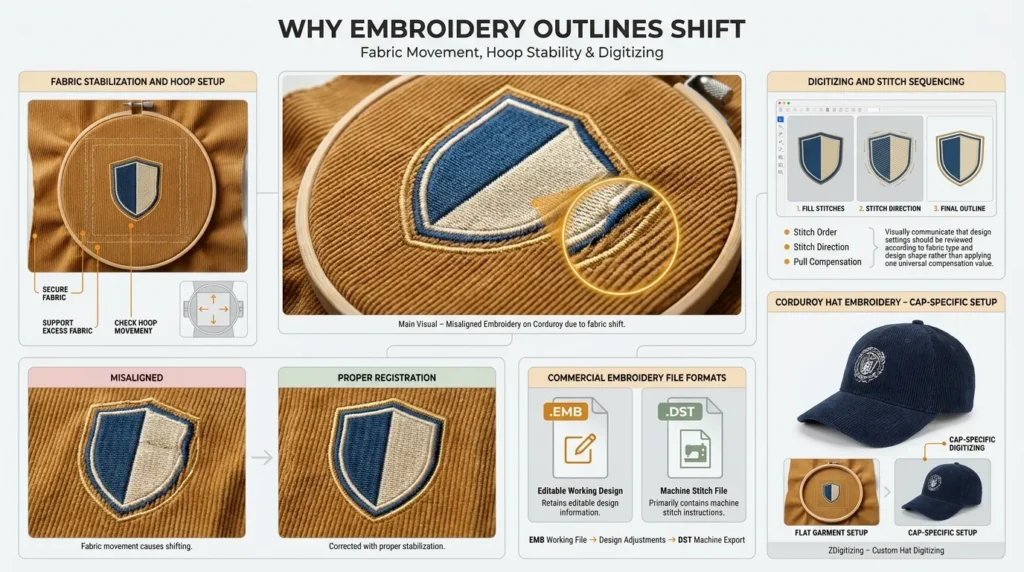
Secure the layers and inspect design sequencing when outlines separate from filled areas. Movement during corduroy embroidery can come from loose attachment, stretch, or garment drag.
Digitizing can also contribute, so compare the stitch-out with the design before assuming every registration problem requires stronger backing.
Common Causes and Fixes
Use a basting box when appropriate, support excess fabric, and check the hoop’s full travel area. If the garment stays secure but gaps persist, review stitch order, direction, and pull compensation in the editable design. Avoid applying one compensation value to every fabric and shape.
Check Commercial Files and Cap Setups
An .EMB file retains editable design information; a .DST file primarily contains machine stitch instructions. Keep the working file for revisions and export a compatible machine file after adjustments.
An embroidery corduroy hat project requires cap-specific checks, including frame compatibility, seams, and embroidery clearance. For corduroy hats custom embroidery, do not assume a flat tote setup will transfer directly.
Appropriate hat digitizing from ZDigitizing should consider the cap’s construction, available stitching area, and production setup.
Problem 6: Thread Breaks, Skipped Stitches, or Broken Needles
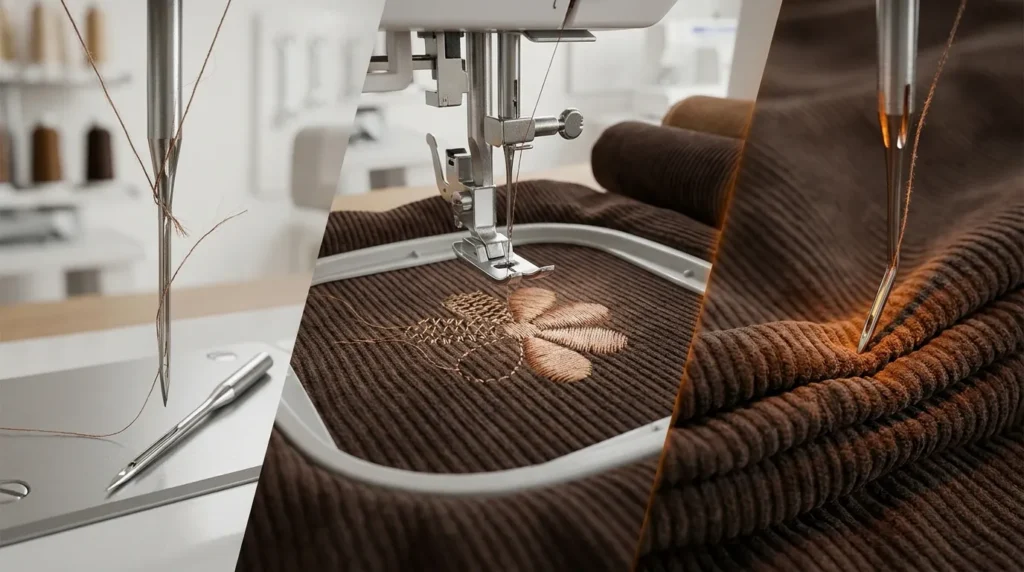
Stop and inspect the needle, threading, bobbin area, and garment clearance before continuing. These symptoms have different causes, so avoid changing several settings at once.
Reliable corduroy embroidery requires the machine to form stitches cleanly through the full layer combination without collisions, excessive friction, or restricted movement.
Thread Shredding or Breaking
Fit a fresh compatible needle and check the thread path for snags. Inspect thread condition and clean accessible lint according to the manual. If stitch quality improves at a lower speed, use that tested setting rather than chasing maximum production speed.
Skipped Stitches
Check needle installation, needle compatibility, and bobbin placement. Inspect whether thick layers interfere with stitch formation. Repeated skipping after basic checks may require machine-specific troubleshooting.
Repeated Needle Breaks
Stop the machine and inspect for collisions, bulky seams, obstructions, or needle deflection. Remove broken fragments before restarting. Follow the manufacturer’s guidance; recurring breakage should not be treated as a speed issue alone.
Step-by-Step Setup for Embroidering Corduroy
Use one repeatable workflow from fabric inspection through sample approval. For corduroy embroidery, the test should match the final garment’s texture, stretch, and layers.
USA embroidery businesses can use this sequence for a 4-inch logo while adapting placement and support to the actual project.
- Inspect the care label, fabric construction, stretch, and nap.
- Confirm design dimensions and placement.
- Select compatible backing, topping, needle, and thread.
- Mark the area with a tested method.
- Secure the fabric without stretching or crushing it.
- Add topping and basting when appropriate.
- Stitch the complete design on matching material.
- Release the sample and inspect coverage, lettering, and registration.
- Adjust the setup or file before stitching the finished item.
Keep technical software measurements, such as stitch length and pull compensation, in millimeters when that matches the software. Use inches for garment placement and design dimensions in customer instructions.
How to Finish Embroidered Corduroy Neatly?
Remove topping gently, clean up the backing, and inspect the fabric after release. Finishing corduroy embroidery should protect delicate stitches and preserve the pile.
Follow both garment care instructions and stabilizer removal directions, especially before applying water, steam, or heat to an unfamiliar customer item.
Remove Topping Without Pulling Stitches
Support the embroidery while removing excess topping. Treat remaining residue according to the product instructions. Use water only if the fabric permits it, and let the area dry before judging its final appearance.
Trim or Remove Backing
Trim cut-away carefully without nicking the garment or stitches. Leave enough support around the design. Support stitched areas when removing tear-away, and avoid pulling aggressively against thin lettering.
Inspect the Finished Order
Check for loose threads, residue, puckering, and pressure marks. Compare placement across garments. The final corduroy embroidery style should look intentional, with readable lettering and clean edges that complement the fabric’s texture.
Quick Troubleshooting Chart
Use this chart to identify the first check for each symptom. For corduroy embroidery, change one variable at a time and compare the results. If the first adjustment does not help, return to the relevant section rather than repeatedly adding density, tightening the hoop, or changing tension.
Problem | Likely Cause | First Action |
Sinking stitches | Pile interrupts coverage | Add topping and review underlay |
Unclear lettering | Text too fine for the texture | Enlarge or simplify lettering |
Hoop marks | Pile compressed by pressure | Test secure floating |
Puckering | Stretching or inadequate support | Review placement, backing, and stitch buildup |
Misaligned outlines | Movement or sequencing | Secure layers and inspect the file |
Thread breaks | Needle, threading, or friction | Replace the needle and check threading |
Needle breaks | Collision, bulk, or deflection | Stop and inspect the setup |
Get Cleaner Corduroy Embroidery for Your Next Order
Clean results come from suitable backing, controlled pile, secure placement, and a design prepared for the fabric. Test the complete design before starting customer garments, and keep a record of successful setups. These habits help USA embroidery businesses produce consistent jackets, shirts, totes, and personalized gifts.
If the artwork needs changes, ZDigitizing offers manual digitizing, quality checks, 24/7 support, and free minor revisions. Share your fabric details, finished embroidery dimensions, and machine requirements so the team can prepare the design around your project.
Send your artwork and corduroy project details to ZDigitizing to discuss your next embroidery order in the USA.
Enjoy a FLAT 30% OFF on your first order right now and try our quality!