Many people believe that how to digitize for embroidery is as simple as clicking a button, but it is actually a careful craft. It is the process of planning exactly how a needle moves across fabric to turn a digital image into real thread. By learning this skill, you gain total control over stitch density and patterns for professional results every time. This ensures your final design looks sharp, stays durable, and runs smoothly on any machine.
How to Digitize for Embroidery in USA?
What Does Digitizing for Embroidery Mean?
When you learn how to digitize for embroidery, you are essentially translating a picture into a language that a sewing machine can read. Standard image files like JPGs or PNGs don’t tell a machine where to start or stop, so you must create a digital “path” for the needle to follow.
This process is especially important when digitizing logos for embroidery because logos often have sharp corners and small text that require specific stitch types. By mapping out every stitch, you ensure the design stays flat on the fabric and looks exactly like the original artwork.
Free vs Paid: Choosing the Best Embroidery Digitizing Software
Picking your software is one of the most important steps in learning how to digitize for embroidery. This decision affects how much control you have over your designs and how fast you can work. There are both free and paid options, and each has its own benefits and limits.
Beginners usually start with free tools to learn the basics. Later, many upgrade to paid versions for better features, easier workflows, and customer support. Professional shops often buy high-end packages because the consistent quality and speed help them make more money in the long run.
Top Free Embroidery Digitizing Software
Top Free Embroidery Digitizing Software
If you are just starting and don’t want to spend money yet, free tools are a great way to experiment. They allow you to turn artwork into basic stitch files. However, they often lack advanced settings like “pull compensation” (which stops fabric from bunching up).
Ink/Stitch: This is an open-source plugin for the free drawing program called Inkscape. It offers strong capabilities, but it requires time and practice to master.
SophieSew: A basic program for Windows that is good for learning how to place stitches manually.
Embird (Basic Demo): While not fully free forever, its basic manager helps you view and organize designs.
Using these tools is a low-risk way to practice how to digitize for embroidery before you decide to invest in professional software.
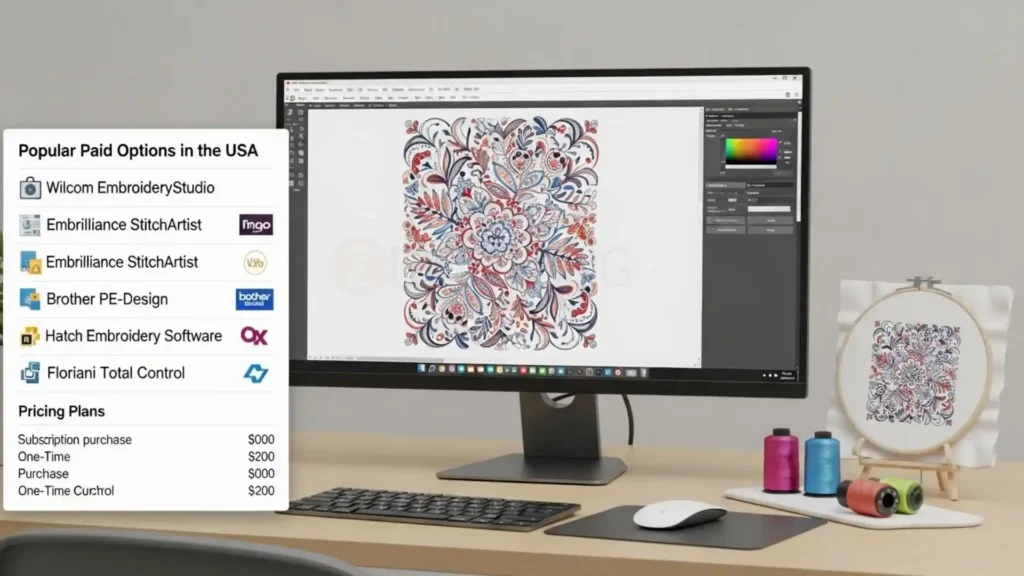
Popular Paid Options in the USA
Popular Paid Options in the USA
Paid programs usually have a cleaner look and better tools for making complex designs. Many of these offer different “levels” so you can buy a basic version now and upgrade later. Knowing how to digitize for embroidery with professional tools can save you hours of frustration.
Software Name
Best For
Estimated Price (2026)
Embrilliance Essentials
Beginners & Mac Users
$149 – $189
Chroma Inspire
Small Businesses
$560+
Hatch Embroidery 3
Advanced Hobbyists/Pros
$1,099 (or $99/mo)
Brother PE-Design 11
Brother Machine Owners
$1,700 – $1,957
Wilcom EmbroideryStudio
Large Commercial Shops
$3,000 – $4,000+
Computer Specs and Graphics Tools
Most modern computers can run these programs without any trouble. You should have at least 8GB of RAM so the software doesn’t lag while you work. It is also helpful to have a “vector” drawing program like Adobe Illustrator or CorelDRAW. These tools let you clean up your logos and simplify shapes before you start the actual how to digitize for embroidery process.
Understanding Embroidery Stitch Types and Core Concepts
Once you have chosen your software, you need to understand the different “building blocks” of a design before you start stitching.
Before you begin the actual how to digitize for embroidery process, you must learn which stitches handle small details and which ones cover large areas. Using the wrong stitch can make your fabric pucker or cause the thread to break while the machine is running.
Here are the core stitch types every beginner should know:
Understanding Embroidery Stitch Types and Core Concepts
Satin Stitch: This is the most common stitch for text and borders. It looks like a smooth, shiny line where the thread wraps from one side to the other. It is perfect for digitizing logos for embroidery when you have narrow columns.
Fill (Tatami) Stitch: When you have a large shape, like a big circle or a background, you use a fill stitch. It consists of rows of small stitches that “fill” the area so the fabric doesn’t show through.
Running Stitch: This is a single line of thread, similar to a standard sewing machine stitch. It is used for fine details, outlines, or moving the needle from one part of the design to another.
Underlay Stitch: These form a hidden base layer that supports the fabric and prepares it for the final stitching.
Manual Stitch: This gives you total control because you place every single needle point yourself. While it takes longer, it is the best way to handle very tiny details.
Mastering these basics is a huge part of understanding how do I digitize for embroidery, because it allows you to plan your design’s texture and strength before you ever touch a needle.
Understanding the Language: Embroidery File Formats
Just like a computer needs specific files to open photos, your sewing machine needs its own digital language to understand your artwork. Learning how to digitize for embroidery is only effective if you save your hard work in the correct format for your specific machine brand.
When you finish the creative part of the process, you must export your design correctly so the machine can read the stitch commands.
Understanding these extensions is a vital part of digitizing process for both home and commercial use.
Understanding the Language Embroidery File Formats
.DST: The universal standard for commercial machines (like Tajima or Barudan).
.PES: The most common format for Brother and Baby Lock home machines.
.EXP: Primarily used by Melco and Bernina commercial machines.
.HUS: The specific language for Husqvarna/Viking machines.
Step-by-Step: How to Digitize for Embroidery (Beginner Friendly)
It starts with simple steps anyone can follow. These steps work for logos, text, or basic designs on shirts or hats. You will use your software to turn a picture into stitches that your machine understands.
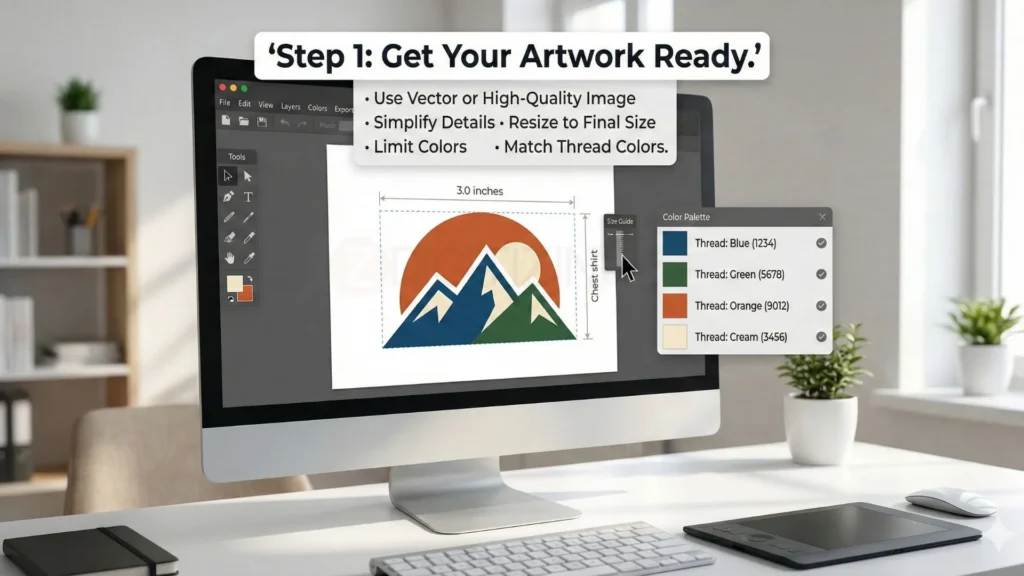
Step 1: Get Your Artwork Ready
Get Your Artwork Ready
Pick a clear image or logo to start. Use a vector file if you can, like SVG, or a sharp PNG/JPG. Make it simple, remove tiny details that won’t show in stitches, because how to digitize for embroidery needs clean lines.
Open the image in a free tool like Inkscape or GIMP.
Clean up colors to 4-6 max (less is better for beginners).
Resize to your final size, like 3 inches wide for a shirt logo.
Save as high quality and note the colors for thread matching.
This prep makes the embroidery digitizing process smooth from the start.
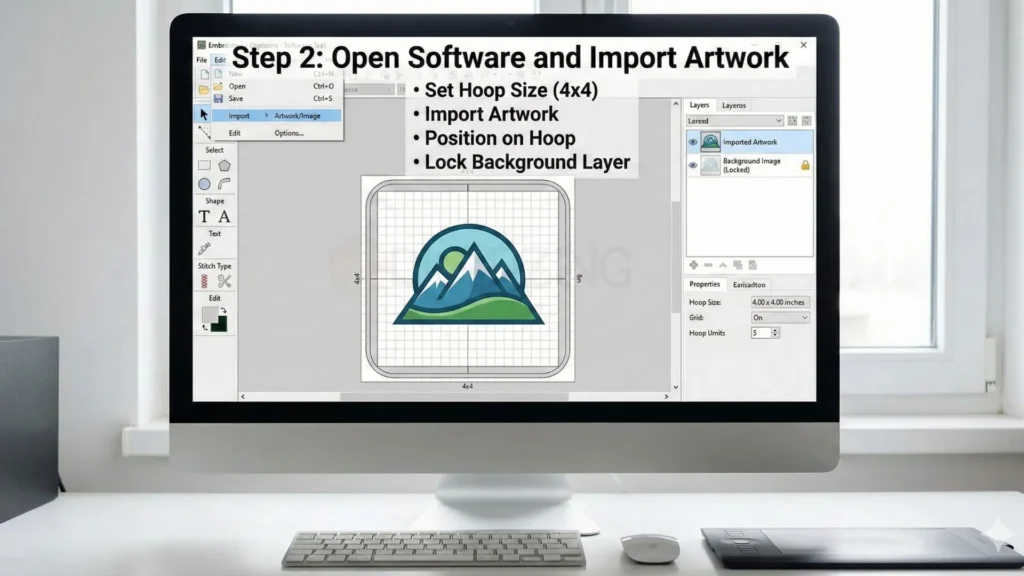
Step 2: Open Software and Import Artwork
Open Software and Import Artwork
Load your embroidery digitizing software, like a free one or a trial version. Start a new design and set the hoop size for your machine, such as 4×4 inches.
Import (drag or File > Import) your cleaned artwork.
Place it where you want on the hoop.
Lock the background layer so you don’t move it by mistake.
Now you see your image ready for stitches.
Step 3: Draw Shapes and Add Basic Stitches
Draw Shapes and Add Basic Stitches
How to digitize for embroidery means breaking the design into stitch areas. Use easy tools in your software.
Trace outlines with the running stitch tool (thin line stitch).
For letters or borders, pick satin stitch (smooth, shiny columns).
For big areas like stars or fills, use fill stitch (covers space).
Match colors: click a shape, pick a thread color from the chart.
Embroidery digitizing techniques here are simple: start with outlines, then fill inside. Keep stitch lines going the same way for a smooth look.
Step 4: Set Stitch Settings for Good Results
Set Stitch Settings for Good Results
Every stitch needs rules so it sews nicely. Adjust these one area at a time.
Density: How tightly stitches pack. Start at 0.4mm for fills (not too tight).
Underlay: Add light stitches first under heavy areas. Pick zigzag for most fabrics.
Pull compensation: Make shapes 5-10% wider so they don’t shrink when sewn.
Stitch length: 3-5mm for running, auto for satin.
Test one small change, like density, then preview. How to digitize for embroidery works best when you tweak slowly.
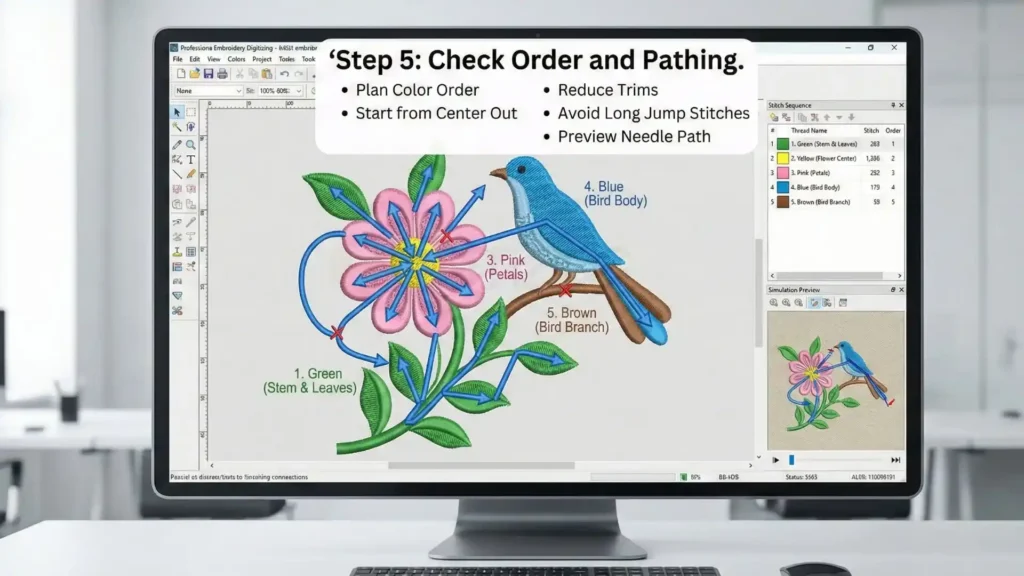
Step 5: Check Order and Pathing
Check Order and Pathing
Machines sew in order, so plan the path smartly.
Color order: Sew lightest colors first, or group same colors together.
Path: Start from the center, go out. This cuts trims (thread cuts).
Avoid jumps: Connect shapes when you can.
Preview the stitch path, which shows a line how the needle moves. Fix long jumps over empty space.
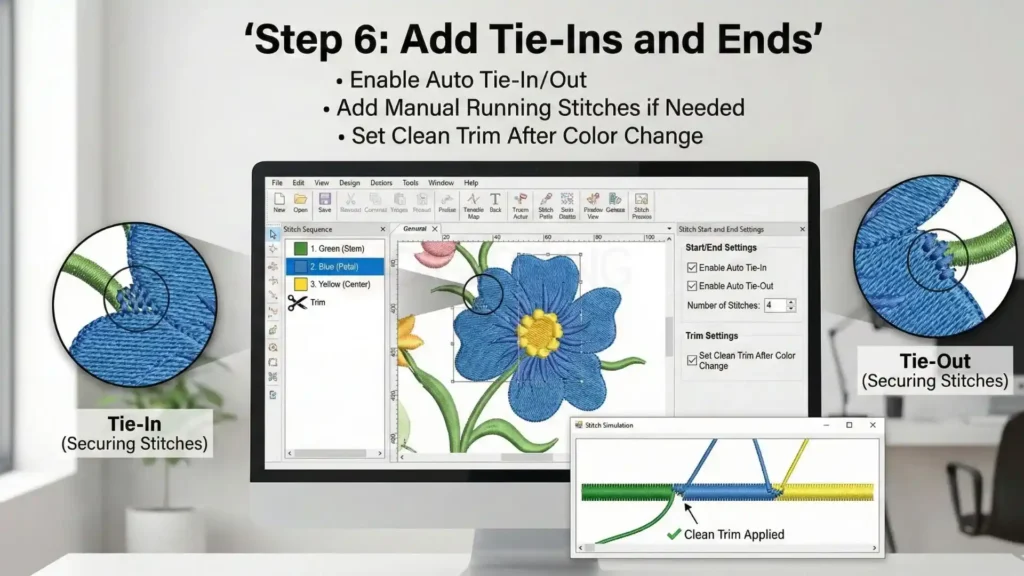
Step 6: Add Tie-Ins and Ends
Add Tie-Ins and Ends
Stop thread breaks with good starts and stops.
Auto tie-in/out: Most software adds 3-5 tiny stitches.
Manual: Add running stitches at start/end of each color.
Trim settings: Set to cut thread clean after color change.
Step 7: Save and Export the File
Save and Export the File
Time to make the machine file.
Save project file (.emf or software format) for edits later.
Export as your machine format: PES for Brother, DST for shops, JEF for Janome.
Name clear: “logo_shirt_3inch.pes”.
How to digitize for embroidery ends with the right file ready to sew.
Step 8: Test Stitch on Scrap Fabric
Don’t skip this!
Hoop scrap fabric like your real shirt (same stabilizer).
Load file, match threads, sew slowly first.
Look closely: Gaps? Too puckery? Letters wonky?
Go back to Step 3, fix, re-export, re-test.
Good tests save your good shirts. Now you know how to digitize embroideryfor real jobs.
Quick Tips for First Time
Start small: 2×2 inch logo max.
One fabric: Practice on cotton polo first.
Watch free YouTube for your software.
30-60 minutes per simple design to learn.
Follow these, and your first design will look pro. Practice makes it fast!
Manual vs Auto Digitizing and AI Embroidery Digitizing
How to digitize for embroidery can use manual work, auto tools, or AI digitizing; each has good and bad points. Pick based on your design, time, and skill level to get clean results. This section compares all three so you choose smart.
Type
Best For
Pros
Cons
Time Needed
Best Tools
Manual Digitizing
Complex logos, small text, tricky fabrics like stretch knits
Full control over every stitch; perfect density and pathing; no auto errors
Slow; needs skill and practice
30-90 min per design
Wilcom, Hatch Stitch Artist, Embrilliance
Auto Digitizing
Simple shapes, quick tests, basic fills
Fast setup from image; good for beginners
Often too dense; bad pathing; ignores fabric pull
2-5 min + edits
Built-in auto in most software like PE-Design
AI Embroidery Digitizing
Medium designs, batch jobs, modern workflows
Smart guesses on stitches; learns from data; handles colors well
Still needs human fixes; weak on tiny details; software cost
5-15 min + tweaks
Hatch AI tools, Chroma auto-digitize, cloud AI services
Business, Pricing, and Legal Rules in the USA
As you get better at how to digitize for embroidery, you need to learn about the business side of things. Even if you are just making designs for yourself right now, you might work with other people’s logos in the future.
Knowing the rules helps you stay out of trouble and makes you look like a pro. It also helps you understand why some people charge money for their work and how you can do the same if you want to start a small business.
Who Owns the Design?
When you learn how to digitize for embroidery, you are the creator of the stitch file. Usually, the person who makes the file owns it unless they sell it to someone else. Some shops make a design for a customer but keep the file so the customer has to come back to them for more sewing. Other shops let the customer buy the file to keep. It is a good idea to decide on your rules before you start working with others.
Rules for Famous Logos
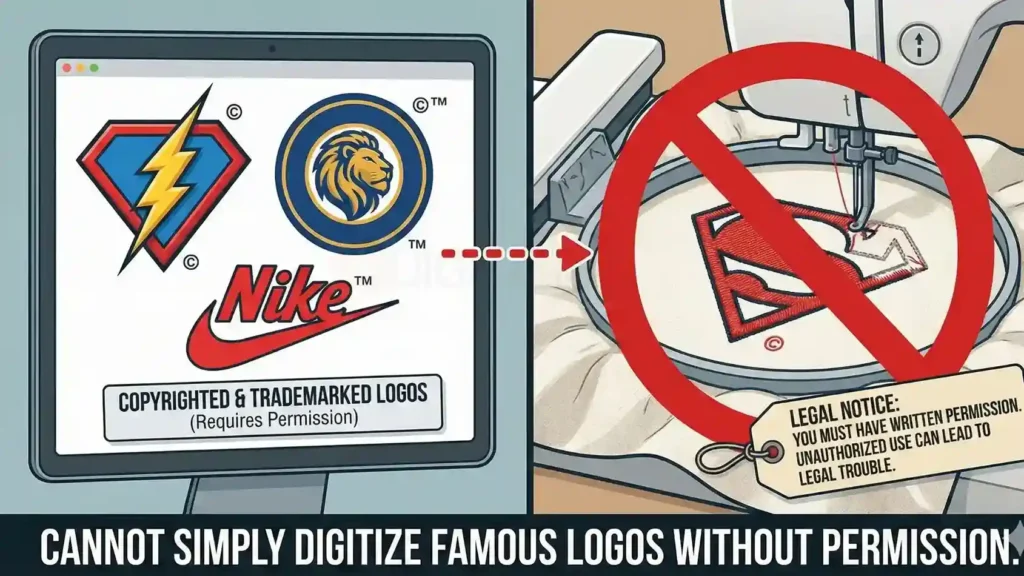
Rules for Famous Logos
You cannot just take a famous logo, like a superhero or a sports team, and turn it into an embroidery file. In digitizing in usa, those designs belong to the companies that made them. You must have written permission to use them, or you could get into legal trouble. Always ask for permission before you start a project for a big brand.
How Much Does it Cost?
The price for making these files can change based on how long it takes and how many stitches are used. For example, a professional patch digitizing service might charge a different price because patches need a very thick border to stay strong. In the USA, most people charge between $10 and $50 for a simple logo. If a design is very big or has a lot of tiny details, it will cost more because it takes more time to get it right.
DIY vs Outsourcing Digitizing in the USA
Deciding whether to do the work yourself or hire a professional is a major turning point when learning how to digitize for embroidery. While doing it yourself gives you total creative freedom, it also comes with many technical challenges that can be frustrating for beginners.
DIY vs Outsourcing Digitizing in the USA
If you choose the DIY route, be prepared for a steep learning curve. You might spend hours trying to fix thread breaks or designs that don’t line up because the fabric stretched. Many people find that how to digitize for embroidery requires months of practice before the results look good enough to sell. If you are in a hurry, these complications can lead to wasted fabric and lost time.
Why Outsourcing is a Smarter Move?
For many people in the USA, outsourcing is the best way to get perfect results without the headache. Whether you need a custom embroidery digitizing services in UK or a reliable partner in the USA, professional digitizers have the skills to make sure your machine runs smoothly.
By letting experts handle the “Stitch Map,” you avoid the mistakes that happen when you are still learning how to digitize for embroidery. This lets you focus on sewing and selling while knowing your files are ready for production.
Get Professional Help with ZDigitizing
If you want the best quality without the stress of learning hard software, ZDigitizing provides professional embroidery digitizing services to make your work easier. With over 10+ years of experience, our team offers expert digitizing that makes sure your designs look perfect on any fabric. We know your time is valuable, so we have a 24/7 working team and 24/7 customer support ready to help you anytime.
At ZDigitizing, quality is guaranteed, and we provide a preview before payment so you can be sure you love it. If you need a small change, minor edits are free, and our prices are already lower than the market. To help you get started, we are offering 50% OFF on your first order for all new customers.
Experience premium embroidery digitizing quality today! Visit ZDigitizing to place your first order and get 50% OFF now.
Are you looking for embroidery digitizing and vector art services at low cost with superfast turnaround, guarranted quality and preview before pay? So, you are at right place. We can digitize and vectorize any type of artwork in your required file format.