Modern fabric decoration has evolved with laser embroidery, a technique that uses precise laser technology to create detailed designs directly on fabric without traditional stitching. It eliminates common embroidery challenges such as thread breaks, slow production, and limited design detail while delivering fast and accurate results. In this guide, you’ll learn how it works, its benefits, costs, and the best applications for different projects.
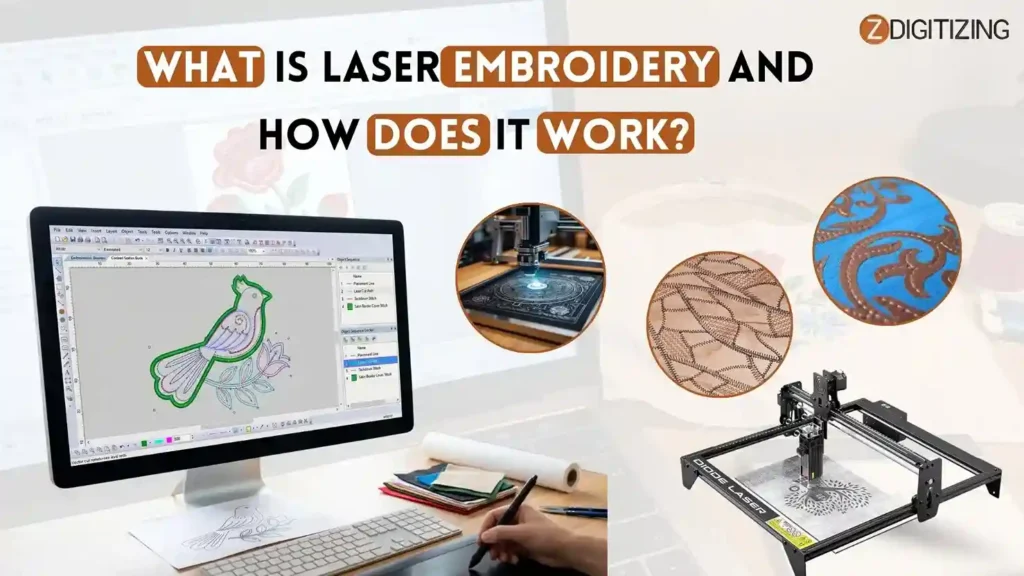
What Is Laser Embroidery and How Does It Work?
What Exactly Is Laser Embroidery?
This embroidery combines laser technology with fabric decoration to create detailed patterns, textures, and designs directly on textiles. Instead of relying only on needles and thread, it uses a laser beam to cut, engrave, or shape fabric with high precision.
Types of Laser Techniques
It includes several techniques that use laser technology to decorate fabrics in different ways. Each method offers unique effects, from engraved textures to precisely cut applique designs.
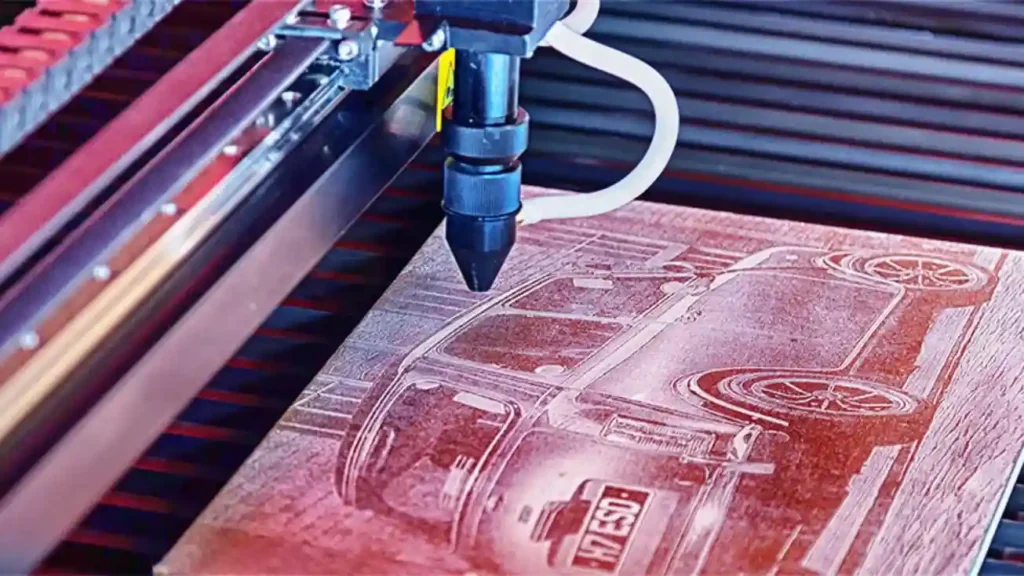
1. Laser Engraving Embroidery
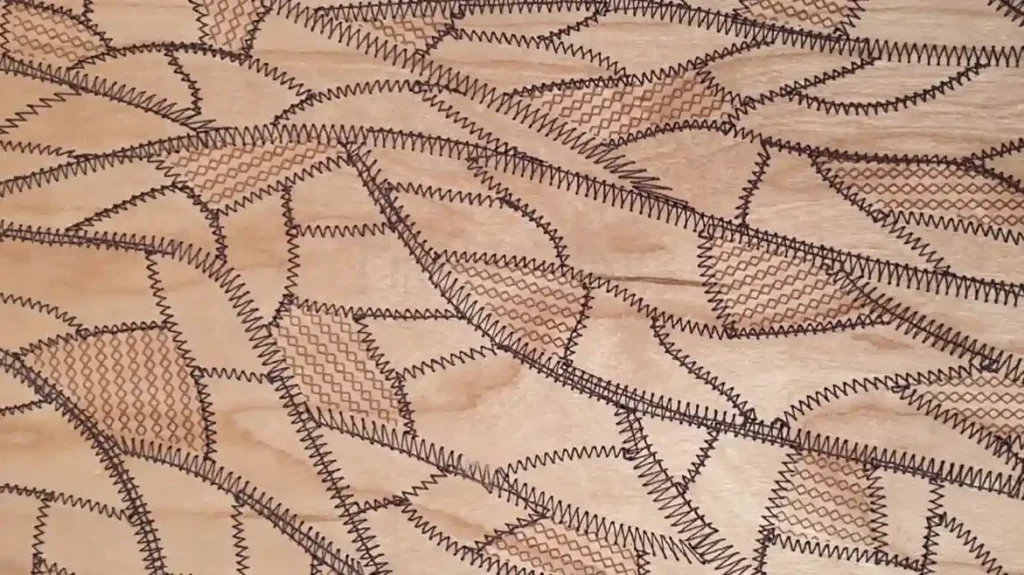
This method uses a laser to burn or etch designs onto fabric surfaces. It creates contrast by changing the fabric color and works especially well on denim and similar materials.
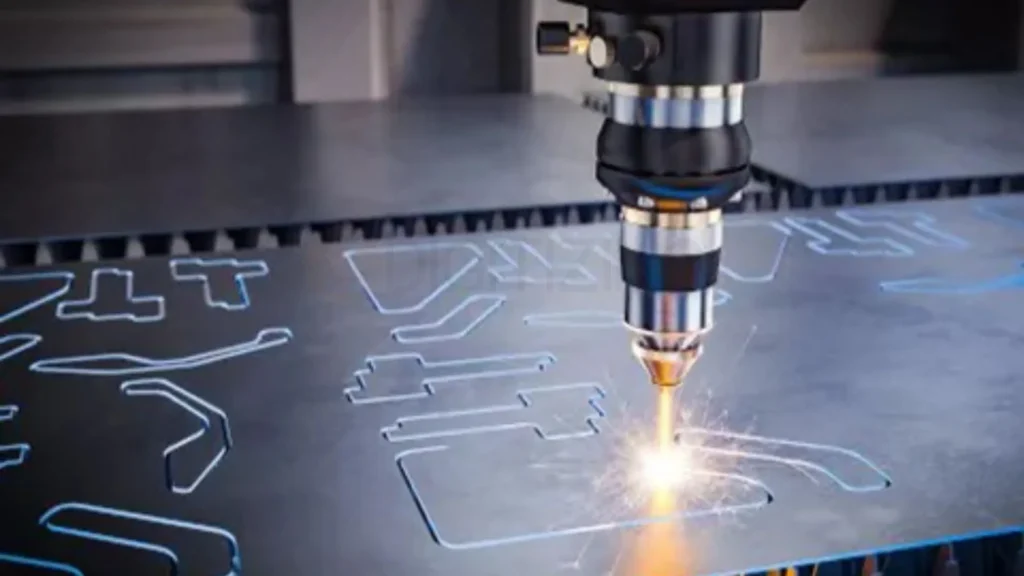
2. Laser Cut Embroidery
In this technique, a laser precisely cuts fabric pieces for decorative designs or appliqué work. The clean cuts help reduce fraying and improve design accuracy.
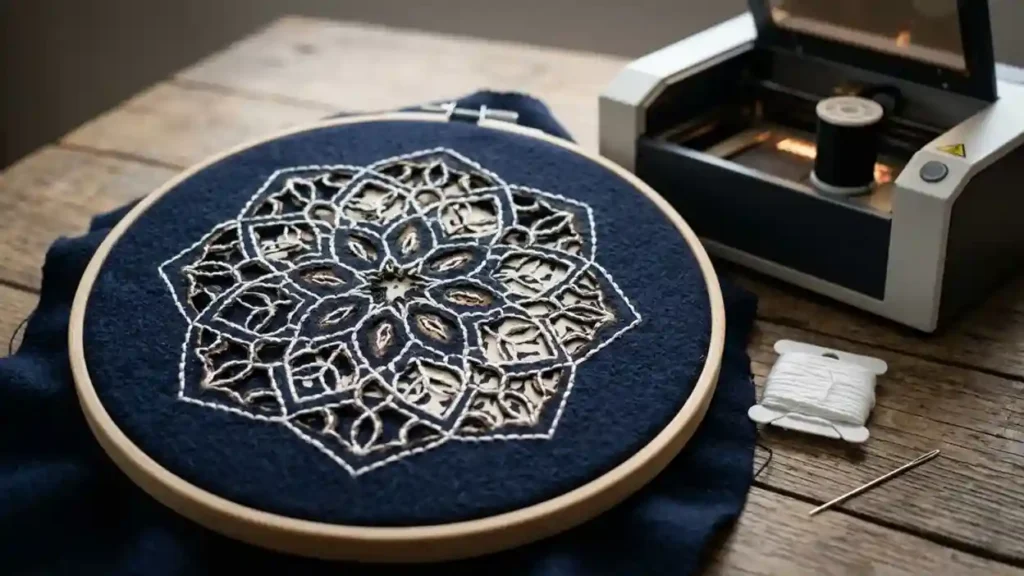
3. Laser Applique Embroidery
It combines traditional stitching with laser-cut fabric layers. The laser trims excess material around the design before the final stitches secure everything in place, creating a neat and professional look.
How Is It Different From Traditional Embroidery?
Unlike traditional embroidery, which builds designs stitch by stitch, the laser embroidery process uses heat and precision cutting to create patterns much faster. This reduces production time while maintaining consistent quality.
For businesses and designers, this embroidery offers cleaner details, perfect shapes, and repeatable results that are difficult to achieve with thread alone. It is especially useful for large production runs and designs with fine details.
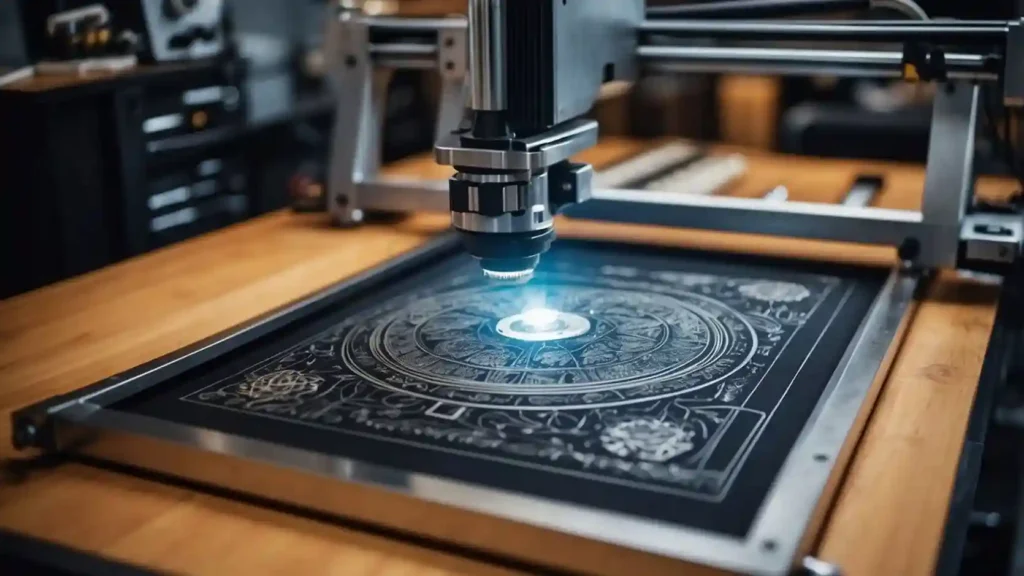
How Does Laser Embroidery Work? (Step-by-Step Process)
It consists of several simple steps, from preparing a design to creating a finished product. Each stage plays an important role in achieving clean, detailed, and professional-looking results.
Step 1: Create or Prepare Your Design
Every laser project begins with a design. Most laser machines require vector files for laser embroidery, such as SVG, AI, or EPS formats, because they contain precise paths that the machine can follow accurately.
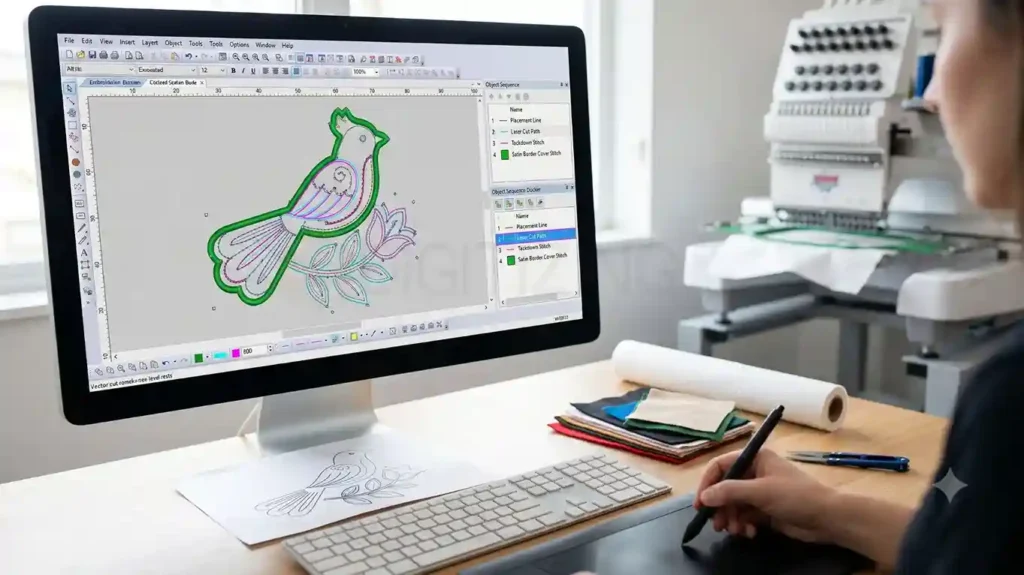
If your artwork is in JPG or PNG format, it must be converted into a vector file before production. Many professionals use embroidery design software to create, edit, or convert designs into machine-ready artwork.
Need Help Preparing Your Files?
At ZDigitizing, we provide professional digitizing and vector conversion services for businesses, apparel brands, and embroidery shops. From logo digitizing and patch digitizing to cap, applique, jacket back, and 3D puff digitizing, we create high-quality files ready for production.
Step 2: Convert the Design for the Machine
Once the design is complete, it is imported into the machine’s control software. Popular laser control software includes LightBurn (highly recommended for its user-friendly interface), LaserGRBL (a free option for diode lasers), and manufacturer-specific software that comes with your machine.
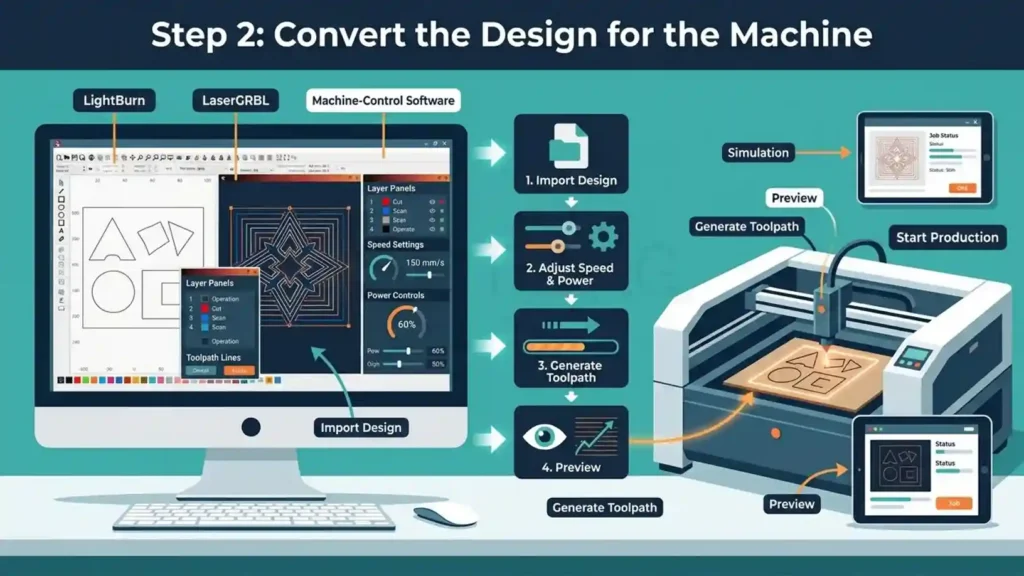
Each program has its own interface and features, but they all perform the same core function: telling the laser where to move, how fast to go, and how much power to apply.
The software converts the artwork into one of the supported embroidery file formats and generates the path the laser will follow during cutting or engraving. The preview allows you to check the design and make adjustments before starting production.
Step 3: Prepare and Secure the Fabric
The fabric must be placed flat on the machine bed and secured properly to prevent movement. Wrinkles or shifting fabric can affect design accuracy and reduce the quality of the final laser embroidery result.
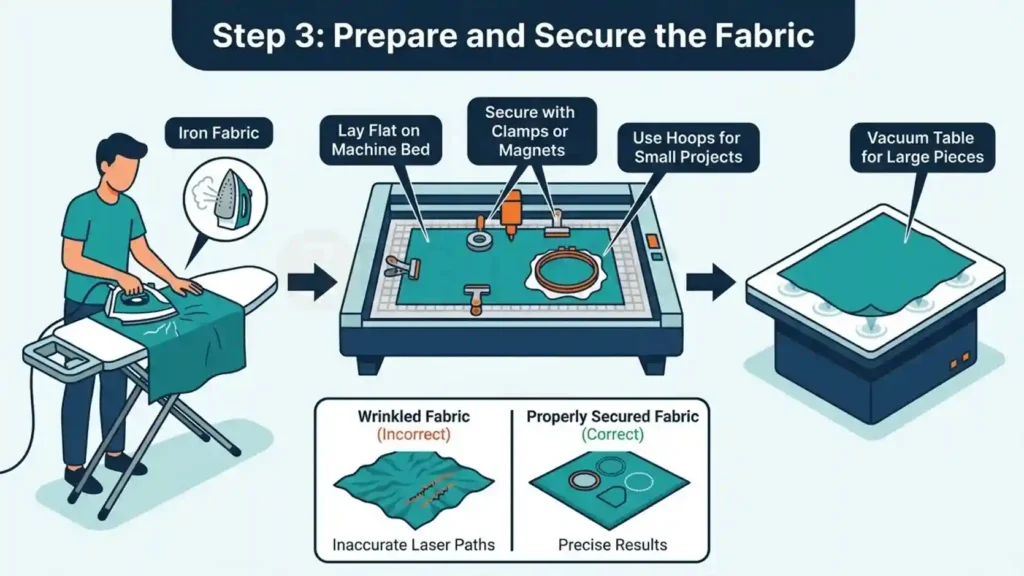
Use clamps, magnetic holders, or specialized jigs to secure fabric edges firmly. For smaller projects, embroidery hoops designed for laser machines work well. For larger pieces, you might need a vacuum table that holds fabric flat through suction, or adhesive spray specifically designed for laser applications (heat-resistant, non-flammable).
Also, many users also iron the fabric beforehand to ensure a smooth working surface.
Step 4: Adjust Machine Settings
Before starting the job, you need to configure settings such as power, speed, and frequency. Every laser for embroidery machine requires different settings depending on the fabric type and the desired effect.
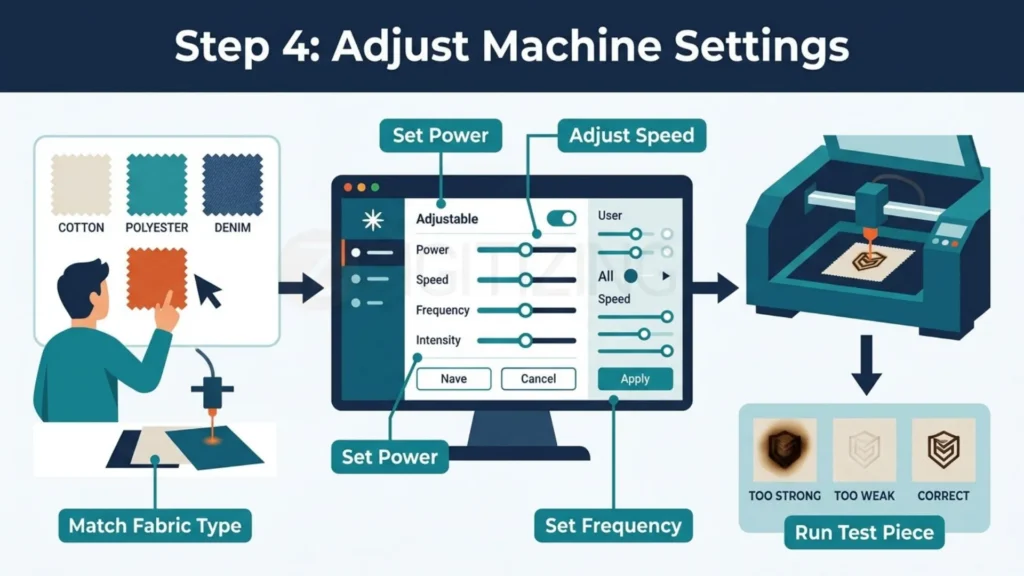
Testing on a scrap piece of fabric is always recommended to ensure the settings produce the expected results.
Step 5: Cut or Engrave the Design
After everything is prepared, the machine begins the embroidery process automatically. The laser follows the programmed path, cutting or engraving the fabric with high precision.
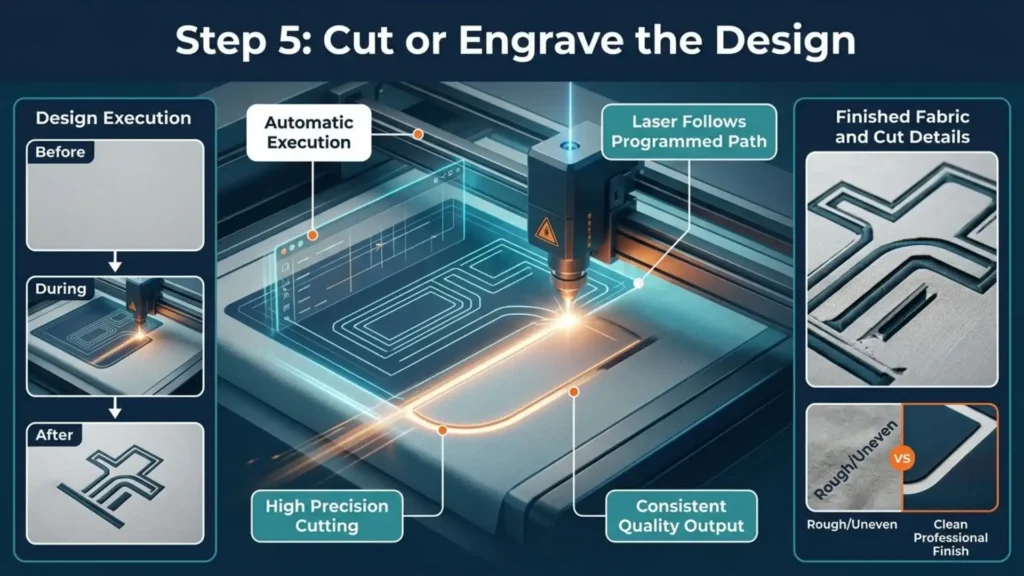
The finished design typically features sharp details, clean edges, and consistent quality, making this technique ideal for both custom projects and large production runs.
Laser Embroidery Machine: What You Need to Get Started
Choosing the right equipment is fundamental to successful laser work. Your machine selection depends on your budget, intended use (hobby vs professional), and the fabrics you’ll work with most often.
Types of Lasers for Embroidery
Not all lasers work equally well for textile applications. Understanding the differences helps you invest in the right technology.
1. CO2 Lasers
CO2 lasers are by far the most popular choice for laser embroidery and textile work. These lasers use carbon dioxide gas to generate the beam and excel at cutting organic materials like cotton, denim, leather, and acrylic.
Most CO2 lasers for fabric work range from 40 to 100 watts:
- 40-60 watts: Sufficient for primarily fabric work
- 80-100 watts: Better for mixed materials, thicker leather, or multiple fabric layers
2. Fiber Lasers

Fiber lasers use fiber optic cables to deliver the laser beam. While excellent for marking metals, they’re less suitable for most embroidery machine laser applications on fabric. Their wavelength doesn’t interact well with organic textile materials, making CO2 lasers the superior choice for textile work.
3. Diode Lasers

Diode lasers represent an affordable entry point, particularly for hobbyists and beginners. These compact lasers work adequately for light engraving on fabric and thin materials. However, they’re significantly slower than CO2 lasers and struggle with thicker fabrics or deep cuts.
Note: When selecting an embroidery laser cutting machine, consider wattage, bed size, and software compatibility. For beginners, start with a 40-60 watt CO2 laser. For professional production, invest in 80+ watts for faster cutting and better versatility across different materials.
Key Features to Look For in a Laser Embroidery Machine
When evaluating laser machines, focus on these essential features that directly impact your results and workflow:
Wattage and Power
Wattage determines what materials you can cut and how quickly. Higher wattage means faster cutting and ability to handle thicker materials, but also higher cost. For serious work, aim for at least 40 watts. For professional production, 60-100 watts provides better efficiency.
Bed Size
The working area determines the maximum fabric size you can process in one pass. Desktop machines offer 12″×8″ working areas, while industrial units provide 24″×12″ or bigger. Choose based on your typical project sizes, large garment panels need more space than small patches.
Software Compatibility
Intuitive software simplifies your workflow enormously. Look for machines compatible with industry-standard software like LightBurn, which offers excellent features including material libraries, power curves, and easy design import.
Avoid laser embroidery machines with proprietary software lacking updates or support.
Safety Features
Laser machines involve hazards including intense light, heat, and fire risks. Essential safety features include auto shut-off when the enclosure opens, protective enclosures with safety interlocks, emergency stop buttons, and proper ventilation systems. Never compromise on safety for price savings.
Precision and Accuracy
Look for machines with quality motion control systems delivering precise positioning. Ball screws and linear rails provide better accuracy than cheaper belt-driven systems. For detailed work, precision within 0.01mm matters for clean, professional results.
Popular Laser Embroidery Machines for Different Needs
Different applications require different machines. Here are proven options across categories and budgets:
For Beginners and Hobbyists
The Atomstack A10 Pro or Sculpfun S30 diode lasers offer affordable entry at $300-$800. These handle light fabric engraving and thin material cutting adequately while you learn the technology. They’re slower than CO2 lasers but perfect for learning fundamentals without major investment.
For Small Businesses and Serious Makers
The Glowforge Pro or Omtech 60W CO2 laser provides professional capability at $3,000-$5,000. These CO2 lasers cut fabric quickly and cleanly, handle multiple material types, and offer the reliability needed for commercial production. Larger bed sizes accommodate bigger projects.
For Professional Embroidery Integration
The Brother PR1055X represents a specialized option combining embroidery and laser capabilities.
This 10-needle embroidery machine with integrated laser offers 14″×8″ embroidery area with wireless file transfer, ideal for shops already doing embroidery work who want to add capabilities without entirely new workflows.
For Industrial Production
The Tajima TMAR-KC Type 2 delivers industrial speed at 1,200 stitches per minute with automatic tension control. At the professional end with significant investment, these machines handle high-volume production while maintaining consistent quality across thousands of pieces.
For Specialized Applications
The ZSK LaserBridge integrates laser cutting directly into an embroidery production line, allowing seamless transition between cutting and stitching. The HappyJapan HCD3E-1501 handles heavy-duty work on leather, denim, and patches with exceptional durability for demanding environments.
Best Fabrics for Laser Embroidery (What Works and What Doesn’t)
Not all fabrics respond equally well to laser. Understanding which materials work best saves frustration, wasted materials, and poor results. The key factors are fiber content, fabric weight, and how the material reacts to laser heat.
Excellent Fabrics for Laser Embroidery
These fabrics work best and give great results:
- Cotton: Cuts cleanly with crisp edges. Works in all weights from lightweight shirting to heavy canvas. Laser creates nice contrast through slight browning at cut edges.
- Linen: Similar performance to cotton with a distinctive textured appearance. Cuts well and produces clean results.
- Wool: Cuts well but needs careful power adjustment to avoid excessive browning at the edges.
- Denim: The superstar is denim laser embroidery. Laser removes indigo dye layer, revealing lighter fabric underneath for a worn-in vintage look. Best results with dark blue or black denim, 10-14 oz weight, 95%+ cotton content.
- Leather: Withstands laser intensity beautifully. Cuts cleanly while sealing edges to prevent fraying. Vegetable-tanned leather gives the most consistent results. Great for accessories, bags, and jackets.
- Felt: Non-woven fabric that works exceptionally well for layered appliqué designs. Doesn’t fray naturally and cuts with perfectly clean edges. Multiple colors can be layered for vibrant effects.
- Polyester and Synthetic Blends: Work but need careful settings. Laser seals edges as it cuts, preventing fraying. Use lower power and higher speed to avoid melting and stiff, glassy edges.
Fabrics That Need Careful Settings
These fabrics work but require extra caution:
- Silk: Very delicate. Use low power with high speed to avoid burning through. Creates beautiful subtle etching but has a small margin for error. Always test on scraps first.
- Chiffon and Lace: Ultra-lightweight fabrics needing low power plus backing stabilizers. Stabilizers prevent excessive burning and shifting. Results can be stunning but demand patience.
- Velvet and Corduroy: Textured fabrics that create interesting 3D effects through laser etching. Laser removes the pile (raised fibers) in patterned areas, creating contrast. Adjust power carefully for visible effect.
- Rayon and Viscose: Semi-synthetic fabrics that cut adequately but tend to brown more than natural fibers. Browning can be desirable for contrast or undesirable depending on your goals. Test extensively.
Fabrics to Avoid
These fabrics give poor results and should be avoided:
- High-Elastane Stretch Denim: Denim with more than 5% spandex or elastane melts unpredictably, creating jagged edges. Stick with 95%+ cotton denim.
- Very Light-Wash or Pre-Distressed Denim: Doesn’t provide enough contrast for visible effects. Laser needs a dark surface dye to remove and reveal the lighter fabric underneath.
- Synthetic-Heavy Blends: Fabrics with more than 5% polyester or nylon in cotton blends produce inconsistent results. Synthetic fibers melt differently from natural fibers.
- Coated or Treated Fabrics: Materials with water-resistant coatings, fire retardants, or chemical treatments can release toxic fumes when hit by laser heat. Also interferes with clean cutting.
- Very Thick or Dense Materials: Heavy canvas over 18 oz or multiple fabric layers may exceed your laser’s cutting capacity, leaving fuzzy uncut edges. Test thickness limits first.
Understanding fabric behavior comes with experience. Always test new materials on scraps first, document your successful settings, and build a personal reference library for your specific machine and typical projects.
Laser Embroidery vs Traditional Embroidery: Key Differences
Understanding the differences between laser and traditional embroidery helps you choose the right method for each project. Both techniques have their strengths, and knowing when to use each one separates amateur results from professional work.
Feature | Laser Embroidery | Traditional Embroidery |
Speed | Minutes per design; 10x faster for mass production | Hours to days for complex patterns |
Precision | Exact accuracy down to millimeter; identical repeats | Limited by hand/machine stitch accuracy |
Materials | Works on cotton, denim, leather, synthetics, thick fabrics | Best on cotton, linen; struggles with thick materials |
Edge finish | Sealed edges, no fraying | Raw edges may fray without finishing |
Design complexity | Intricate details, gradients, fine lines possible | Limited gradients; difficult with fine details |
Setup cost | $2,000–$10,000+ for machine | Lower entry cost for basic machines |
Best for | Mass production, complex designs, synthetic fabrics | Small runs, traditional aesthetic, natural fibers |
Laser Embroidery vs Screen Printing: Which Should You Choose?
When decorating apparel and textiles, laser and screen printing serve different purposes. Understanding when to use each technique maximizes your results and customer satisfaction.
Aspect | Laser Embroidery | Screen Printing |
Texture | Raised 3D textured feel; premium tactile quality | Flat surface; smooth feel against skin |
Durability | Extremely durable through hundreds of washes; threads don’t crack | Ink can crack over time; fades gradually with washing |
Color Range | Limited by thread colors; best for 1-5 colors | Unlimited colors; can print full-color photos and gradients |
Best For | Logos, text, team apparel, high-end collegiate wear, corporate branding | Complex gradients, large flat areas, photographic images, promotional items |
Setup Cost | One-time digital setup; no extra cost for color changes | Separate screen needed for each color; higher setup cost |
Setup Time | Minutes to prepare digital file | Hours to create screens for multi-color designs |
Fabric Types | Works on most fabrics including thick materials, leather, denim | Best on cotton and cotton blends; struggles with thick fabrics |
Minimum Order | Economical for single pieces; no minimum quantity | Cost-effective for bulk orders; single pieces expensive |
Longevity | Lasts lifetime of garment; thread doesn’t fade significantly | Fades over 50+ washes; may crack after 30-40 washes |
Perceived Value | Premium, high-end appearance; customers pay more | Standard decoration method; less premium perception |
Which Is the Winner and Why?
Laser machine embroidery is the winner for premium quality and durability. It creates a raised 3D textured look that signals quality to customers, withstands hundreds of washes without cracking or fading, and works on thick materials like denim and leather where screen printing fails.
Perfect for logos, team apparel, corporate branding, and high-end products where customers value quality and will pay premium prices.
Screen printing wins for budget-friendly bulk orders and full-color designs. If you need to print 500+ t-shirts with photographic images or complex color gradients, screen printing is dramatically more cost-effective and can handle unlimited colors that laser simply cannot match.
Is Laser Embroidery Expensive? Cost Breakdown for 2026
One of the most common questions about laser concerns cost. Is it expensive to get started? How does it compare to traditional embroidery? Let’s break down the real costs with 2026 pricing.
Machine Costs by Category
Your largest investment is the machine itself. Prices vary based on capabilities and intended use:
Category | Price Range | Best For | What You Get |
Budget/Hobbyist | $300–$800 | Beginners, small craft projects | Diode lasers for light engraving, slow speeds, limited bed size |
Entry Diode Lasers | $300–$1,200 | Light fabric engraving, thin leather | Compact size, USB connectivity, app control |
Desktop CO2 Lasers | $1,500–$3,000 | Serious fabric work, deeper engraving | True CO2 technology, faster cutting, professional results |
Professional/Small Business | $3,000–$10,000 | Daily commercial use, production | 60-100W CO2 lasers, large beds, advanced software |
Industrial-Grade | $10,000–$50,000+ | Heavy-duty manufacturing, high-volume | 100W+ power, industrial reliability, warranty support |
Recommendation for beginners: The $1,500–$3,000 desktop CO2 laser offers the best balance of capability and affordability for serious laser embroidery work.
Cost Per Piece vs. Traditional Methods
Understanding per-piece costs helps you price laser machine embroidery services competitively:
- Laser-Engraved Patches: $8–$15 per patch (small runs), $3–$6 per patch (100+ bulk). Premium pricing reflects unique feel and intricate design capabilities.
- Traditional Embroidered Patches: $2–$8 per patch. Less expensive for bulk orders where laser machine embroidery requires piece-by-piece processing.
- Denim Jacket Customization: It costs $25–$50 (simple), $50–$100+ (complex). Traditional embroidery costs $15–$40.
- Team Apparel (50+ jackets): It runs $12–$20 per piece. Traditional embroidery costs $8–$15. Premium reflects superior durability and appearance.
- Custom Home Decor: Throw pillows with laser embroidery designs command $30–$60 retail. Unique dimensional quality justifies higher pricing.
For mass production exceeding 500 identical pieces, laser becomes more cost-effective long-term despite higher per-piece costs on small runs.
Ongoing Costs to Budget
Beyond the initial machine purchase, laser involves ongoing expenses:
- Electricity: CO2 lasers cost $50–$150 monthly. Diode lasers cost $20–$50 monthly.
- Consumables: Laser tubes ($200–$600 replacement), mirrors/lenses ($50–$150 yearly), adhesive spray and stabilizers ($50–$100 monthly).
- Maintenance: Annual professional service costs $200–$500 for CO2 machines.
- Software: LightBurn license costs $60 one-time. Professional packages range $300–$500 annually.
- Materials: Fabric costs $5–$20 per project. Leather runs $15–$40 per square foot. Denim costs $8–$15 per yard.
- Ventilation and Safety: Exhaust systems cost $200–$800. Safety glasses ($30–$80), fire extinguishers ($50–$100).
Total ongoing monthly costs: Expect $200–$500 including electricity, consumables, and maintenance (not including materials).

Conclusion
Laser embroidery combines laser precision with textile art to create intricate, durable designs faster than traditional methods. This guide covered what laser is, how it works, which machines and fabrics work best, costs, and how it compares to other decoration methods. The key to great results is not just having the right equipment but also having properly prepared designs.
Professional embroidery digitizing is essential for the best embroidery results. Even the best machine cannot produce clean cuts if the digital file is poorly made. At ZDigitizing, we provide affordable embroidery digitizing services in Germany with over 10 years of experience.
Our expert digitizing team works 24/7 and offers 24/7 customer support. We guarantee quality on every order and provide a preview before payment. Minor edits are free, and our prices are already lower than the market. You also get 50% OFF on your first order.
Visit ZDigitizing today to place your first order and get 50% OFF. Experience premium embroidery digitizing quality that makes your laser projects look flawless and professional.


