Let’s discuss the Ricoma MT-2001-8 Common errors & solution.
1. Resolving A Thread Break:
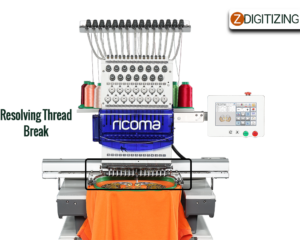
If a thread break occurs, the machine will automatically stop and you would get a thread break alert on the embroidery status icon. The thread would break always at the lower part of the machine head. To resolve this issue, thread the machine from where the thread break happened through the needle and down the presser foot. Then, rest the thread on the holding spring, leaving about one inch of thread hanging. If an excessive thread is left on the spring, it would not be pulled to the underside of the embroidery. If very little thread is left, the thread would not catch the bobbin. After rethreading the machine, rewind your design. This step is crucial because when a thread break happens, the machine continues to advance temporarily. Hence, the design must be backed up to make sure there is no gap or missed stitches on your pattern. To rewind, press the stop button, and let the machine back up about ten stitches approximately. Then, press again the stop button to command the machine to stop backing up more. Eventually, press the start button to resume sewing your pattern.
2. Thread Break Troubleshooting:
There are several reasons why you might be facing frequent thread breaks. To make sure it is not a technical problem, follow these steps:
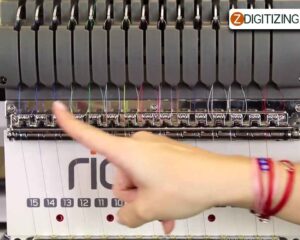
- Check the thread path to ensure your machine is rightly threaded. It must follow the right path.
- Ensure your thread tension is right. Tight tension might lead to missed stitches, pulling, puckering, thread breaks, and thread stress. On the other hand, loose tension would cause the thread to loop and pile up.
- Check the position of the needle to decide if an actual thread break has happened. Because sometimes the machine reads a thread break, but the thread is still linked to the material. If this is the scenario, check all the thread pathways. Then, do a manual trim and check the supply of the bobbin. If the thread is broken, follow the right thread path and rethread the needle.
- Ensure the thread you are utilizing is not defective. If it is, pull out several yards of thread unless you get rid of the defective thread. If that does not work, try changing the thread with a new one.
- Check for defective needles or needles not placed rightly. You would be capable to tell if a needle is defective or not placed correctly by verifying if the issue is on one or some needles and not others. Change any damaged or twisted needles.
- Ensure the bobbin is installed rightly. Remove any fuzz or dirt build-up in the bobbin case. Ensure the thread trimmer knife is completely pulled back.
- If thread breaks are happening on every needle, you have to adjust the hook timing.
3. Bobbin Running Out:
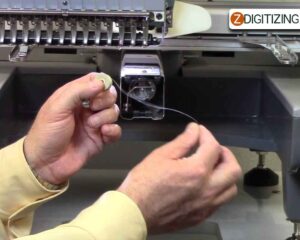
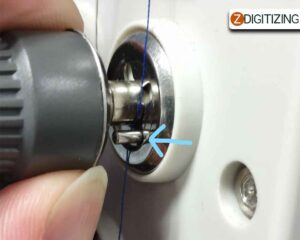
If the bobbin thread runs out, the machine would automatically stop and a thread break alert will appear on the embroidery status icon. To distinguish a thread break from the bobbin running out, have a look at the thread from the working needle. If it is still linked to the material, it means the bobbin ran out of thread or there is a problem with the bobbin thread. To resolve this, remove the bobbin from the bobbin case. Change it with a new bobbin, and then put the bobbin case back in the rotary hook.
4. No Needle Error Or Color Change Error:

A no-needle or color change error happens when the machine cannot detect which needle is over the needle plate. This might occur because the machine head is placed between two needle plates. If you get a needle error on your panel, you might see a question mark or a zero appear on your needle icon where the needle number was one showed. If so, clear the message and place the color change motor shaft behind the control panel. Using an open-ended wrench, move the shaft gradually unless the machine reaches a needle number. The color change box would light up on the needle the machine is allocated to.
5. Motor Fault Or Main Axis Error:
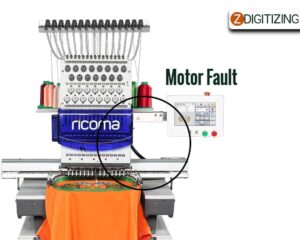
The machine has to be aligned to hundred degrees to function properly. The main axis is not at a hundred degrees error means that the main axis is not lined up to hundred degrees which is the right position for the machine to begin and stop sewing. This error could be caused if a needle hits the hoop If you get a bird’s nest and other causes. If you get this error, clear the message by pressing “OK”. Then ensure there is a working needle from one to fifteen displayed on the icon. Now turn off the machine. On the left side of your machine, you will see 2 small openings. On one, you will see that the degree of the machine is aligned, and on the other, you will see an Allen head screw. Place the Allen wrench into the Allen head screw and rotate it in a counterclockwise direction until the number shows a hundred degrees again.
Now you can turn on the machine. When the panel shows the main menu screen, press the hundred-degree button on your panel. Now the machine would be all set to embroider.
6. Tension:
Right thread tension is crucial for quality embroidery. Improper thread tension would cause various embroidery issues. For example, very loose tension would cause threads to loop, and very tight tension would cause recurring thread breaks.
Tension would rely on the intricacy of your design, the material you are using, the thread, and backing you are using, and also hooping.
Before making any tension adjustments, ensure your machine is rightly threaded. Sometimes you might face tension issues just because your machine is improperly threaded. You can adjust the settings of the tension using the following:
- The Spring Lever
- The Top Tension Knobs
- The Bobbin Case
If you have verified your machine is rightly threaded, begin by adjusting the check spring lever. Please keep in mind, that before making any tension adjustments knobs, we suggest first adjusting the spring lever because this is the easiest fix and small changes to the spring lever might regulate the tension in your embroidery design.
Easy Steps For Ricoma Mt-2001-8S Maintenance:
Ricoma MT-2001-8S maintenance is very easy. The most crucial maintenance that has to be completed is lubricating the rotary hook. Before oiling or cleaning, we suggest turning off your machine. To maintain and clean the rotary hook, begin by removing the bobbin case from the rotary hook.
Clean any thread lint in the area using a lint brush or dusting spray.
Then add three or four drops of machine oil to the rotary hook.
Now you can insert the bobbin case back into the rotary hook and close the bobbin housing unit.
To make sure the machine runs efficiently, repeat this process twice a day if you are planning to run a machine eight hours a day.
Once or twice a week, remove the needle plate and clean around the trimmer knives with a soft brush.
Once a week, pass a business card or paper through the bobbin case slit to clean any lint buildup.
Every week, place a drop-off oil directly on the needle bar through the slots in the needle case, alternate each week.
One week lubricate the upper needle bar section and the next week the lower needle bar section.
Once a week oil the opening on the needle plate. For this section, we suggest turning on the machine and setting it to needle one to see the opening on the right side of the machine head.
Add three drops of oil each week to that section.
Then, add three drops of oil to the metal rail of the machine head.
Now you can move your machine head to needle 15 and place 2 drops of oil on the other side of the rail.
Once each three to five months, apply white lithium grease to the black metal bar in the machine head. Also, apply this grease to the wheels placed on the back of your machine head.
Once each three to five months, apply white lithium grease to the color change cam.
You would first need to remove the metal plate placed above the color change cam by loosening the attached screw. Then apply grease to the color change cam area.
Place the cover back over the color change cam and tighten the screw before proceeding.
Always remember, not to over oil. After oiling, stitch on a test swatch before returning to production to assure extra oil does not stain garments.
These were the simple steps for troubleshooting Ricoma MT-2001-8S embroidery machine and Ricoma MT-2001-8S maintenance. Now that you very well know how to maintain and solve Ricoma MT-2001-8S problems & solution, it is time to start embroidering. Good luck!
Winding up with offer:
Hope it will be helpful for you guys!
If there’s any question related to this article you can simply ask in the comment section and don’t forget to like and share with those you think might be helpful for them.
Also, if you want digitizing services for your embroidery machine with super-fast turnaround and excellent quality just click the link below and get a free quote in less than 5 minutes. We offer 50% off on all our services to our potential customers.


