Convert PNG to DST is totally doable, but it’s not as simple as dragging a file in and hitting save. There are a few steps, a few rules, and some stitch settings you must get right if you want your design to stitch cleanly on fabric. The good news? You don’t need to be an expert to follow this guide. Just read along, follow each step, and by the end, you’ll be able to convert your PNG into a proper DST embroidery file with confidence. Let’s make this easy, clear, and beginner-friendly.
Convert PNG to DST: Simple Steps to Create Embroidery Files
What is a PNG File?
Before you jump into PNG to DST conversion or try to convert image to DST, you should first understand what a PNG actually is.

A PNG file is basically a clean, high-quality image format that supports transparency, perfect for logos, artwork, and designs you plan to digitize later. When you start the conversion process, knowing the nature of a PNG helps you trace it better, pick cleaner edges, and assign stitches more accurately.
So think of PNG as your starting point, the base image that will eventually turn into a beautiful embroidery-ready DST file.
What is a DST File Format?
A DST file is the stitch-based format your embroidery machine actually reads, and it’s the final goal when you convert PNG to DST or even convert logo to DST format for stitching.
Unlike normal images, the DST embroidery format contains real stitch commands: where to start, stop, trim, and how each thread should run across the fabric. That’s why you can’t simply save a PNG as DST; the machine needs stitch instructions, not pixels.

Once your file becomes DST, it’s ready to load, hoop, and stitch out beautifully on your embroidery machine.
Can You Directly Convert PNG to DST? (And Why Not Always)
Okay, so now that we understand the formats, let’s talk honestly. Can we just pick a PNG and turn it into a DST with one click?
We all wish it were that simple, but embroidery doesn’t work like converting a normal image. Yes, embroidery file conversion is possible, but only when the PNG is digitized first. A PNG is only a picture… no stitches, no thread paths, nothing for the machine to actually follow. A DST, on the other hand, is full of real sewing instructions.
Think of it like this:
- PNG = a beautiful picture
- DST = the stitching roadmap behind that picture
Without instructions, the machine has nothing to follow; that’s where PNG embroidery digitizing comes in. You trace the design, choose stitch types, set density, add underlay, adjust pull compensation… and then you export it. That’s the moment it becomes a real file you can convert PNG for embroidery machine use.
So yes, you can convert PNG to DST, but not by skipping steps. If you follow the process, you get a neat, clean-stitching file. If you rush it, you get thread breaks, uneven edges, and a very frustrated embroiderer.
What You Need Before Converting PNG to DST?
Before you start working on your design, make sure you have the basic embroidery tools and knowledge ready, it will make the whole process smoother and help you convert image to embroidery file without confusion. A little preparation always leads to a cleaner final stitch result.
You will need:

- A clear PNG image (good resolution)
- Digitizing software
- Basic understanding of stitch types
- Stabilizer & fabric knowledge
- Thread color plan
With these in hand, you’re ready to begin the conversion confidently.
1. A Clear PNG Image (Good Resolution)
First things first. you need a clean, sharp PNG image. If the artwork is blurry or pixelated, the stitches will also look broken and uneven. A high-resolution image makes it much easier to convert PNG to DST smoothly because the software can trace edges clearly.
If your design is hand-drawn or rough, clean it before digitizing. The cleaner the PNG, the better the embroidery result, simple rule, big difference.
2. Digitizing Software
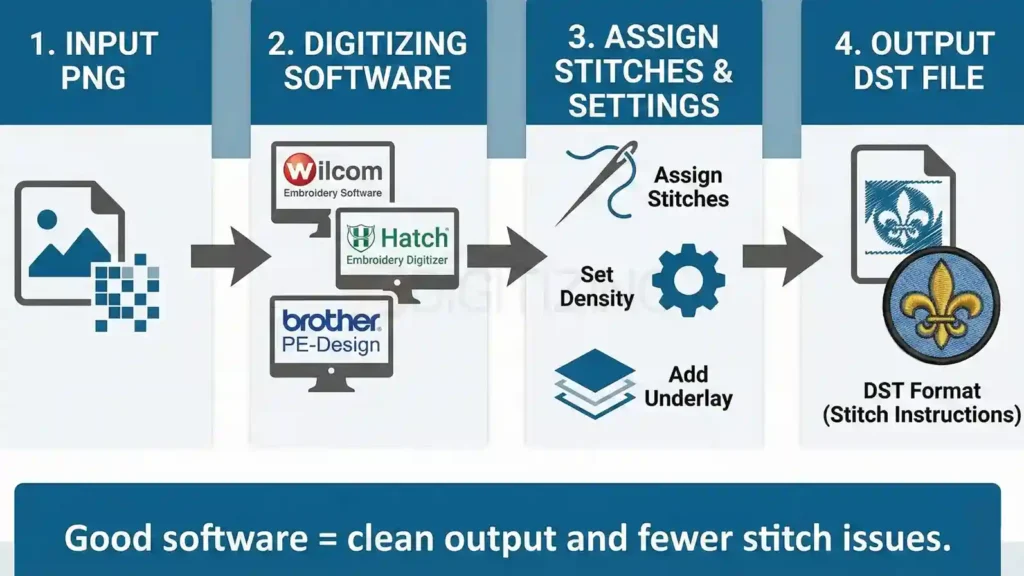
You cannot directly convert PNG to embroidery file without proper software because the machine needs stitch instructions, not just pixels. Tools like Wilcom embroidery software, Hatch embroidery digitizer, and Brother PE-Design software allow you to assign stitches, set density, add underlay, and export in DST format.
This is where your image actually transforms into a stitch-based embroidery file. Good software = clean output and fewer stitch issues.
3. Basic Understanding of Stitch Types

Just a little stitch knowledge helps a lot. Satin stitches work best for letters and borders, fill stitches cover bigger shapes, and running stitches add details or outlines.
When you know where to use what, your file converts more accurately and stitches beautifully on fabric. A basic understanding gives you control instead of guesswork in embroidery digitizing software.
4. Stabilizer & Fabric Knowledge
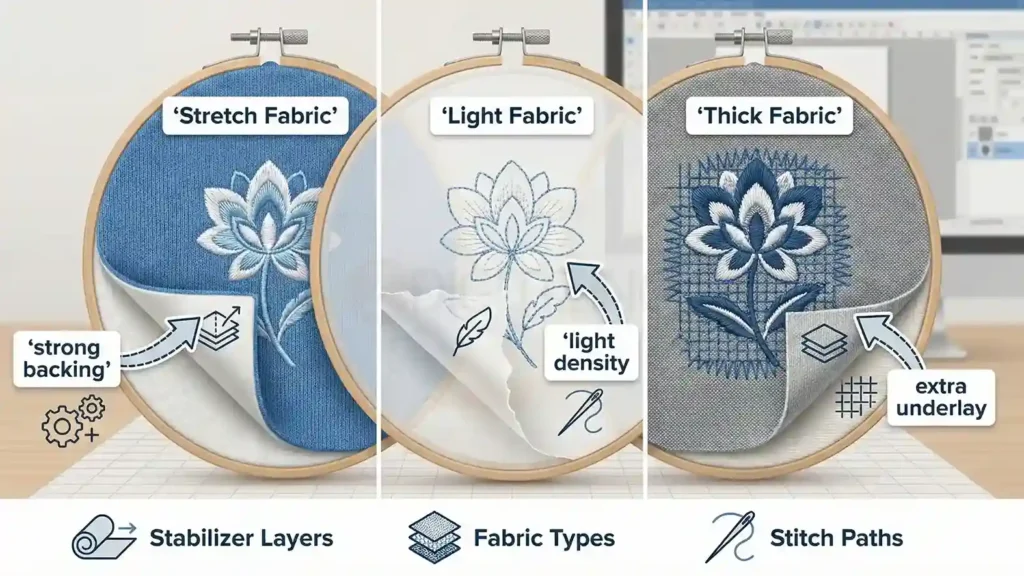
Embroidery isn’t only thread, fabric support matters too. Stretchy fabric needs a stronger backing, thin fabric needs lighter density, thick fabric may need more underlay for stability.
Knowing how stabilizer and fabric behave helps you avoid puckering, pulling, and distortion. Better stability means a smoother sew-out when exporting to DST embroidery format.
5. Thread Color Plan

Plan your thread colors before stitching. It saves time and keeps your design visually balanced. Decide on shades, contrast, and color sequence so you don’t pause midway searching for threads.
A simple color plan makes your final result look professional, neat, and well-structured, especially when you convert image to embroidery file for actual production.
How to Convert PNG to DST in Wilcom | Step-by-Step
Let’s convert your image properly, not theory, but exactly how we do it inside Wilcom embroidery software. Follow these steps like you’re doing the process live. By the end, your PNG will be ready as a clean DST embroidery file.
Step 1: Open Wilcom and Start a New File
First thing, open the Wilcom embroidery software. Click New Design so you have a clean workspace. This is your base, like opening a blank sheet before you start drawing.
Step 2: Insert Your PNG Image
Go to Image → Insert Image and load your PNG logo or picture. Adjust it to the center, we always place it middle so tracing becomes easy. At this point, it’s still just an image; now we convert it to stitches.
Step 3: Set the Final Size First
Before digitizing, decide the size you want to embroider.
For example:
- Hat logo → around 3 inches
- Left chest logo → 3.5-4.5 inches
- Large back design → 8-12 inches
Resize using the corners, once digitizing starts, we never resize again because it affects stitch density.
Step 4: Reduce Colors or Clean the Image (If Needed)
If the design has too many colors or shading, we quickly clean it. In Wilcom, we sometimes reduce colors so only main shapes stay visible for tracing.
Clean PNG = smooth digitizing.
Step 5: Start Tracing the Design, The Real Digitizing Begins
Now we begin manual tracing. Use the Input A / Input B / Column tools to outline shapes. We digitize part-by-part, border, text, fill shapes, small details. This is the moment your PNG stops being an image and starts becoming an embroidery file.
We do it like this in real work:
- Zoom in on one section
- Trace it neatly
- Convert to stitches
- Move to the next section
Slow and clean, never rush.
Step 6: Apply Stitch Types
After tracing, we assign stitches:
- Satin stitch → text, borders, thin elements
- Tatami/Fill stitch → wide areas, solid shapes
- Running stitch → outlines, detailing
This is basically logo digitizing for embroidery, choosing the right stitch for each part.
Step 7: Adjust Density, Underlay & Pull Compensation
Now we fine-tune the design, because stitches behave differently from pixels. We set the underlay for support, adjust the stitch density so fabric doesn’t pucker, and add pull compensation so shapes don’t shrink while sewing. This is where quality is built.

Step 8: Add Thread Colors and Sequence
Next, we assign thread colors, even if the customer will change them later. Then we set the stitch sequence so the machine runs logically, fewer jumps, less trim, and smoother embroidery flow.
A bad sequence = messy stitching.
Step 9: Run Simulation / Stitch Player
Click Stitch Player. We watch the entire design stitch virtually. If we see unnecessary jumps, direction issues, or thread piles, we fix them now. This preview saves fabric, time, and headache.
Step 10: Export as DST Format
Finally, when everything looks clean, we go to Save As → .DST is one of the most used embroidery format types. That’s it, PNG successfully converted to DST and ready for machine use.
Step 11: Test Sew-Out (If It’s Going for Production)
We always test a sample sew-out before final delivery. If anything looks off, density too tight, satin too wide, small part not stitching, we return to Wilcom, edit, re-export.
When Should You Hire a Professional Digitizer?
Sometimes digitizing feels easy, but when orders start piling up, designs become complex, or you simply don’t have time to sit and digitize image for embroidery yourself, the pressure increases.
You might be trying to meet deadlines, deal with customers, manage stitching, and handle everything at once. At that point, opening software again to trace artwork, fix density, adjust angles, and convert PNG to DST can feel like an extra weight on your head.
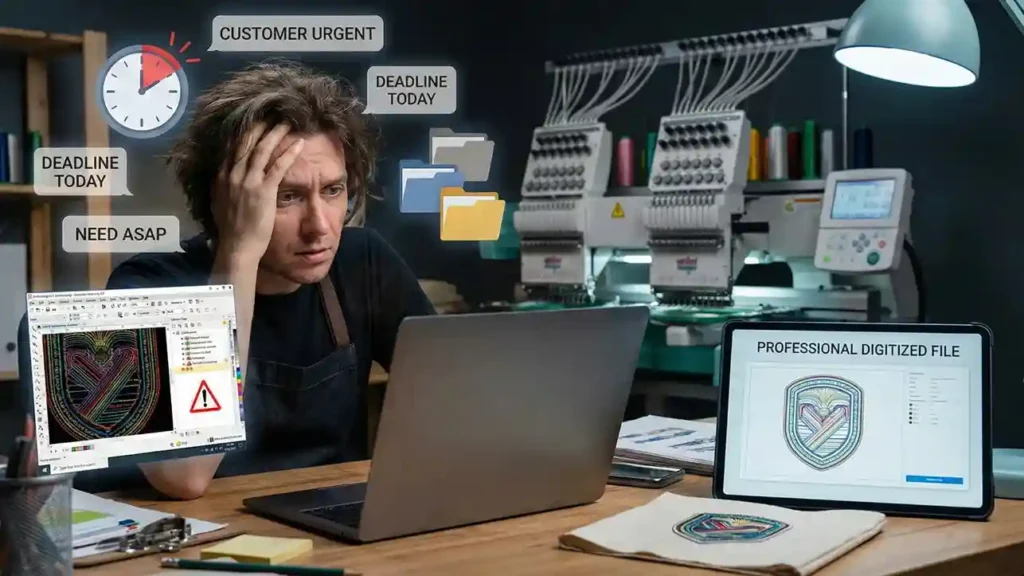
And this is exactly the situation where hiring a professional becomes a smart move.
Because when a professional digitizer steps in, you don’t need to purchase expensive programs, learn features, or worry about embroidery image tracing or stitch balancing. You can focus fully on production, running your machine, or managing business orders without losing hours inside software. No delays in urgent work, no stress of repeated test sew-outs, and no risk of ruining fabric due to digitizing errors.
And this is where ZDigitizing makes everything easier for you.
We have been providing embroidery digitizing services since 2002, working with all embroidery file formats and embroidery machine file types for caps, jackets, shirts, patches, logos, and commercial orders. Our team is experienced, skilled, and trained to convert any artwork into a clean, machine-ready embroidery design, with correct density, proper underlay and smooth stitch flow.
Our pricing is affordable compared to the market, and we offer 24/7 support, so help is always available when you need it. Standard turnaround time is 4 to 12 hours, but if you’re in a rush or working with short deadlines, we can complete your order within 1 to 4 hours as well. Bulk orders get special discounts, which is perfect for businesses and resellers.
And the best part? You can test our quality without risk, because we give 50% OFF on your first digitizing order.
So if time is short, workload is heavy, or you just want fast, perfect, professional results without trial and error, ZDigitizing will handle the file, and you can simply hoop, stitch, and deliver confidently.
Order now, enjoy a 50% OFF, and see the quality yourself.
FAQs
Yes, you can, but PNG must be digitized first. You need to trace the design, assign stitches, and then export it in DST format using embroidery software like Wilcom or Hatch.
A PNG alone is not stitch-ready. It must be turned into stitches through digitizing, then saved as DST, PES, JEF, or any embroidery machine file type, depending on your machine.
Import the PNG into embroidery software, trace it, assign stitch types, adjust density and underlay, run a preview, then save/export it as a DST embroidery file.
You digitize the image using software, meaning you rebuild it as stitches instead of pixels. Once digitized, you choose the embroidery file format you need and export it for machine use.


