Learning how to use Brother embroidery machine properly can turn regular fabric projects into clean, professional-looking embroidery. Brother machines are popular because they are easy to use, durable, and packed with helpful features for custom stitching. This guide explains everything step by step in simple language.

To use your machine, insert the bobbin, pass the upper thread through the numbered paths, and hoop your fabric with the right stabilizer. Then select a built-in design or upload a .PES file through USB, attach the hoop, lower the presser foot, and press the start button to begin stitching automatically.
How to Use Brother Embroidery Machine?
Understanding the Types: Brother Embroidery vs Sewing Machine
When learning how to use an embroidery machine, the first thing you should know is the difference between a sewing machine and an embroidery machine.
Although they look similar, they are built for different tasks. Understanding the Brother embroidery machine vs sewing machine comparison will help you choose the right machine and use it correctly.

When learning how to use Brother embroidery machine, remember that a sewing machine is made for joining fabric with straight or zigzag stitches, while an embroidery machine is designed to create decorative designs automatically using a hoop and computerized system.
If you are looking for an embroidery machine for home use, you will find three main types:
- Single-Needle Machines: Best for beginners and home users. You change thread colors manually.
- Combo Machines: Work as both a sewing and embroidery machine, making them ideal for versatile home projects.
- Multi-Needle Machines: Designed for businesses and advanced users. They hold multiple thread colors and switch between them automatically, saving time.
Here is a simple breakdown to help you understand the key differences while learning how to use Brother embroidery machine models:
Machine Characteristic | Standard Sewing Machine | Dedicated/Combo Home Embroidery | Multi-Needle Commercial Machine |
Primary Fabric Movement | Feed dogs pull fabric straight | Computerized carriage moves hoop | Heavy-duty robotic arm moves hoop |
Needle Count | 1 Needle | 1 Needle (Manual thread changes) | 4 to 10 Needles (Automatic shifts) |
Stitch Velocity (Per Minute) | 600 – 850 stitches | 400 – 650 stitches | 800 – 1,200+ stitches |
Best Used For | Joining seams, hemming, quilting | Customizing garments, home decor | High-volume production, hats, business |
Physical Footprint | Small and highly portable | Medium (Requires extra desk space) | Large, heavy tabletop industrial design |
If you’re planning to learn how to use Brother embroidery machine for personal projects or to start a small embroidery business, choosing a dedicated or combo embroidery machine is a smart and practical option.
Pre-Owned Buyer’s Guide: Inspecting Used Embroidery Machines
Buying used embroidery machines is a fantastic way to acquire a high-end, expensive model while staying well within a modest budget.
Because these tools contain sophisticated computer components and high-speed moving parts, you must be careful not to buy someone else’s broken mechanical headache. Shopping for used Brother embroidery machines requires a systematic approach to ensure you get a reliable, working device.
Before learning how do you use an embroidery machine, make sure you choose a machine in good condition. If you are buying a used model, always ask the seller to power it on and complete a test stitch before you buy, unless it comes with a certified warranty from an authorized dealer.

As you continue how to use Brother embroidery machine, pay attention to the machine’s sound during stitching. A smooth, steady sound is normal, while grinding, knocking, or screeching noises can be a sign that the machine needs maintenance or repair.
Always check the internal stitch counter in the settings page. Just like the odometer on a used car tells you how many miles it has driven, a Brother machine tracking screen shows the total number of lifetime stitches it has fired, which can also help identify a potential Brother embroidery machine problem if the machine’s performance changes unexpectedly.
When learning how to use Brother embroidery machine models, it is also important to check the machine’s stitch count if you’re buying used. Machines with under 1 million stitches are nearly new, while those with over 20 million stitches may require major repairs soon.
Use this simple maintenance checklist before using Brother embroidery machine models to make sure you are making a safe and reliable investment:
Inspection Point | What to Look For & Verify | Why It Matters |
Lifetime Stitch Count | Check the system settings page for the total number. | Tells you the true age and wear of the internal motor. |
Carriage Arm Alignment | Ensure the hoop arm moves smoothly without shaking. | Slanted or loose arms cause ruined, offset designs. |
Tension Disk Path | Inspect for deep scratches or trapped thread debris. | Scratches cause constant thread snapping issues. |
LCD Touchscreen | Press all corners to ensure alignment calibration works. | If the screen fails, you cannot select patterns or edits. |
Included Hoop Frames | Ensure structural plastic frames aren’t warped or cracked. | Warped hoops cannot hold fabric tightly enough to stitch. |
When learning how to use Brother embroidery machine, make sure a used machine includes the original manual, power cable, and embroidery hoops. If any of these accessories are missing, you can often negotiate a better price.
Step-by-Step Guide: How to Use Brother Embroidery Machine
Now that you understand your hardware options, let’s learn exactly how to embroider with Brother machine from absolute scratch!
Now that you’re ready to learn how to use Brother embroidery machine, let’s begin with the setup process one step at a time for the best results.
Step 1: Getting Familiar with Your Machine Anatomy and Touchscreen Control
Before flipping the power switch on, take a moment to look at the different parts of your machine. On the front, you will see a large LCD screen panel. On the right side, you will find the main power port, a power switch, and a slot for a USB flash drive.
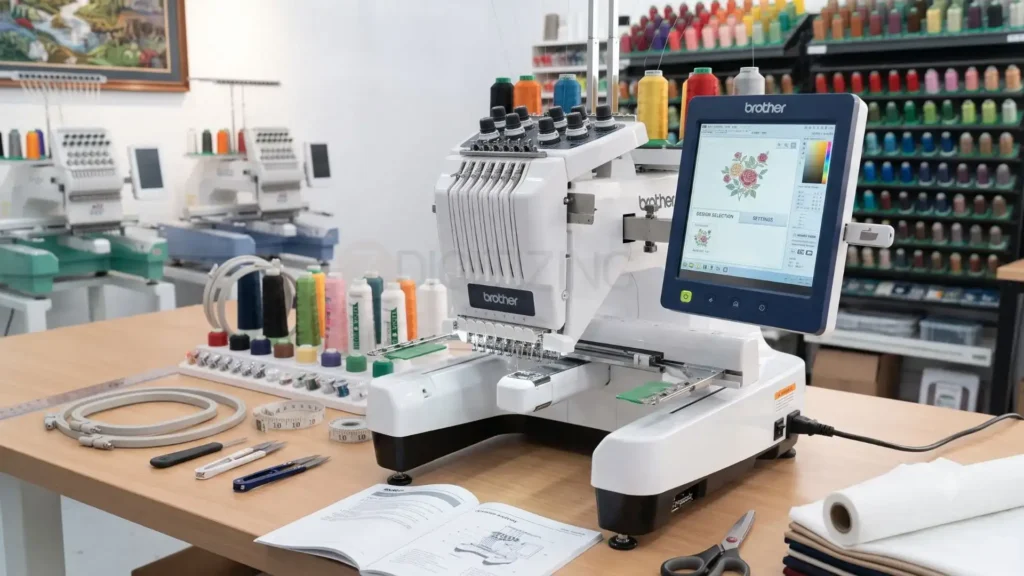
Directly above the needle area, you will spot a series of grooved tracks stamped with bright numbers and arrows. This is your upper thread guide path.
Turn the power switch ON to start the machine. The machine will hum, and the screen will light up with a safety reminder message telling you that the embroidery carriage arm will move into its starting base position.
Keep your hands clear of the metal arm and press “OK” on the screen. The arm will slide smoothly to the left.
While learning how to use Brother embroidery machine, take a moment to explore the home screen. You will usually see these three main folders:
- Built-in Designs: A collection of pre-loaded pictures, holiday art, and decorative patterns.
- Built-in Fonts: Alphabet letters for creating custom names, words, and monograms.
- USB Folder: The digital library slot where your custom files will appear once you plug a thumb drive in.
Step 2: Threading the Upper Path and Preparing the Bobbin
One of the most important parts of how to use Brother embroidery machine is threading it correctly. If the thread misses a single tension guide disc, your project will quickly turn into a messy knot of tangled thread.
First, let’s insert the bottom bobbin. Open the clear plastic slide cover located directly underneath the needle plate. Take your wound bobbin spool and hold it in your fingers so the thread drops down the left side, looking exactly like the letter “P”.
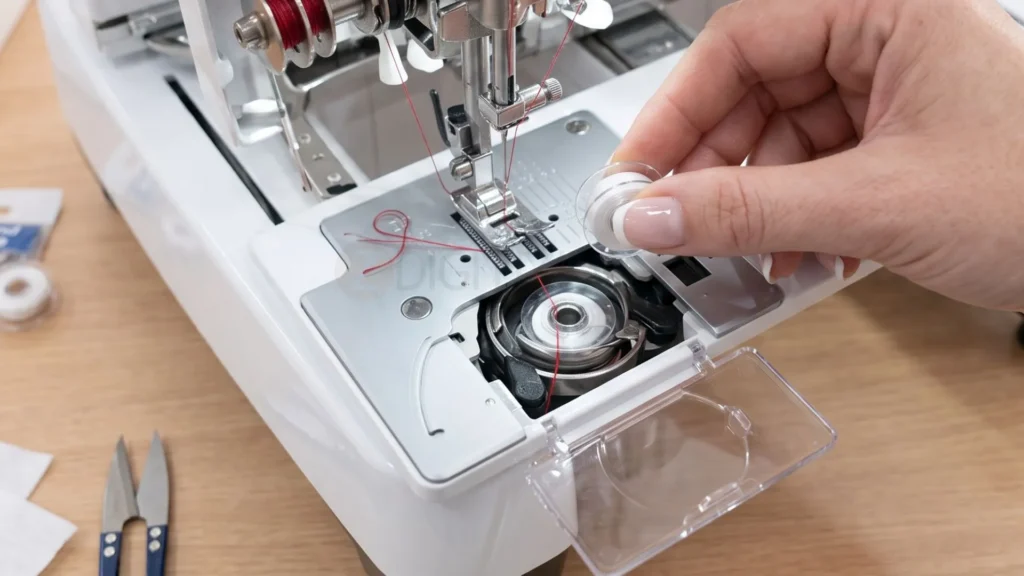
To avoid common Brother embroidery machine bobbin problems, drop the spool straight into the round plastic bobbin case basket. Guide the loose thread tail through the small metal slots on the front, pulling it to the left along the guide channel until the built-in blade automatically cuts off the excess thread. Finally, snap the clear plastic window cover back into place.
Now, let’s do the upper thread path. Make sure your presser foot lever is raised all the way up, this opens the internal tension discs so the thread can slide deeply inside them.
Place your spool of embroidery thread onto the horizontal spool pin and lock it tight with a plastic spool cap. To correctly how to use Brother embroidery machine, pass the thread through each numbered guide in the order shown on the machine.
- Pull thread left through the rear guide hook (Step 1).
- Bring thread straight down the front right channel (Step 2).
- Loop it under the bottom U-turn curve and head back up the left channel (Step 3).
- Hook it through the silver metal take-up lever at the top from right to left (Step 4).
- Bring it straight back down the left channel toward the needle guide assembly (Step 5).
- Slip the thread behind the fine wire guide clip directly above the needle point (Step 6).
Lower your presser foot lever down. Push the advanced automatic needle threader lever on the far left side down firmly.
The mechanism will swing forward, pass a microscopic wire hook right through the eye of the needle, catch your thread line, and pull a perfect loop out through the back of the needle automatically! Pull that loop through, and your upper threading path is completely finished.
Once both threads are set correctly, you’re ready to continue how to use Brother embroidery machine with confidence.
Step 3: Mastering Stabilizers and Fabric Preparation
Never try to embroider on a single layer of plain fabric without a backing support material!

Fabric is naturally flexible, and as the needle punches thousands of close stitches into it, the cloth will quickly bunch up, stretch, and pucker into an ugly, ruined mess. To stop this, we always use a backing sheet called a stabilizer.
When learning how to use Brother embroidery machine, choosing the right stabilizer for your fabric is essential. Use the guide below to select the best embroidery stabilizer for each material.
Material Group | Material Examples | Recommended Needle Size | Ideal Stabilizer Selection |
Stretchy Knits | T-shirts, hoodies, activewear, sweaters | 75/11 or 80/12 Ballpoint | Cut-away stabilizer (Stays permanently behind the design to stop stretching over time). |
Woven Fabrics | Denim jackets, canvas bags, cotton aprons | 90/14 Sharp / Denim | Tear-away stabilizer (Crisp paper-like backing that rips cleanly away around design borders). |
Delicate Silks | Satin robes, thin blouses, sheer linings | 70/10 Sharp / Microtex | Sticky self-adhesive tear-away (Holds fabric safe without clamping it in a tight hoop frame). |
Nappy / Fluffy | Bath towels, fleece blankets, corduroy | 90/14 HJ Ballpoint | Tear-away on bottom + Water-soluble clear topping film on the top surface to stop stitches sinking. |
Step 4: Perfect Hooping and Floating Techniques
When practicing how to use Brother embroidery machine, proper hooping is essential for clean, accurate embroidery. Place the hoop on a flat surface, loosen the outer hoop, and separate the inner and outer frames before positioning your fabric and stabilizer.
Lay a flat sheet of tear-away backing stabilizer down on the table, and place your ironed fabric smooth directly on top of it. Place the outer frame ring underneath both layers.
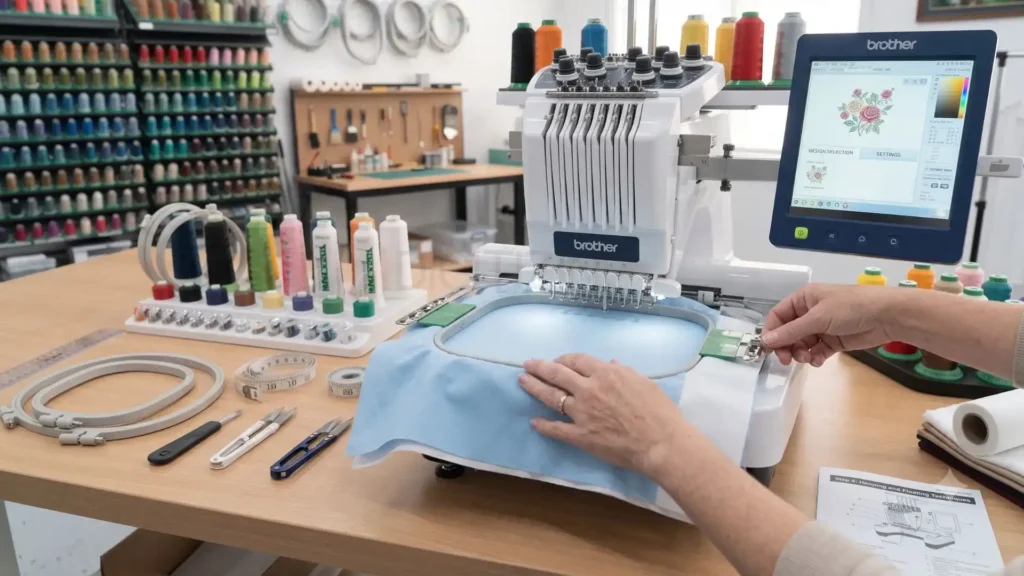
Take the smaller inner hoop frame piece, align it straight with the outer ring, and press it firmly straight down into the outer ring. The inner ring should clamp down tightly, sandwiching the fabric and stabilizer sheet securely between the two pieces.
Tighten the metal adjustment outer screw until the frame holds everything rigid. Gently tug the outer edges of the fabric so it feels as flat and tight as a drum skin. If the fabric feels loose, floppy, or wrinkled inside the hoop frame, your stitches will not line up correctly, creating distorted shapes.
What is Floating? While using how to use Brother embroidery machine techniques, you may need the floating method for thick, small, or hard-to-hoop items like beanies, caps, or sleeves. Instead of hooping the fabric, hoop only the stabilizer tightly and place the fabric on top before stitching.
Next, you apply a light layer of temporary fabric adhesive spray or use sticky peel-and-stick stabilizer paper. You then smooth your fabric flat onto the sticky stabilizer surface, letting it “float” safely over the top ring without ever clamping the garment inside the frame rings!
Step 5: Formatting USB Drives and Transferring Custom .PES Files
As you learn how to use Brother embroidery machine, you’ll eventually want to stitch custom logos, fonts, or downloaded designs. To avoid loading errors, make sure your USB drive is properly formatted before transferring .PES files.
Purchase a simple, small USB flash drive (ideally 8 gigabytes or 16 gigabytes in size). Large external hard drives or massive 128 gigabyte USB sticks often use complex power systems that home computers cannot process.

Plug the thumb drive into your home computer desk setup. Right-click the drive icon folder and select the option labeled “Format”. Choose FAT32 as the file format system, click quick format, and hit start. This wipes the memory clean and builds a simple file path structure your Brother machine can easily understand.
When practicing how to use Brother embroidery machine, always use a .PES design file. Copy the file directly to the main folder of your formatted USB drive so the machine can detect it without any issues.
Do not hide the file deep inside complex nested folders, or your machine will have trouble locating it. Eject the USB drive safely from your computer and slide it into the USB port on the side of your powered-on Brother machine.
On the LCD touchscreen panel, tap the icon that looks like a USB memory stick. The screen will load for a few moments, and you will see a visual preview grid of your custom design file appear beautifully!
Once your design is ready while learning how to use Brother embroidery machine, tap the design thumbnail and press “Set” to move to the design arrangement screen.
Need a custom embroidery file? ZDigitizing provides affordable embroidery digitizing services in Brazil and all over world with fast delivery, premium quality, and competitive pricing.
Step 6: Setting Colors, Framing the Design, and Commencing the Stitch-Out
As you continue learning how to use Brother embroidery machine, you can adjust the design by moving, rotating, or resizing it on the screen. Once you’re happy with the layout, pick up your prepared hoop and get ready to begin stitching.
Slide the two metal brackets on the edge of the hoop frame directly into the mounting slots on the machine’s carriage arm. Push down firmly until you hear a clear, reassuring metallic click sound. The frame is now locked onto the computerized robotic movement arm.
Before pressing start, always look for the button labeled “Trial” or “Trace” on your screen. Tap it! The machine carriage arm will quickly move the hoop around in a large square path, showing you exactly where the needle will travel during the real stitching process.

This guarantees that your design will fit perfectly within the hoop boundaries and won’t accidentally hit the hard plastic edge of the frame, which would snap the needle instantly.
Look at the color breakout column on the left side of your screen. The machine will tell you exactly which color segment it plans to sew first. Ensure that color thread spool is loaded on top. Lower the clear presser foot lever down to clamp the fabric safe.
After completing all the settings while learning how to use Brother embroidery machine, look at the physical Start button. When it changes from red to green, press it to begin stitching.
The machine will fire up, take three slow lock-stitches to anchor the thread end securely, and then ramp up to its high-speed automated decorating run. Sit back and watch the creative magic happen right before your eyes!
Brand Showdown: Brother vs Janome Machine (Plus Singer & Bernina)
For machine embroidery for beginners, the Brother vs Janome embroidery machine comparison is a great place to start. Brother machines are easier to learn and use, while Janome is known for durability and precise stitching, helping you choose the best machine for your needs.
Brand | Target Audience | Key Strength | Standout Tech / Ecosystem | Hoop & Fabric Capability |
Brother | Beginners to Home Businesses | Ultra-intuitive tech & wireless design transfer | Artspira App, Disney designs, PE-Design | Excellent automation; handles standard fabrics easily |
Janome | Passionate Sewists & Quilters | Superior stitch precision & structural durability | AcuAssist app, heavy-duty build | Exceptional stability for thick layers & large projects |
Singer | Budget-Conscious Crafters | Highly affordable entry-level pricing | Basic computerized software, USB transfer | Standard hoop sizes; great for casual or light hobby use |
Bernina | Luxury & Professional Creators | Premium, commercial-grade stitch quality | Hook system, advanced vector-to-stitch software | Ultimate control; flawless pe |
Pro Tips for Maintenance and Common Troubleshooting Frameworks
Once you understand how to use Brother embroidery machine, keeping it clean is just as important as using it correctly. Regularly remove lint, dust, and thread buildup to keep the machine running smoothly and avoid common stitching issues.
This lint collects under the throat plate and drinks up the lubricating oils, leading to friction wear and annoying tension imbalances.

Once a week, remove the needle, take out the clear plastic bobbin cover, and unscrew the two metal screws holding the flat throat plate down. Lift the plate away. Use a small nylon brush or a vacuum hose tool to clear out all the gathered lint chunks hiding around the metal bobbin basket area.
Expert Warning: Never use cans of compressed store air to blow lint out of your machine! The high-pressure air blast will push the sharp, abrasive lint chunks deeper into the sealed internal gears and electronic circuit boards, causing severe damage over time. Always brush or vacuum the debris outward instead.
If you face stitching problems while learning how to use Brother embroidery machine, use the troubleshooting guide below to identify the cause and fix the issue quickly without visiting a service center.
- Thread bunches under the fabric: Usually caused by incorrect upper threading. Raise the presser foot, remove the tangled thread, and re-thread the machine correctly.
- Upper thread keeps breaking: This is often caused by a damaged needle or tight thread tension. Replace the needle and slightly reduce the upper tension.
- Bobbin thread shows on top: The bobbin is likely inserted incorrectly. Reinsert it, making sure the thread follows the correct “P” direction.
- Machine skips stitches: This usually happens when the needle is too small or installed incorrectly. Use a 90/14 embroidery needle and ensure the flat side faces the back.
These simple tips will help you troubleshoot most issues while practicing how to use Brother embroidery machine.
Conclusion
Learning how to use Brother embroidery machine correctly helps you create neat, professional-quality embroidery with fewer mistakes. By using the right stabilizer, setting proper thread tension, and keeping your machine clean, you can enjoy smooth stitching and better results on every project.
As your skills improve, you will also see that high-quality embroidery files make a big difference. Proper digitizing, including left chest embroidery digitizing, helps your machine stitch more accurately and gives your designs a clean, professional finish.
If you need expert embroidery files, ZDigitizing has over 10 years of experience providing professional embroidery digitizing and vector art services. We offer fast turnaround times, affordable pricing, free minor edits, and 24/7 customer support for customers worldwide. New customers can also enjoy 50% OFF their first order.
Keep practicing, maintain your machine regularly, and continue learning how to use Brother embroidery machine to get the best embroidery results on every project.