In this article we’ll discuss “How to add lettering to any embroidery design in wilcom application? We will learn to make shapes for letters.
Follow these steps for putting a design to your letters.
How To Add Lettering To Any Embroidery Design
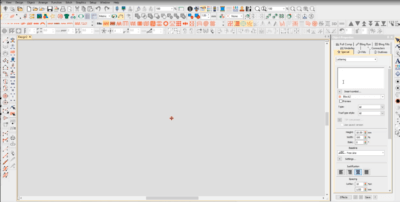
Step 1:
Open up the Wilcom application and import your required design file.
Embroidery Digitizing
&
Vector Art Services
Are you looking for embroidery digitizing and vector art services at low cost with superfast turnaround, guaranteed quality and preview before pay? So, you are at right place. We can digitize and vectorize any type of artwork in your required file format.
Step 2:
Add letters in Normal style:
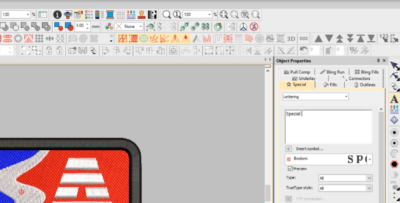
Open the lettering Tab, And type the letter in a dialogue box. After typing the letter, the next step is to select the font style for the letter. For this purpose open the font style tab and then choose the desired font style.
After choosing font style then click on the apply button. Font style applied then click on design Box. Your letters are designed and show in the design box.
Finally adjust letters according to your design, adjust the gap between letters from the spacing tab.
Step 3:
Add letters in curvy style:
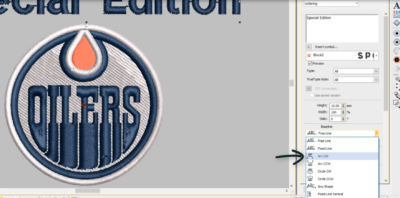
Repeat the same process used in the normal lettering style. open up the design file and write letters. After this process opens the free line tab. Then select Arc CW tool, click on Arc CW tool, click on apply changes letter’s changed into curvy style.
If you want more curvy style letters, then select tab circle CW.click on circle CW tab letter converted into more curved style. Then adjust according to the design.
By following these steps, you can easily make our lettering designs. Later on, you can adjust another setting, i.e. colours, size, etc. according to your desire.
And finally, save the file.
If you want to learn more about digitizing then watch our other digitizing tutorial on our youtube channel.
Do you Need digitizing service for your embroidery machine, With super-fast turnaround and excellent quality? Click the link and get free quote.
How to add embroidery outline border around the tatami object
Frequently Asked Questions
Follow these easy steps to add letters to embroidery design: 1. First select the alphabet key to open the screen with different fonts accessible. 2. Then, choose your desired font. 3. Type your word. After typing in the first uppercase letter, the lower case letters could be chosen by pressing the lower case button. Don’t worry about the placement of the word. 4. Set your design. After the whole word has been typed, press the SET button in the lower right-hand corner. This would save the work and make it accessible for editing. 5. Move your word. The entire word has smaller boxes around the letters. It means that this element in the design has been chosen and could be edited using the options present at the bottom of the screen. The word could be moved by pressing any of the arrow buttons and all of the letters would move together. 6. Press the embroidery button. Once the design looks the way you want, select the embroidery button to continue to the next screen. 7. Save your design. Any of the designs you made could be easily saved by pressing the memory button
Follow these steps to sew letters onto fabric: 1. Choose a template that you would like to use. If you are good at sketching, you can draw your template. Otherwise, many free templates are available online. 2. Prepare your fabric. A stabilizer is an amazing tool to make your material simpler to work with because it would be stronger. A double-sided stabilizer is better because it will give both sides of your material adhesive while providing you the liberty to iron your designs on the material. 3. Place the letters or designs so that the area is fitted well. This is when you ensure that the design is not too small or too big on your selected material because once you start, it will be too late to turn back! 4. Test your stitching on a scratched piece of material. This is an important step because it would help you see if the stitch suits your design and whether your sewing machine is rightly threaded or not. Then, you could easily adjust the length and width of your stitch unless you find the ideal size. 5. Ensure that you’re using a needle that is appropriate for embroidery. 6. Stitch the letter’s edge first 7. Raise your needle when you get to the end. Then you can pull the thread and cut it. 8. Hide the ends with backstitching. Finish off with a bit of backstitching to place everything together. Start with the first couple of stitches; go slowly while holding the hoop to keep the thread secure.
.You can add alphabet letters in embroidery by the following: 1. BACKSTITCH LETTERS: The standard backstitch makes for a nice outline in hand embroidery. It is best for the lettering or outlining block lettering. To do backstitching, come up under the material and pull the needle, and floss though. Make your first stitch, and then bring the needle back up under the material at a complete stitch length, leaving a space between the needle and the former stitch. Bring the needle back and pass at the end of the former stitch to make a complete line. Pull the needle through and move forward similarly unless you stitch the entire letter. 2. STEM STITCH LETTERS: It is best for cursive fonts. Stem stitch letters add a cool surface dimension that makes the letters look like curved rope. To start with this stitch, bring the floss up through the material from the underside for a single stitch. Bring the needle back up only to the side of the stitch you just made. Keep going in this similar motion unless you complete the letter. 3. RUNNING STITCH LETTERS: It looks like a dashed line. It could be worked completely on the surface or a single stitch at a time. To start with this stitch, bring the floss and needle up through the material. Bring the needle in and out, catching a bit of the material with every stitch. Pull the needle through, and you would see your dashed line start to form. Continue unless you finish the design.


