Ricoma mt-1501 common errors & solutions with easy steps to maintain

Ricoma MT-1501 Common Errors & Solutions With Easy Steps To Maintain

Let us now discuss Ricoma MT-1501 Common Errors & solutions with very easy steps to maintain. 

Ricoma MT-1501 Embroidery Machine:

Ricoma MT-1501 Embroidery Machine

The Ricoma MT-1501 Embroidery Machine has a huge working area appropriate for heavy items and a redesigned small sewing arm for intricate embroidery areas. Common among start-ups, the Ricoma MT 1501 Embroidery Machine can embroider on anything from caps, flats, finished clothing, and a lot more. 

Embroidery Digitizing
&
Vector Art Services

Are you looking for embroidery digitizing and vector art services at low cost with superfast turnaround, guaranteed quality and preview before pay? So, you are at right place. We can digitize and vectorize any type of artwork in your required file format.

Ricoma Mt-1501 Common Errors & Solution:

Ricoma Mt-1501 Common Errors & Solution

You will learn how to easily correct the common error messages you might be getting on your embroidery machine. We will cover the following common errors Ricoma machine

  1. NO NEEDLE ERROR – How to correct a no needle error or color-changing error?
  2. MAIN AXIS ERROR – How to correct the main axis error or main access is not at a hundred degrees error?
  3. THREAD BREAK – How to correct a thread break?
  4. NO BOBBIN – What to do when the bobbin runs out?
  5. NEEDLE BREAK – How to correct a needle break?
  6. EMERGENCY STOP ERROR – How to correct an emergency stop error?

Let’s describe everything precisely, starting with part one…

1. How To Correct A No Needle Error Or Color-Changing Error?

How To Correct A No Needle Error Or Color-Changing Error

A no-needle error means that the machine is not able to detect which needle is over the needle plate. To fix this error first clear the error message by pressing “OK”. Locate the red knob on the right side of the head of the machine. Then turn the knob gradually unless there is a number from one to five on the needle switch display. 

Let’s continue with part two…

2. How To Correct The Main Axis Error Or Main Access Is Not At A Hundred Degrees Error?

How To Correct The Main Axis Error Or Main Access Is Not At A Hundred Degrees Error

The machine has to be aligned to a hundred degrees to function properly. The main axis is not at a hundred degrees error means that the main axis is not lined up to hundred degrees which is the right position for the machine to begin and stop sewing. This error could be caused if a needle hits the hoop If you get a bird’s nest and other causes. If you get this error, clear the message by pressing “OK”. Then ensure there is a working needle from one to fifteen displayed on the icon. Now turn off the machine. On the left side of your machine, you will see 2 small openings. On one, you will see that the degree of the machine is aligned, and on the other, you will see an Allen head screw. Place the Allen wrench into the Allen head screw and rotate it in a counterclockwise direction until the number shows a hundred degrees again. 

Now you can turn on the machine. When the panel shows the main menu screen, press the hundred-degree button on your panel. Now the machine would be all set to embroider. 

Next, let’s head over to part three…

3. How To Correct A Thread Break?

How To Correct A Thread Break

The machine will stop automatically if a thread break occurs and a message on the stitch float icon will appear. This icon is placed on the first row in the 4rth column and would show the message “T-BREAK”. If this happens, you can rewind your design by pressing the stop button. Press the stop button again, once you reach the desired location. After that, re-thread the needle, locate the reset switch on your machine’s head, and pull downward and upward. Now you can press start and your machine will continue where it left off. 

Let’s head over to part four…

4. What To Do When The Bobbin Runs Out?

What To Do When The Bobbin Runs Out

The machine will automatically stop if the bobbin thread runs out, and a message on the stitch float mode icon will appear. This icon is placed on the first row in the 4rth column and would show the message “T-BREAK”. The same message appears when a thread break occurs. To differentiate a thread break from the bobbin running out, have a look at the thread from the working needle. If it is still attached to the material, it means the bobbin ran out of thread or there is a problem with the bobbin thread. 

To correct this, remove the bobbin from the bobbin case and replace it with a new bobbin and then place the bobbin case back in the rotary hook. 

Let’s continue with part five…

5. How To Correct A Needle Break?

How To Correct A Needle Break

Needles break sometimes when they wear out from embroidering on harsh fabrics. For example, caps are made up of thick material that causes needles to break sometimes. If a needle break occurs, first remove the needle excess, if it is still attached to the clothing, tweezers might help. After that, with the help of a screwdriver lose the screw to release the broken needle. Insert a new needle, ensuring the groove and the needle’s eye are facing completely forward. Once it is in the right position, tighten the screw if required. Rethread the missing path and you may now continue embroidering. 

Let’s conclude with part six…

6. How To Correct An Emergency Stop Error?

How To Correct An Emergency Stop Error

An emergency stop error is caused when the emergency stop switch has been pushed. It happens usually during shipping or in an emergency condition. If a dialog box reading emergency stop appears on the screen, resolve this problem by rotating the emergency stop button in the clockwise direction following the direction of the arrows on the button.

Easy Steps For Ricoma Mt-1501 Maintenance:

Easy Steps For Ricoma Mt-1501 Maintenance

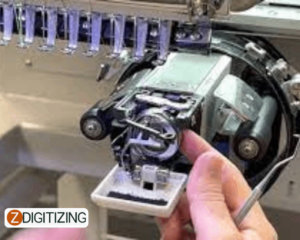
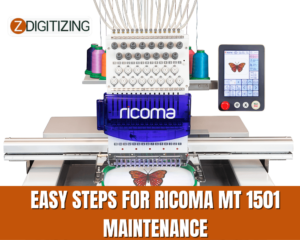
Ricoma mt 1501 maintenance is very easy. The most crucial maintenance that has to be completed is lubricating the rotary hook. Before oiling or cleaning, we suggest turning off your machine. To maintain and clean the rotary hook, begin by removing the bobbin case from the rotary hook.

Clean any thread lint in the area using a lint brush or dusting spray. 

Then add three or four drops of machine oil to the rotary hook.

Now you can insert the bobbin case back into the rotary hook and close the bobbin housing unit.

To make sure the machine runs efficiently, repeat this process twice a day if you are planning to run a machine eight hours a day. 

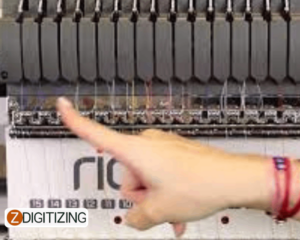
Once or twice a week, remove the needle plate and clean around the trimmer knives with a soft brush.

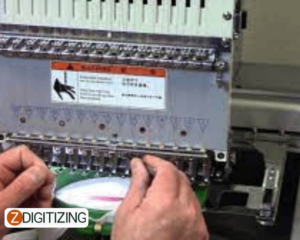
Once a week, pass a business card or paper through the bobbin case slit to clean any lint buildup.

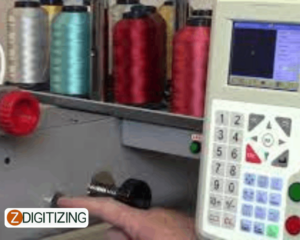
Every week, place a drop-off oil directly on the needle bar through the slots in the needle case, alternate each week. 

One week lubricate the upper needle bar section and the next week the lower needle bar section.

Once a week oil the opening on the needle plate. For this section, we suggest turning on the machine and setting it to needle one to see the opening on the right side of the machine head. 

Add three drops of oil each week to that section.

Then, add three drops of oil to the metal rail of the machine head.

Now you can move your machine head to needle 15 and place 2 drops of oil on the other side of the rail. 

Once each three to five months, apply white lithium grease to the black metal bar in the machine head. Also, apply this grease to the wheels placed on the back of your machine head. 

Once each three to five months, apply white lithium grease to the color change cam. 

You would first need to remove the metal plate placed above the color change cam by loosening the attached screw. Then apply grease to the color change cam area. 

Place the cover back over the color change cam and tighten the screw before proceeding. 

Always remember, not to over oil. After oiling, stitch on a test swatch before returning to production to assure extra oil does not stain garments. 

These were the simple steps for maintaining the machine. Now that you very well know how to maintain your machine, it is time to start embroidering. Good luck!

Winding Up:

We hope this article will be helpful for you. If you want to digitize embroidery design you would need a professional like ZDigitizing, as digitizing is a complex process.  

Zdigitizing is a digitizing embroidery company that provides complete digitizing and vector art services all over the world to businesses, industries, and corporations. Zdigitizing provides high-class, durable, and reasonable custom digitizing embroidery and vector art services. We have been delivering top-notch digitizing embroidery services for 20+ years. 

So, if you need a digitizing or vector art service for your embroidery machine, with a super-fast turnaround and excellent quality, ZD will be your best choice. Just click the link below and get a free quote in less than 5 minutes. We offer 50% off on all our services to our potential customers on their first order. So, get a free quote now and we will get in touch with you. 

Hope it will be helpful for you guys!

If there’s any question related to this article you can simply ask in the comment section and don’t forget to share with those you think might be helpful for them.

And finally, thanks for reading!

MOST POPULAR EMBROIDERY DIGITIZED DESIGN

2576 Sold

Girl Flower Embroidery Design
Price 1.99$ Only

1.99$ Only

Your Favorite Design is

JUST ONE CLICK AWAY
Buy Now

1341 Sold

Mickey Mouse Embroidery Design
Price 2.99$ Only

2.99$ Only

Your Favorite Design is

JUST ONE CLICK AWAY
Buy Now

3721 Sold

Cute Bee Embroidery Design
Price 4.99$ Only

4.99$ Only

Your Favorite Design is

JUST ONE CLICK AWAY
Buy Now

1541 Sold

Mermaid Fish Embroidery Design
Price 3.99$ Only

3.99$ Only

Your Favorite Design is

JUST ONE CLICK AWAY
Buy Now

2216 Sold

Love Flower Embroidery Design
Price 1.99$ Only

1.99$ Only

Your Favorite Design is

JUST ONE CLICK AWAY
Buy Now

1724 Sold

Jumping Dog Embroidery Design
Price 2.99$ Only

2.99$ Only

Your Favorite Design is

JUST ONE CLICK AWAY
Buy Now

1721 Sold

Squid Embroidery Design
Price 1.99$ Only

1.99$ Only

Your Favorite Design is

JUST ONE CLICK AWAY
Buy Now

3721 Sold

Skull Embroidery Design
Price 3.99$ Only

3.99$ Only

Your Favorite Design is

JUST ONE CLICK AWAY
Buy Now
Cat-with-heart

1421 Sold

Cute Bear Embroidery Design
Price 5.99$ Only

5.99$ Only

Your Favorite Design is

JUST ONE CLICK AWAY
Buy Now

1245 Sold

Phoo Embroidery Design
Price 1.99$ Only

1.99$ Only

Your Favorite Design is

JUST ONE CLICK AWAY
Buy Now

Embroidery Digitizing & Vector Art Services

Are you looking for embroidery digitizing and vector art services at low cost with superfast turnaround, guarranted quality and preview before pay? So, you are at right place. We can digitize and vectorize any type of artwork in your required file format.